12 Airbnb Photo Mistakes That Are Killing Your Bookings (And How to Fix Them)
Are your Airbnb photos costing you bookings? These 12 common photography mistakes are easy to make and even easier to fix.
You have a great property. The location is desirable, the price is competitive, and your reviews (the few you have) are positive. But bookings are slow. You keep checking the calendar, adjusting your nightly rate, wondering what you are doing wrong.
Before you slash your prices, look at your photos. In nearly every case where a quality property is underperforming on Airbnb, the photos are the problem. Not the property. Not the price. The photos.
Airbnb's internal data has consistently shown that listing photos are the single most important factor in booking decisions. Guests scroll through dozens of listings, and they decide within seconds whether to click on yours or keep scrolling. If your photos have any of the 12 mistakes below, you are losing bookings you should be winning.
The good news is that every one of these mistakes is fixable, most of them in a single afternoon.
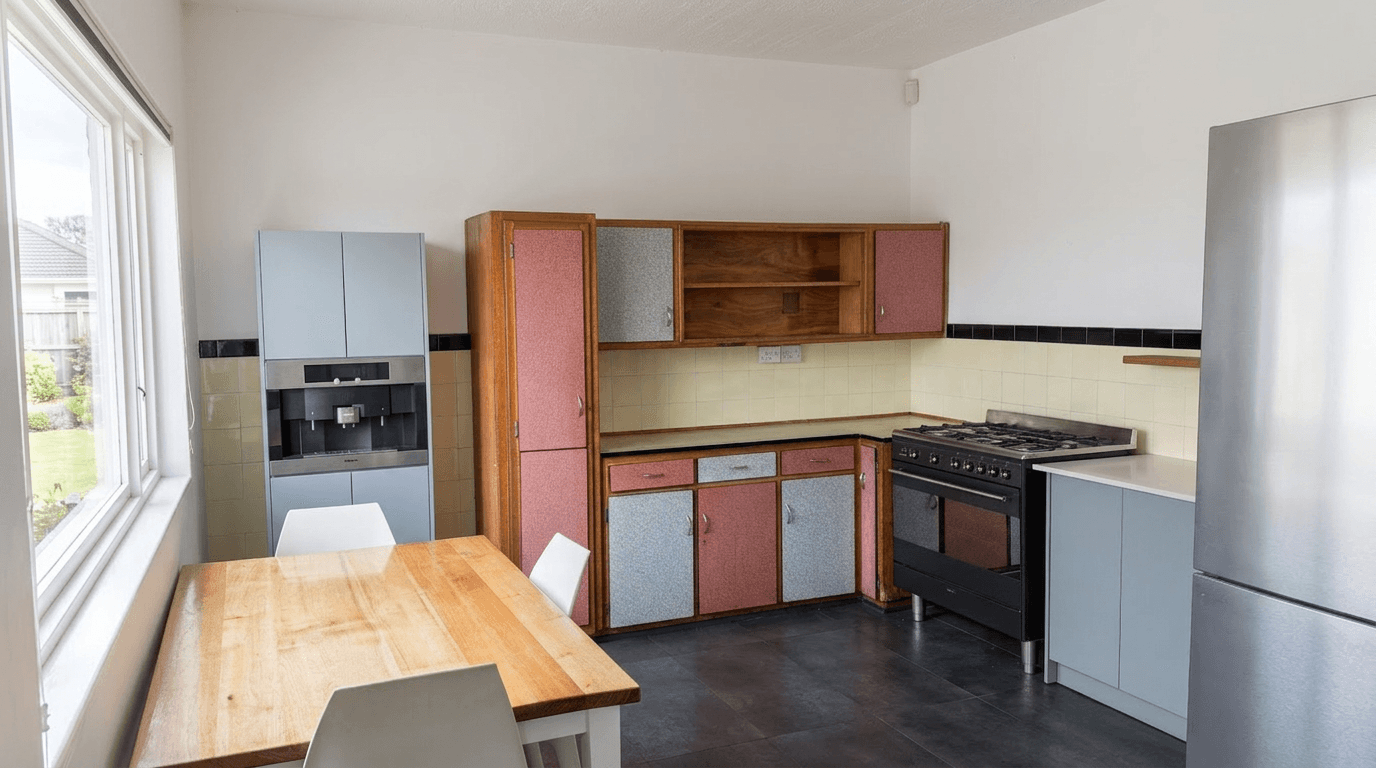
Mistake 1: Using Your Phone Flash
What it looks like: Harsh, flat lighting with bright hotspots on walls and surfaces. Deep, unnatural shadows behind furniture. A yellowish or blue-white cast over the entire image. Objects in the foreground are blindingly bright while the background falls into darkness.
Why it kills bookings: Flash photography makes rooms look small, sterile, and unpleasant. It destroys the natural atmosphere of a space and makes even a beautiful room look like a crime scene evidence photo. Guests subconsciously associate flash-lit photos with low effort and low quality.
The fix: Never use flash for listing photos. Instead, maximize natural light. Open every blind and curtain, turn on all room lights, and shoot during the brightest part of the day. If a room is still too dark, use your phone's HDR mode to capture detail in both bright and dark areas. In post-processing, AI brightness enhancement can lift shadows and brighten rooms naturally without the harshness of flash.
Mistake 2: Shooting in Portrait Mode
What it looks like: Tall, narrow photos that show the ceiling and floor but cut off the left and right sides of the room. Only a fraction of the space is visible, and the composition feels cramped and awkward.
Why it kills bookings: Airbnb's photo display is designed for landscape (horizontal) images. Portrait (vertical) photos get cropped, letterboxed, or displayed with black bars on the sides. More importantly, landscape orientation is the standard for interior photography because it captures the width and flow of a room, which is exactly what guests want to see.
The fix: Always shoot in landscape orientation. Hold your phone horizontally. Every single photo in your listing should be a horizontal image. The one exception is extremely narrow spaces like hallways or shower stalls, but even these usually look better in landscape.
For the best interior photo compositions, our guide on iPhone real estate photography tips covers shooting angles and orientation in detail.
Mistake 3: Visible Clutter and Personal Items
What it looks like: Shoes by the door, mail on the counter, charging cables draped across nightstands, toiletries scattered on the bathroom counter, a laundry basket visible through a bedroom door, kids' toys on the floor, a coat thrown over a chair.
Why it kills bookings: Clutter sends two damaging signals. First, it makes spaces look smaller than they are because the eye is drawn to the objects rather than the space. Second, it makes the property feel like someone else's home rather than a vacation rental ready for the guest. Guests want to imagine themselves in a clean, prepared space, not in the middle of someone's daily life.
The fix: Before shooting, do a thorough declutter of every room. Remove all personal items: family photos, mail, personal care products, clothing, shoes, and anything that is not deliberately staged. Remove items from countertops, clear nightstands, empty visible trash cans, and close all closet and cabinet doors. Stage with intention -- a few carefully chosen items (fresh flowers, a coffee table book, a folded throw) look better than a dozen scattered personal belongings.
The Box Method
Keep a large empty box or laundry basket nearby during your photo session. As you move from room to room, toss all the clutter into the box. You can put everything back after the shoot. This takes five minutes per room and transforms the photos.
Mistake 4: The Toilet Seat Is Up
What it looks like: Exactly what you think. An open toilet visible in a bathroom photo. Sometimes it is the focus of the shot. Sometimes it is just lurking in the background of an otherwise nice bathroom photo.
Why it kills bookings: An open toilet is the single most cited turnoff in Airbnb listing photos according to multiple hosting surveys. It communicates a lack of attention to detail and makes guests question the overall cleanliness of the property. Even guests who consciously know it is a minor thing have a visceral negative reaction.
The fix: Close the toilet lid in every bathroom photo. Always. If you have multiple bathrooms, check every one before shooting. If possible, compose your bathroom shots so the toilet is not the focal point -- show it in the frame for completeness, but lead with the vanity, shower, or tub. Some hosts choose to shoot the bathroom in two shots: one focused on the vanity and shower that excludes the toilet entirely, and one wider shot showing the full layout with the lid closed.
Mistake 5: Dark, Underexposed Rooms
What it looks like: Rooms that look dim, murky, and uninviting. You can see the general shapes of furniture but not the details. Windows appear as bright white rectangles while the rest of the room is in shadow. The overall feeling is like the house has no electricity.
Why it kills bookings: Dark photos communicate neglect, age, and poor maintenance. Even a newly renovated room looks dated and dingy when it is underexposed. Guests searching for vacation rentals are drawn to bright, airy photos that feel welcoming and clean. Dark photos get scrolled past.
The fix: Light is the foundation of good listing photography. Before shooting, open every window covering and turn on every light. Shoot during daytime for maximum natural light. Use your phone's HDR mode to balance bright windows with darker interiors. In editing, AI brightness tools can transform underexposed photos into bright, inviting images. This single edit -- brightening dark rooms -- may be the highest-impact improvement you can make to your listing. See real-world before and after examples of this transformation.
Mistake 6: Yellow or Warm Color Cast from Indoor Lighting
What it looks like: Everything in the room has an orange or yellowish tint. White walls look cream or golden. White bedding looks dingy. The whole space feels like it is lit by a campfire rather than modern lighting.
Why it kills bookings: A yellow color cast makes properties look old and poorly maintained, even if they are newly updated. White surfaces that appear yellow trigger cleanliness concerns -- guests wonder if the sheets are actually that color or just look that way. Accurate color representation builds trust; inaccurate color raises doubts.
The fix: The best approach is to shoot with natural light whenever possible, turning off indoor lights that cast a strong warm tone. If you must use indoor lighting, look for daylight-balanced LED bulbs (5000K-6500K) that produce a neutral white light.
In editing, white balance correction is straightforward. AI tools can automatically detect and neutralize color casts, making whites look white and neutrals look neutral. This is one of the fastest and most impactful AI edits available -- a single click can transform a yellow, dated-looking room into a clean, modern one.
Mistake 7: Too Few Photos
What it looks like: A listing with 5-8 photos when comparable listings in the area have 20-30. Missing rooms, no outdoor shots, no detail photos, no amenity highlights.
Why it kills bookings: Airbnb data shows that listings with more photos receive significantly more bookings, with the optimal range being 20-30 photos for most properties. Fewer photos leave guests with unanswered questions: What does the second bedroom look like? Is there a backyard? What kind of kitchen appliances are there? When guests have questions they cannot answer from the listing, they do not message to ask -- they book a different property where the answers are visible.
The fix: Aim for a minimum of 20 photos. Cover every room (including closets if they are walk-in), every outdoor space, key amenities, and neighborhood highlights. Create a shot list before you start photographing, and check off each item as you go. For a comprehensive shot list approach, our guides on kitchen and bathroom photography and outdoor space photography provide room-by-room checklists.
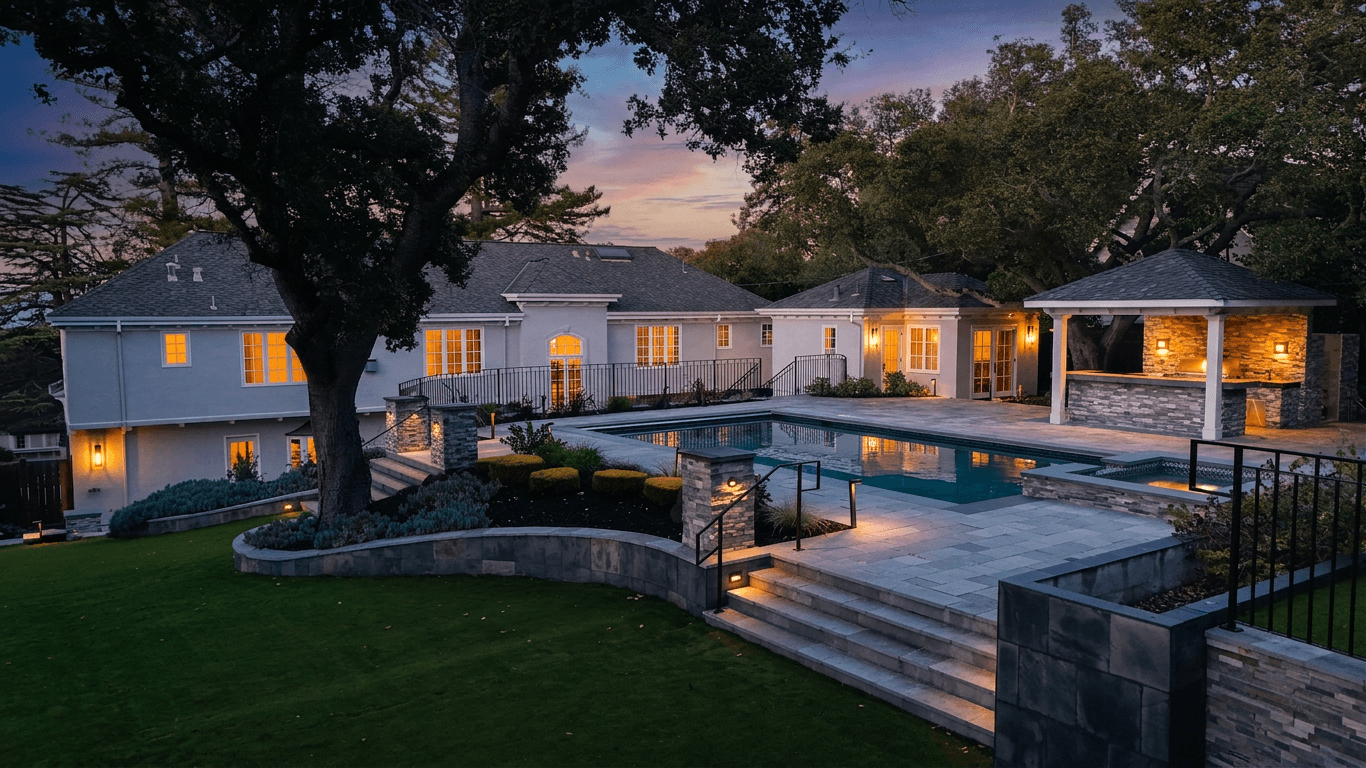
Mistake 8: Wrong Photo Order (Hero Shot Buried)
What it looks like: The first photo in the listing is a random bedroom or a poorly composed exterior shot. The stunning living room with the view, the gorgeous pool, or the beautifully staged patio -- the photos that would actually make someone click -- are buried at positions 10, 15, or 20.
Why it kills bookings: Your first photo is your listing's advertisement. It is the single image that appears in search results and determines whether guests click through to see more. If your best photo is in position 15, most guests will never see it because they never clicked in the first place.
The fix: Put your absolute best photo first. This should be the image that best captures the unique appeal of your property. For most listings, this is either:
- A wide-angle interior shot of the most impressive room (usually the living room or a bedroom with a view)
- An exterior or outdoor shot that showcases a pool, patio, or stunning view
- A twilight exterior that shows the property glowing warmly against a dusk sky
After the hero shot, order your remaining photos to tell a story. Lead with the most impressive spaces, then move through the property logically (exterior, living areas, kitchen, bedrooms, bathrooms, outdoor spaces, amenities, neighborhood).
Mistake 9: Mismatched Photo Quality
What it looks like: Some photos are bright, sharp, and well-composed. Others are dark, blurry, or shot from awkward angles. The listing looks like photos from two completely different properties were mixed together.
Why it kills bookings: Inconsistency creates confusion and distrust. Guests wonder if some rooms were photographed to hide problems. They question which photos represent the actual experience and which were taken on a particularly good day. A listing with consistently decent photos outperforms one with five great photos and ten terrible ones.
The fix: Shoot all your photos in one session, under similar lighting conditions, from consistent heights and angles. If some rooms are unavoidably darker than others, use AI editing to normalize brightness and color temperature across all images so the listing has a cohesive visual style. If you re-photograph one room, re-edit it to match the rest. If you manage multiple properties, maintaining a consistent editing style across all of them becomes even more important -- our guide on multi-property photo workflows covers this in depth.
Mistake 10: Missing Amenity Photos
What it looks like: The listing description mentions a washer/dryer, a coffee machine, a fire pit, a workspace, a rain shower, and a smart TV -- but there are no photos of any of these amenities. Guests have to take your word for it.
Why it kills bookings: Guests have been burned by misleading listing descriptions. When you claim an amenity but do not show it, guests assume it either does not exist, is broken, or is not as good as described. Visual proof converts uncertainty into confidence.
The fix: Photograph every amenity you list. Each one deserves at least a clear detail shot:
- Washer/dryer (doors open, clean, ready to use)
- Coffee machine (staged with mugs)
- Workspace (desk, chair, monitor/lamp, power outlets visible)
- Outdoor amenities (grill, fire pit, hot tub -- staged and inviting)
- Entertainment (TV, game console, board games, book collection)
- Safety features (first aid kit, fire extinguisher, smoke detectors)
- Bathroom amenities (quality toiletries, hair dryer, fresh towels)
The Amenity Photo Test
Pull up your listing and read through your amenity list. For each item, ask: "Can a guest see this amenity in my photos?" If the answer is no, you need to add a photo.
Mistake 11: Outdated Photos After Renovations
What it looks like: The listing shows an old kitchen with laminate countertops, but the property now has granite. The bathroom photos show beige tile that has since been replaced with modern subway tile. The living room photos show old furniture that was replaced two years ago.
Why it kills bookings: Outdated photos rob you of the return on your renovation investment. You spent money upgrading the property specifically to attract more guests and command higher rates, but guests cannot see those upgrades. Worse, if a guest books based on old photos and arrives to find a different-looking property (even a better one), the mismatch can be disorienting and may still result in a complaint.
The fix: Every time you make a significant change to the property -- new furniture, renovated room, new appliances, updated decor -- reshoot those areas immediately and update the listing. Do not wait for a "full reshoot." Replace the specific photos that are now outdated while keeping the rest of your current set. This is also an opportunity to upgrade your editing with AI tools that can make your new photos look polished in minutes.
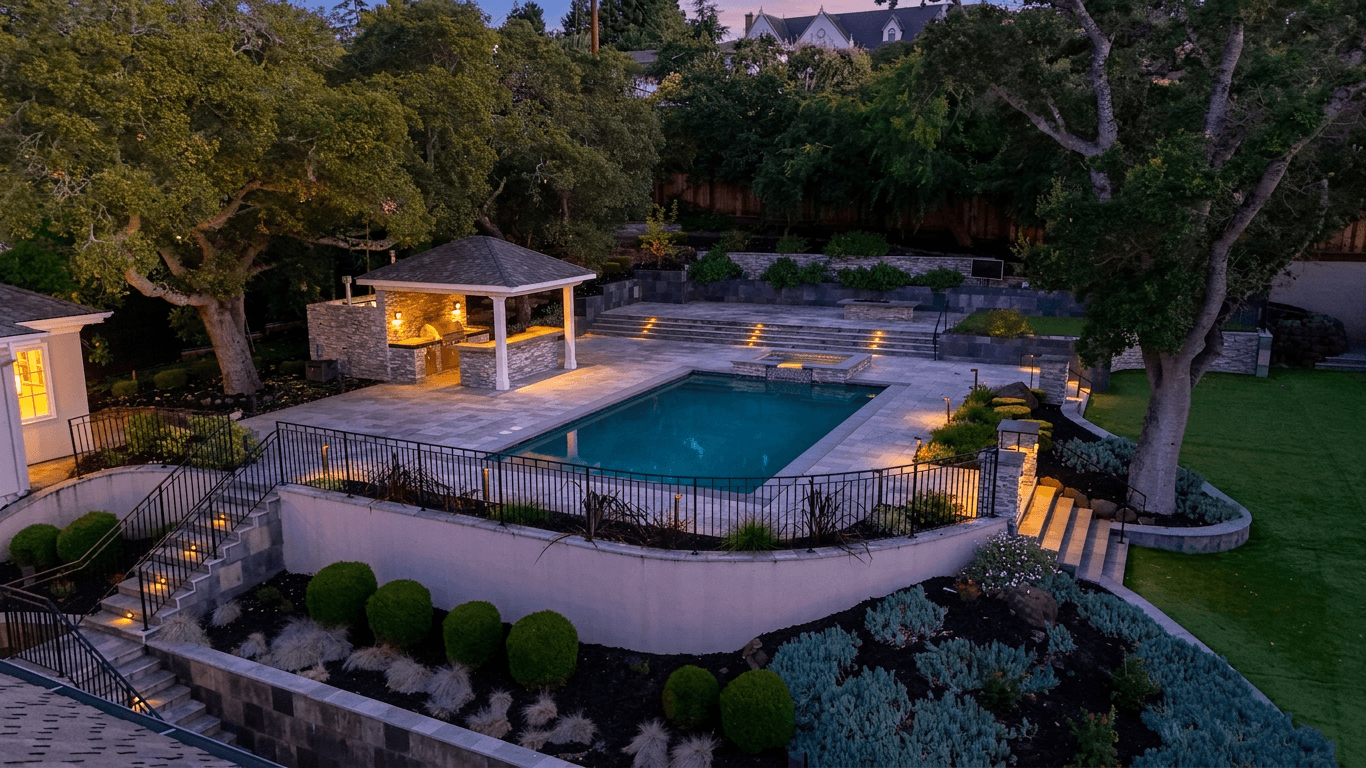
Mistake 12: No Outdoor or Neighborhood Shots
What it looks like: Every photo is an interior shot. No exterior of the property, no yard, no street view, no neighborhood context. The listing exists in a visual vacuum with no sense of place.
Why it kills bookings: Guests are not just booking a room -- they are booking a location. They want to see what the property looks like from outside (curb appeal builds trust), what the outdoor spaces offer (a patio, yard, or parking), and what the neighborhood feels like (is it a quiet residential street, a bustling downtown, a beachfront?).
Missing outdoor photos also create suspicion. Guests wonder: is the exterior in poor condition? Is the neighborhood unappealing? What are they hiding?
The fix: At minimum, include:
- A front exterior shot showing the property entrance (preferably at golden hour or twilight for maximum appeal)
- All outdoor amenity spaces (patio, yard, pool, deck, parking)
- At least one neighborhood context photo (the street, nearby attractions, the view from the property)
- A sunset or twilight shot if your property has exterior lighting
For properties where the outdoor space is a significant draw, dedicate 5-8 photos to exterior and outdoor areas. Our full guide on photographing Airbnb outdoor spaces covers every type of outdoor area in detail.
The Quick-Fix Priority List
If your listing has multiple issues from this list, here is the order to fix them for maximum booking impact:
- Brighten dark photos (Mistakes 5 and 6) -- This is the single highest-impact fix and can be done with AI editing in minutes.
- Add missing photos (Mistakes 7, 10, and 12) -- Take an afternoon to fill the gaps in your photo coverage.
- Reorder existing photos (Mistake 8) -- Put your best shot first. This takes 60 seconds in Airbnb's listing editor.
- Reshoot problem photos (Mistakes 1, 2, 3, and 4) -- Replace flash-lit, portrait-mode, cluttered, or toilet-forward photos with properly shot alternatives.
- Achieve consistency (Mistake 9) -- Use AI editing to normalize brightness, color temperature, and style across all photos.
- Update outdated photos (Mistake 11) -- If you have renovated since your last shoot, update those specific photos.
The Editing Advantage
Many of the fixes above -- brightening, color correction, consistency, sky replacement for outdoor shots -- can be accomplished through AI photo editing rather than reshooting. This is significant because it means you can improve your listing dramatically in a single sitting rather than waiting for perfect weather, optimal lighting, or a photographer's availability.
AI editing tools like Twilight are specifically designed for property photography. They understand the unique challenges of interior and exterior real estate shots and can apply corrections that would take considerable skill and time in traditional editing software. A dark, yellow-tinted kitchen photo can be transformed into a bright, color-accurate image in seconds.
For hosts managing multiple properties, the efficiency advantage is even more pronounced. Instead of coordinating shoots across multiple locations, you can batch-process photos for your entire portfolio with consistent, professional results.
Your Photo Audit Checklist
Go through your current listing right now and check for each of these 12 mistakes. Be honest. It is easy to overlook problems in your own photos because you know what the space actually looks like. Better yet, ask a friend who has never visited your property to look at your listing and point out any photos that seem dark, cluttered, unflattering, or confusing.
Every booking you are missing because of a fixable photo mistake is money left on the table. The property is already there. The investment has already been made. All that stands between you and more bookings is the quality of the images that represent your space to the world.
For a complete framework on creating listing photos that maximize bookings, read our guide on Airbnb listing photos that book. And for hosts who want to understand what the highest-rated hosts do differently with their photography, our Superhost photography secrets article breaks down the patterns that separate consistently booked properties from the rest.
Related Articles
Photography for Unique Airbnb Properties: Treehouses, Tiny Homes, Boats, and Beyond
Master the art of photographing unique Airbnb properties including treehouses, tiny homes, boats, yurts, and glamping sites. Learn small-space techniques, outdoor photography tips, and how to capture the experience guests are booking.
Airbnb Photography vs Real Estate Photography: Key Differences That Matter
Understand the critical differences between Airbnb and real estate photography. From shooting style and staging to editing and photo ordering, learn how to optimize for each market.
Listing Photo Requirements for Zillow, Realtor.com, MLS & Redfin
Learn the exact photo requirements for every major real estate platform. Optimize your listing images for Zillow, Realtor.com, MLS, Redfin, and Trulia to maximize views and engagement.