Photographing Airbnb Kitchens and Bathrooms: The Rooms That Seal the Deal
Kitchens and bathrooms are where Airbnb guests judge cleanliness and quality. Master the photography techniques that make these spaces shine.
Every Airbnb host knows the feeling. You have staged the living room beautifully, the bedroom looks like a boutique hotel, and the outdoor space is inviting. Then you get to the kitchen and bathroom, and suddenly photography feels impossible. The kitchen is small and cluttered with appliances. The bathroom has harsh overhead lighting that makes everything look yellow. The mirror creates weird reflections. The toilet is just... there.
Here is the thing: guests care about kitchens and bathrooms more than almost any other room. These are the spaces where they judge cleanliness, quality, and whether the property will actually meet their needs. A beautiful living room gets attention, but a kitchen that looks dirty or a bathroom that looks outdated costs you the booking.
Research from vacation rental management platforms shows that listings with high-quality kitchen and bathroom photos receive 23% more booking inquiries than those with poor or missing photos of these spaces. Guests are not just looking at these rooms -- they are scrutinizing them.
This guide covers everything you need to know about photographing Airbnb kitchens and bathrooms: staging, lighting, angles, amenity highlights, and editing techniques that make these challenging spaces look their absolute best.
Why Kitchens and Bathrooms Build (or Break) Trust
When guests evaluate an Airbnb listing, they are making a trust decision. They are paying to stay in a stranger's property, and they need to believe it will be clean, well-maintained, and as described. Kitchens and bathrooms are where that trust is tested most directly.
The Cleanliness Signal
Guests use kitchen and bathroom photos as a proxy for overall cleanliness. The reasoning is simple: if the host keeps the kitchen spotless and the bathroom sparkling in their listing photos, the rest of the property is probably well-maintained too. Conversely, a kitchen with stained countertops or a bathroom with visible grime triggers an immediate red flag, regardless of how nice the bedroom looks.
The Quality Indicator
These rooms also signal the overall quality and investment level of the property. Modern appliances, granite countertops, a rain shower head, quality fixtures -- these details tell guests whether they are booking a basic crash pad or a thoughtfully appointed home. Your photos need to communicate these quality signals clearly.
The Practical Decision
Unlike living rooms and bedrooms, which are largely about comfort and aesthetics, kitchens and bathrooms serve functional purposes that guests actively plan around. A family with young children needs to see that the kitchen has a full-size fridge, stove, and microwave. A couple on a romantic getaway wants to see that the bathroom has a soaking tub or a luxurious shower. If they cannot tell from the photos, they will book a property where they can.
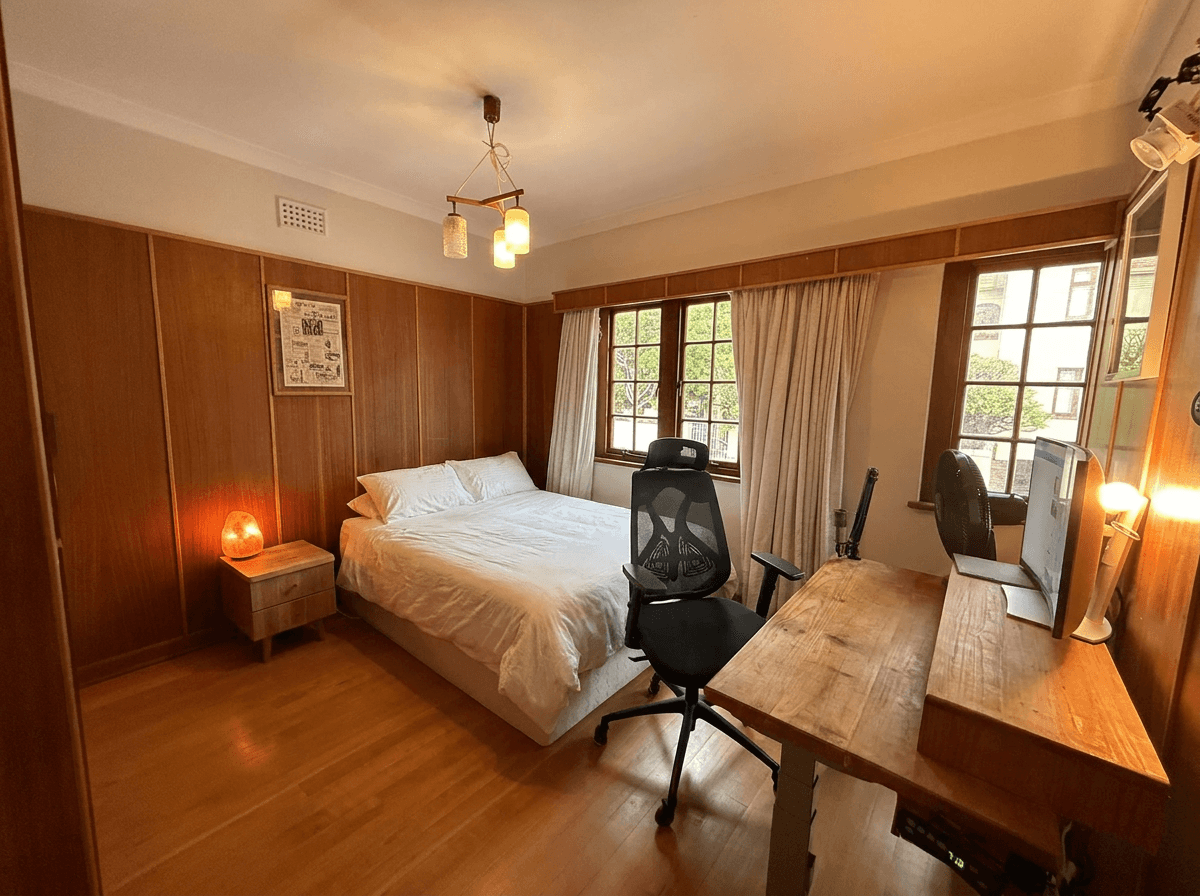
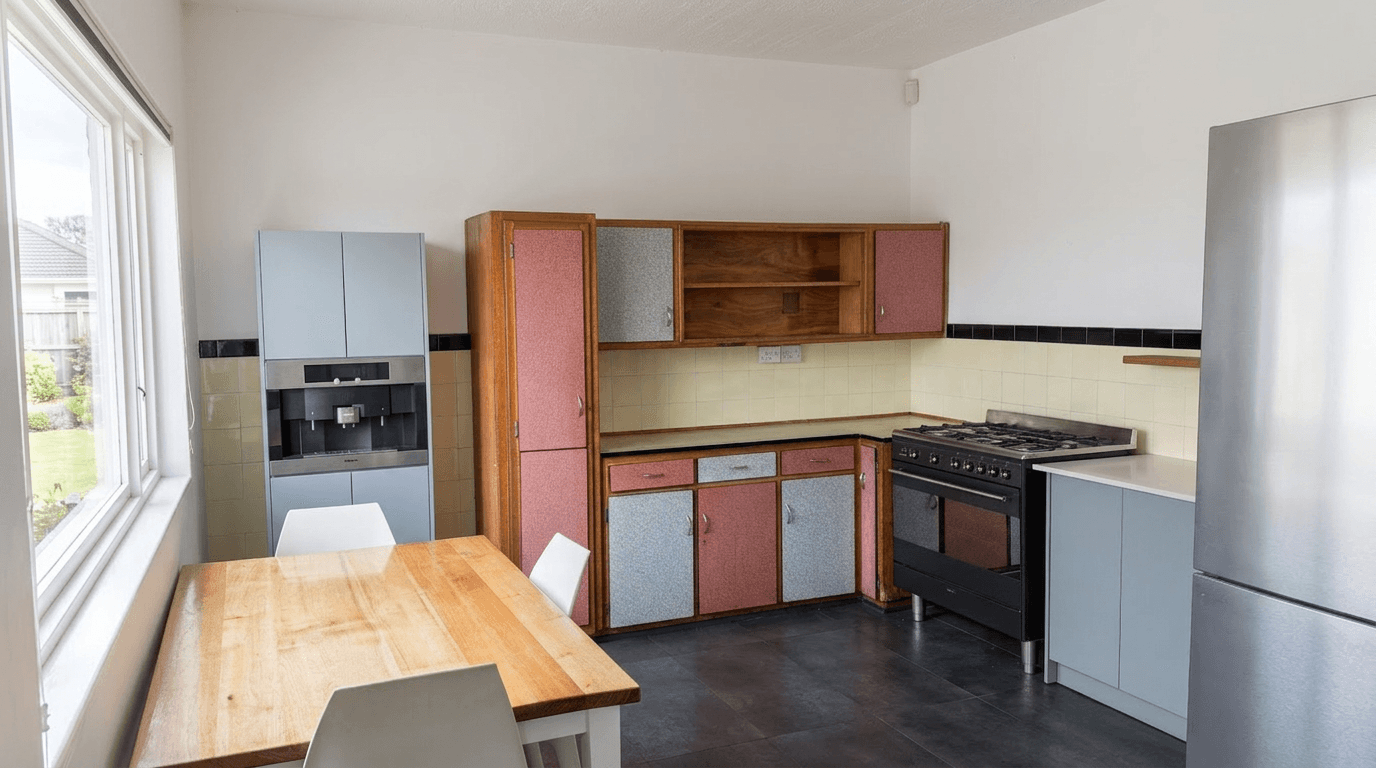
Staging Your Kitchen for Photography
Kitchen staging for Airbnb photography is fundamentally different from staging for real estate sales. In a home sale, you are selling the space and layout. In a vacation rental, you are selling the experience of cooking and gathering in that kitchen.
The Declutter Foundation
Start by removing everything from the countertops. Everything. This is your blank canvas. Then add back only what creates the right impression:
Remove:
- Paper towel rolls and napkin holders
- Dish soap and sponges
- Knife blocks (they look cluttered in photos)
- Spice racks and cooking oil bottles
- Mail, keys, and random household items
- Small appliances you do not want to showcase (toaster, can opener)
- Refrigerator magnets and notes
Keep or Add:
- A fresh fruit bowl (green apples or lemons photograph particularly well)
- A coffee setup (French press or pour-over with a clean mug)
- A small herb plant (rosemary or basil in a simple pot)
- A single cookbook, open or leaning against a backsplash
- A clean cutting board with a cloth napkin
The goal is to create a scene that looks like someone stylish just finished putting the kitchen together, not like someone lives there full-time.
The Coffee Station
If you have a coffee maker -- especially a nice one like a Nespresso, Keurig, or a manual espresso machine -- make it a feature. Stage it with a pair of clean mugs, a small container of pods or beans, and perhaps a sugar bowl. Coffee setup photos consistently appear in positive Airbnb reviews, and guests actively search for listings with good coffee amenities.
Appliance Cords and Visual Noise
One of the most overlooked details in kitchen photography is appliance cords. A tangled power cord running from a coffee maker across the counter to an outlet is visual noise that makes the space feel messy, even if the counter is otherwise clean.
Before shooting:
- Tuck all cords behind appliances or tape them temporarily to the wall behind
- Close all cabinet doors completely -- even one door slightly ajar ruins the clean lines
- Make sure the dishwasher is fully closed and no cycle indicators are lit
- Remove anything from the top of the refrigerator
- Close or remove trash cans from the frame
Staging the Dining Area
If your kitchen includes a dining area, breakfast bar, or island with seating, stage it:
- Set two or four places with clean plates, glasses, and simple flatware
- Add a small centerpiece -- a plant, candles, or a simple vase with flowers
- Tuck chairs or stools in neatly
- If there is a window nearby, open blinds or curtains to maximize natural light
Staging Your Bathroom for Photography
Bathrooms present a unique staging challenge because they are small, functional, and contain elements that are inherently unphotogenic. The strategy is to create a spa-like atmosphere that communicates both cleanliness and comfort.
The Non-Negotiable Rules
These are not suggestions. These are rules that, if violated, will cost you bookings:
- Close the toilet lid. Always. In every photo. No exceptions. An open toilet is the number one bathroom photography mistake in Airbnb listings, and it is one of the most common photo mistakes that kill bookings.
- Empty the countertop. Remove all personal care products, toothbrush holders, and soap dispensers (yes, even the nice ones for now -- you will add back selectively).
- Use white towels. Roll or fold fresh white towels and display them prominently. White towels in photos signal hotel-level cleanliness. Colored or patterned towels, no matter how nice, do not communicate the same thing.
- Clean the mirror. Spotless. No water spots, no toothpaste splatter, no streaks. The mirror is the most scrutinized surface in a bathroom photo.
Adding Back the Right Details
Once the bathroom is stripped to its cleanest state, add back:
- Two or three rolled white towels on a shelf, in a basket, or stacked on the counter
- A small plant (real or high-quality faux -- eucalyptus works particularly well)
- A single upscale soap or lotion bottle (a simple, attractive container, not a drugstore bottle)
- A candle (unlit, for visual warmth)
- A bath mat (white or neutral, clean and fluffy)
If the bathroom has a tub, consider draping a folded towel over the edge and placing a bath tray with a candle and a small plant across it. This immediately communicates "relaxation" rather than "functional bathroom."
Lighting Challenges in Kitchens and Bathrooms
These two rooms present some of the most difficult lighting conditions in any property. Understanding the challenges and knowing how to work around them will dramatically improve your photos.
The Fluorescent Problem
Many kitchens and bathrooms have fluorescent or LED overhead lighting that produces a cold, unflattering blue-white light or, worse, the sickly yellowish-green tint of older fluorescent tubes. This kind of lighting makes white surfaces look dingy, skin tones look unhealthy, and the overall space feel institutional rather than inviting.
The fix:
- Turn off overhead fluorescent lights entirely.
- If the room has under-cabinet lighting in the kitchen, use that instead -- it creates a warmer, more even light on the countertops.
- Open all blinds and curtains to maximize natural light.
- If natural light is insufficient, bring in a portable LED panel or even a table lamp from another room to add warm fill light.
The Yellow Cast from Indoor Lighting
The opposite problem is equally common: warm incandescent or warm-LED bulbs that create an orange or yellow color cast. This makes white countertops look cream, white tiles look yellow, and the entire space feel like it has not been updated in decades.
The fix:
- Shoot with natural light only whenever possible.
- If you must use indoor lighting, use the warmest white balance setting on your camera or phone to counteract the yellow.
- Fix the color cast in editing. AI photo editing tools can automatically correct white balance, removing yellow or blue casts and making white surfaces look genuinely white.
Window Backlighting
Kitchens and bathrooms often have windows that, when you are shooting toward them, become blown-out rectangles of pure white light while the rest of the room goes dark. This is the classic high-dynamic-range challenge.
Solutions:
- Shoot away from windows when possible, using the natural light from behind you to illuminate the room.
- Use HDR mode on your phone. This captures multiple exposures and blends them to show detail in both the bright window and the darker room interior. For more on this technique, see our HDR real estate photography guide.
- Edit in post. AI brightness enhancement can recover detail in underexposed areas while maintaining natural-looking window exposure. This is one area where AI editing before and after comparisons show dramatic improvement.
Small Windowless Bathrooms
Some bathrooms have no natural light at all. This is common in apartments, condos, and older homes. Working with only artificial light in a small space is challenging but not impossible:
- Replace existing bulbs with the highest-wattage daylight-temperature (5000K-6500K) LED bulbs the fixtures support. This creates a cleaner, brighter light that photographs well.
- Turn on every light source in the room -- overhead, vanity, sconces.
- Open the bathroom door wide to let light in from adjacent rooms.
- In post-processing, increase brightness and adjust white balance. AI tools are particularly effective at making artificially lit bathrooms look bright and clean.
Angle Strategies for Small Spaces
Most kitchens and bathrooms in vacation rentals are not large. Standard real estate photography angles often do not work because you simply cannot back up far enough to capture the full room. Here are strategies for making small spaces look their best.
Kitchen Angles
The corner shot: Stand in one corner of the kitchen and shoot diagonally across to the opposite corner. This maximizes the visible space and shows the most counter area, cabinetry, and appliances in a single frame.
The countertop-level shot: Lower your camera to countertop height and shoot along the counter surface. This perspective emphasizes the depth of the kitchen and creates a dramatic look that makes even a galley kitchen feel more spacious.
The detail shot: Get close to specific features -- the coffee station, the gas range, the knife set on a magnetic strip. These detail shots communicate quality and amenities that wide-angle shots may not convey clearly.
The doorway shot: Stand just outside the kitchen doorway and shoot in. The doorframe provides natural framing, and you get enough distance to capture the full layout. If the kitchen is visible from the living or dining area, shoot from there to show the open floor plan connection.
Bathroom Angles
The mirror's perspective: Stand at the doorway and shoot toward the vanity/mirror area. This is the most common and effective bathroom angle because it shows the vanity, mirror, and often the shower or tub in one frame. Be careful about your own reflection -- stand slightly to one side so you are not visible in the mirror.
The tub/shower feature shot: If the bathroom has a standout tub or shower (a clawfoot tub, a glass-enclosed rain shower, a double vanity), compose a shot that makes it the focal point. Shoot from an angle that shows the feature prominently with the rest of the bathroom as context.
The vertical shot: Bathrooms are often taller than they are wide. A vertical (portrait) orientation can work well for narrow bathrooms, capturing from floor to ceiling and emphasizing the room's height and features like high-mounted mirrors or decorative light fixtures.
Watch Your Reflections
Mirrors and glass shower doors are reflection traps. Before pressing the shutter, check for reflections of you, your phone, messy adjacent spaces visible through doorways, or unflattering angles of the toilet. Position yourself to one side of mirrors, and if a mirror reflection is unavoidable, consider editing it out or shooting from a different angle entirely.
The Ultra-Wide Lens Consideration
If you are shooting with a phone, the ultra-wide lens (0.5x on most recent iPhones) can be tempting for small spaces. It captures more of the room, which seems like an advantage. However, ultra-wide lenses introduce significant distortion that makes small rooms look warped and unnatural.
The better approach: use the standard wide lens (1x), take multiple photos from different positions, and choose the best one. You will get a more natural and trustworthy representation of the space. For more on this, our guide to iPhone real estate photography tips covers lens selection in detail.
Shooting Amenities That Matter
Guests booking an Airbnb are not just evaluating the space -- they are evaluating the amenities. Your kitchen and bathroom photos should clearly show the amenities that influence booking decisions.
Kitchen Amenities Worth Highlighting
- Coffee machine (especially high-end: espresso, Nespresso, pour-over setup)
- Full-size appliances (dishwasher, full oven, large refrigerator)
- Cooking essentials (gas range, quality pots and pans visible on a rack)
- Wine and bar area (wine rack, bar cart, cocktail glasses)
- Breakfast bar or island (shows additional seating and counter space)
- Modern touches (smart appliances, induction cooktop, built-in microwave)
Bathroom Amenities Worth Highlighting
- Rain shower head (photograph it from inside the shower looking up)
- Double vanity (compose to show both sinks and the spaciousness)
- Soaking tub (stage it with towels, candle, and bath tray)
- Heated towel rack (show it with towels draped on it)
- Quality toiletries (display high-end products in matching containers)
- Hair dryer and styling tools (these are among the most-requested amenities)
For each amenity, consider whether it is better captured in a wide-room shot or a dedicated detail shot. Generally, large features (tubs, double vanities, kitchen islands) work in wide shots, while smaller amenities (coffee machines, toiletries, shower fixtures) benefit from dedicated close-up photos.
Editing Kitchen and Bathroom Photos
Even with perfect staging and good natural light, kitchen and bathroom photos almost always benefit from editing. These rooms have specific challenges that post-processing can address.
Color Correction for Tile and Fixtures
Tile, grout, porcelain, and chrome are surfaces that are extremely sensitive to color cast. A slight yellow color cast from indoor lighting makes white tiles look aged and grout look dirty. A blue cast makes chrome fixtures look cold and sterile.
AI color correction tools can automatically neutralize these casts and restore accurate whites. This is one of the most valuable edits for bathroom photography specifically. The difference between "slightly yellow white tile" and "crisp, clean white tile" in a listing photo is the difference between a guest feeling confident about cleanliness and feeling uneasy.
Brightening Dark Spaces
Kitchens and bathrooms are frequently the darkest rooms in a property, especially in apartments and older homes. Brightening these photos in post-processing is one of the simplest and most effective edits you can make.
For a comprehensive look at how AI tools handle the full range of interior photo challenges, our guide to bright and airy real estate photography covers the techniques that apply directly to kitchen and bathroom photography.
AI brightness enhancement goes beyond simply increasing the exposure slider. Intelligent tools:
- Lift shadows in dark corners without blowing out already-bright areas
- Enhance light on countertops and other horizontal surfaces
- Brighten cabinet faces while maintaining depth and dimension
- Balance the lighting across the frame so no area feels unnaturally dark or bright
HDR for Window Views
If your kitchen or bathroom has a window with a view -- a kitchen window overlooking the garden, a bathroom with a skylight -- you want both the interior and the view visible in the same photo. This requires HDR processing that captures the full dynamic range.
AI tools handle this automatically. Upload your photo, and the algorithm balances the bright window area with the darker interior to create a natural-looking image where you can see both the clean kitchen counter and the sunny garden outside. This is the kind of edit that once required bracketed exposures and manual blending in Photoshop but can now be achieved with one-click AI processing.
Removing Visual Distractions
Despite your best staging efforts, there are sometimes elements in kitchen and bathroom photos that you only notice after the shoot:
- A power outlet in an awkward position
- A visible plumbing pipe under a pedestal sink
- A stain on the ceiling you did not notice
- A cleaning product peeking out from under the sink
While minor retouching should not cross into misrepresentation, removing small visual distractions that do not affect the guest experience is a standard practice in listing photography.
Room-by-Room Photo Shot List
Use this checklist when photographing kitchens and bathrooms to ensure you capture everything guests want to see.
Kitchen Shot List
- Wide establishing shot from the best corner angle showing the overall layout
- Counter and backsplash detail showing cleanliness and style
- Appliance overview showing the range, refrigerator, and dishwasher
- Coffee station close-up (if applicable)
- Dining or breakfast area staged and set
- Open shelving or pantry (if attractive and well-organized)
- View from kitchen into living/dining area (shows open floor plan)
- Any standout feature (wine rack, island, professional range)
Bathroom Shot List
- Wide establishing shot from the doorway
- Vanity and mirror area close-up showing cleanliness and fixtures
- Shower or tub feature shot showing the size and quality
- Towel display showing fresh, white, hotel-quality towels
- Amenity detail (toiletries, hair dryer, robe)
- Any standout feature (rain shower, freestanding tub, double vanity)
- Lighting detail (if you have attractive sconces or a chandelier)
The Quality Standard
Here is the litmus test for every kitchen and bathroom photo in your listing: would a guest who has never been to your property look at this photo and think, "This is clean, this is well-maintained, and I would feel comfortable using this space"?
If the answer is anything less than an enthusiastic yes, either restage, reshoot, or edit until it is. These rooms carry more weight than their square footage suggests. They are where trust is built or broken, and your photos are the only way potential guests can evaluate them before booking.
For a broader perspective on creating a complete set of listing photos that drive bookings, our guide on Airbnb listing photos that book covers the full strategy from hero shots to amenity details. And if you are working with a phone camera, revisit our iPhone photography tips for the technical settings that get the best results in these challenging spaces.
Related Articles
Superhost Photography Secrets: How Top Airbnb Hosts Photograph Their Properties
Discover the photography strategies that Superhosts use to maintain 4.9+ ratings and near-100% occupancy. Insider tips from top-performing hosts.
Airbnb Listing Photos That Actually Book: A Host's Complete Guide
Learn how to create scroll-stopping Airbnb photos that increase bookings by up to 40%. From composition to AI editing, everything hosts need to know.
Photography for Unique Airbnb Properties: Treehouses, Tiny Homes, Boats, and Beyond
Master the art of photographing unique Airbnb properties including treehouses, tiny homes, boats, yurts, and glamping sites. Learn small-space techniques, outdoor photography tips, and how to capture the experience guests are booking.