HDR Real Estate Photography: A Complete Guide for Agents (and the AI Shortcut)
Everything you need to know about HDR photography for real estate listings. Learn what HDR is, why it matters, how to shoot bracketed exposures, and how AI can create HDR results from a single photo.
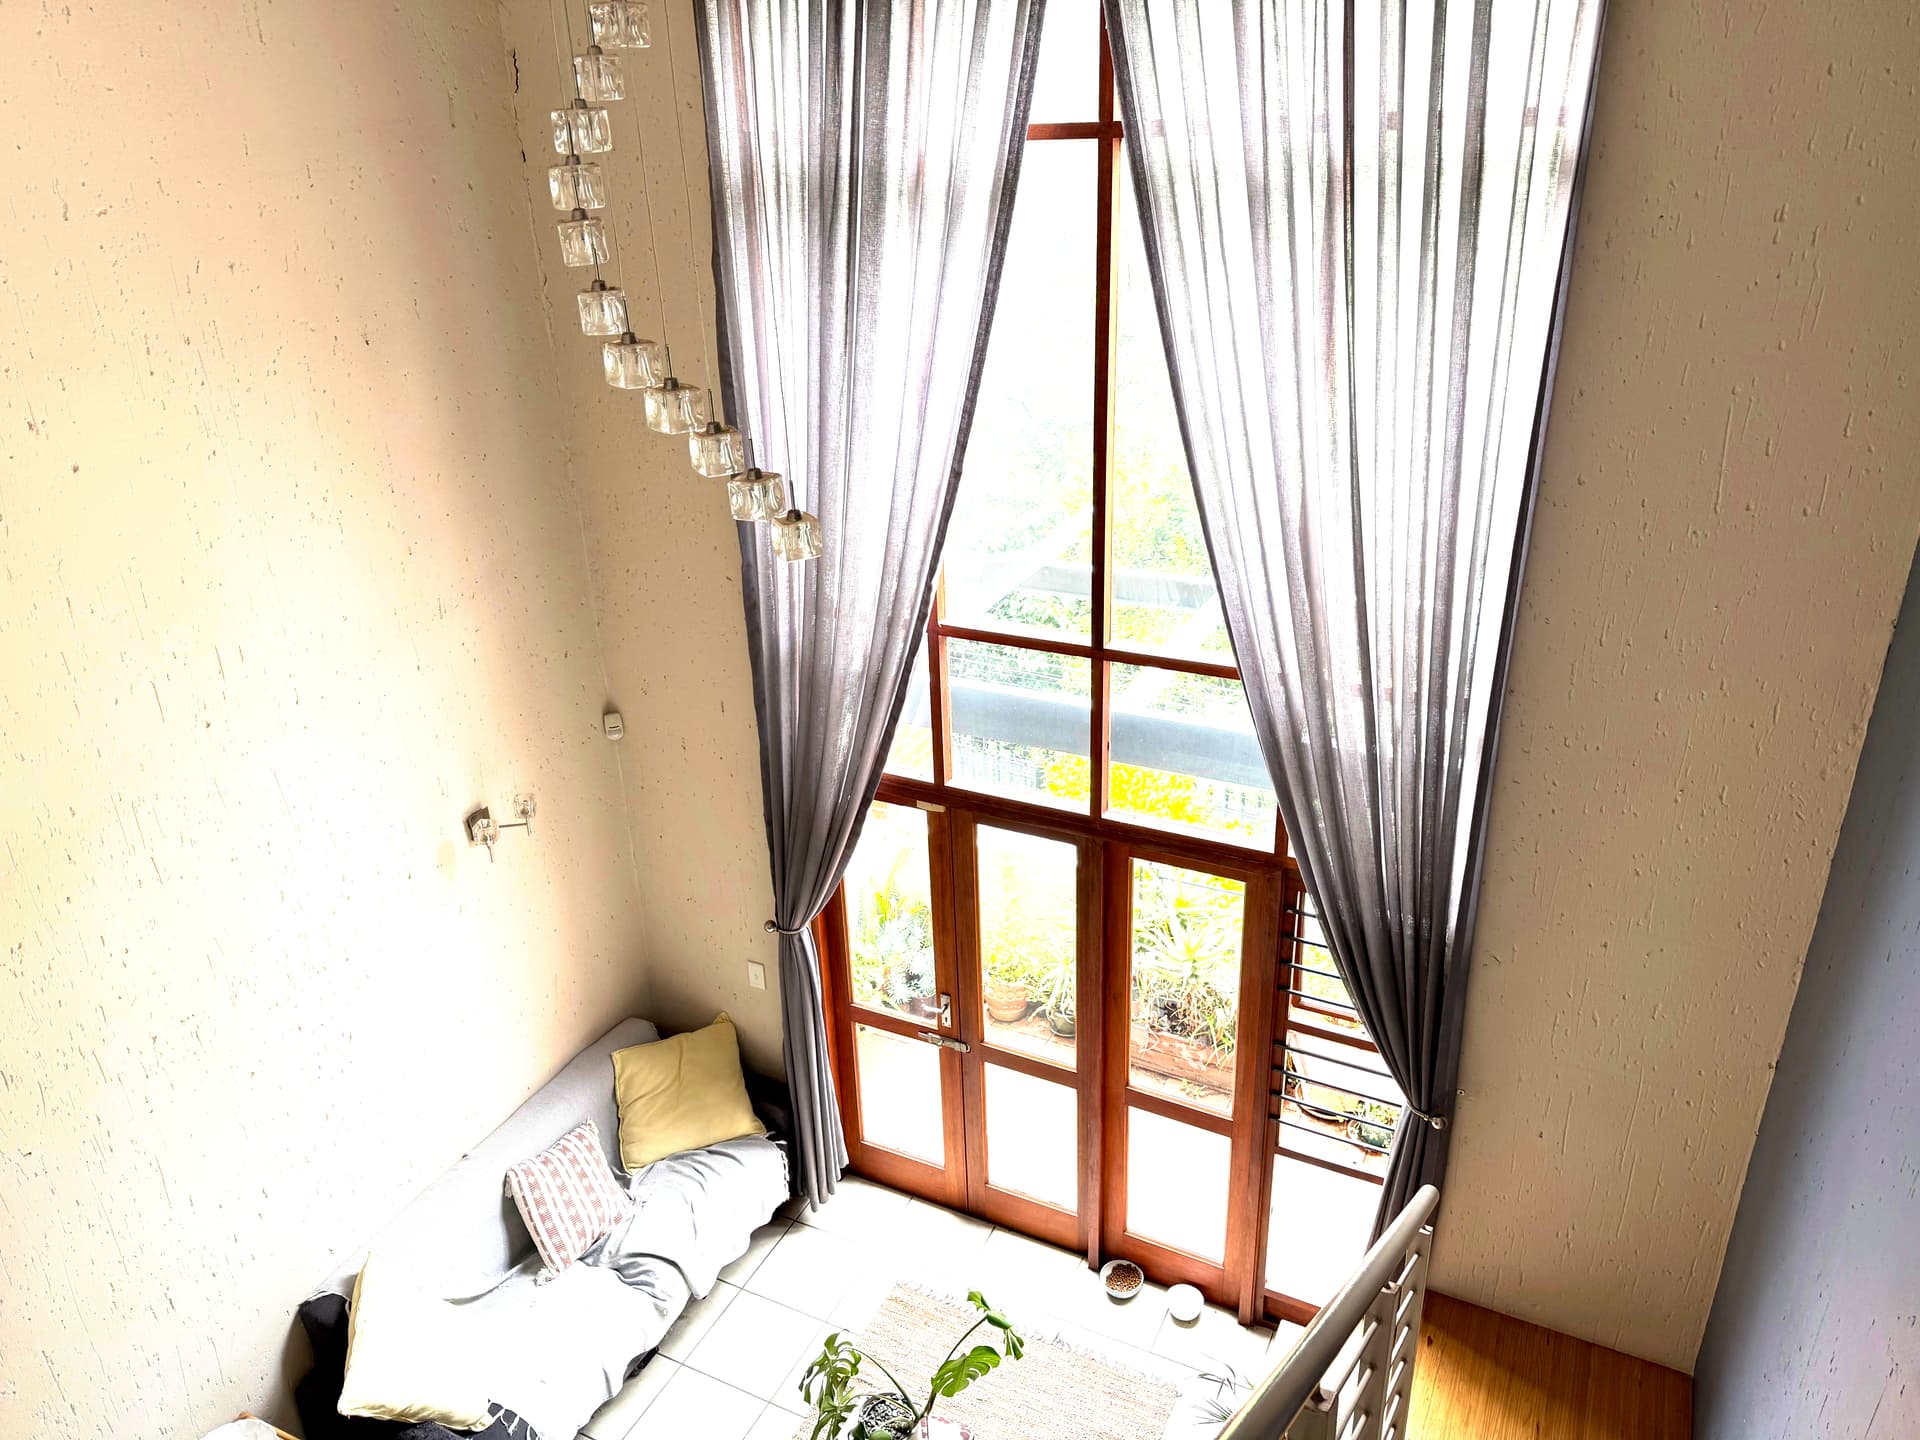
Walk into almost any room in any house and look toward a window. Your eyes can comfortably see the detail in the bright outdoor scene through the glass and the darker interior of the room simultaneously. Cameras cannot do this. The difference in brightness between the view through a window and a typical room interior is far greater than what a single camera exposure can capture.
This is the fundamental problem that HDR (High Dynamic Range) photography solves, and it is why HDR has become essential for real estate photography. In this complete guide, we will explain what HDR is, why it matters for your listings, how to shoot it, how to process it, and how modern AI tools are making professional HDR results accessible to everyone.
What Is HDR Photography?
HDR stands for High Dynamic Range. "Dynamic range" refers to the span between the brightest and darkest elements in a scene that can be captured with detail. A standard digital camera sensor can capture approximately 12-14 stops of dynamic range in a single exposure. The difference between a bright window view and a dark room corner can exceed 16-20 stops.
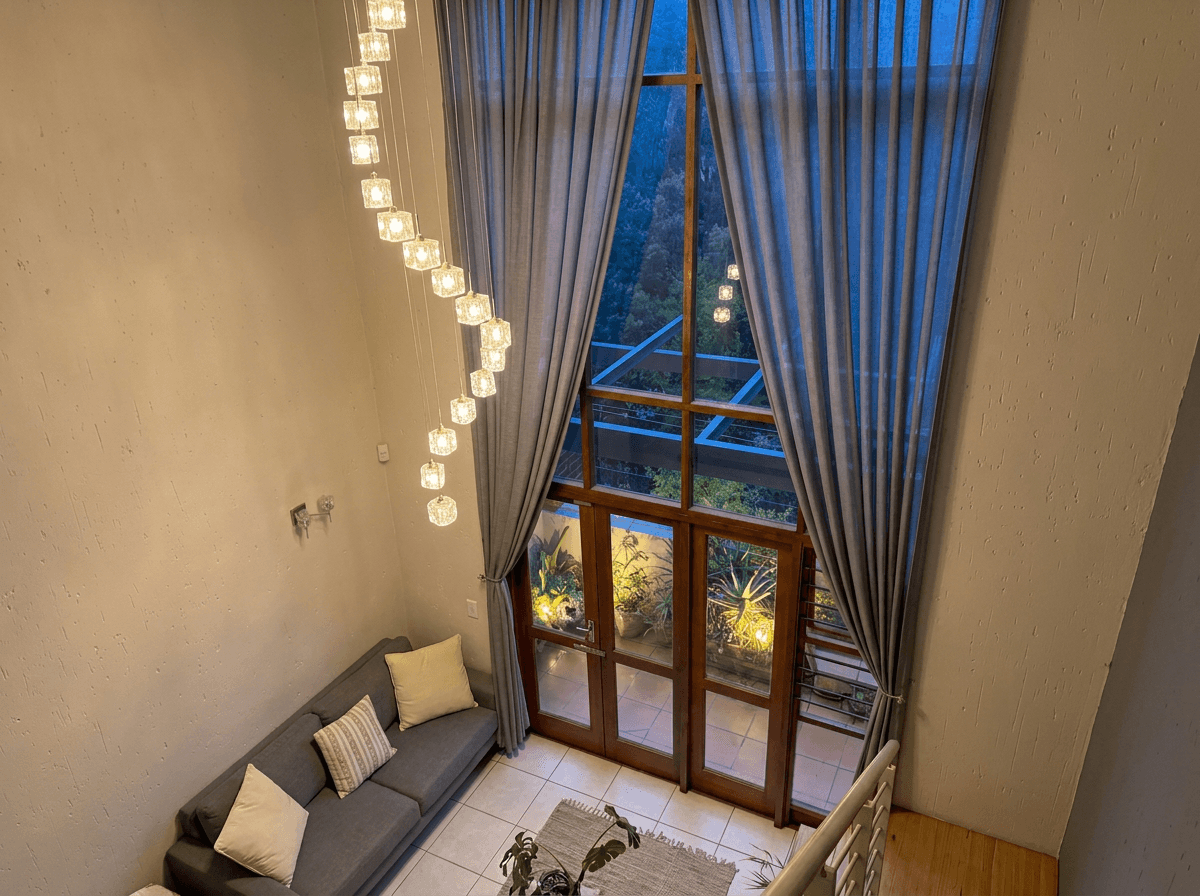
Traditional HDR photography bridges this gap by capturing multiple exposures of the same scene at different brightness levels (called "bracketed exposures") and then merging them into a single image that contains detail throughout the entire brightness range. The result is a photo where you can see the blue sky and landscaping through the windows while also seeing the details of the interior --- just like your eyes do naturally.
Dynamic Range in Real Estate Context
Real estate interiors present some of the most challenging dynamic range scenarios in photography:
- Windows: The brightest element, often 8-10 stops brighter than interior shadows
- Interior ambient light: Mid-range, varying significantly based on room orientation and window size
- Dark corners and closets: The darkest areas, often 4-6 stops below the ambient light level
- Mixed artificial lighting: Adds another layer of brightness variation
A single exposure forces you to choose what to sacrifice. Expose for the interior and windows blow out to pure white. Expose for the windows and the room goes dark. HDR lets you have both.
Why HDR Matters for Real Estate Listings
The impact of HDR on listing quality goes beyond technical correctness. It directly affects how buyers perceive a property.
Showing the Full Picture
When windows appear as white rectangles in a listing photo, the buyer loses context. They cannot see the yard, the view, the neighborhood --- all important factors in a purchase decision. HDR photos that show both the interior and the window view give buyers a complete understanding of what the room actually looks and feels like.
Making Rooms Feel Larger
Dark corners and shadowy areas make rooms feel smaller and less inviting. HDR processing opens up these areas, revealing the full dimensions of the space. A room that looks cramped in a standard exposure can feel spacious and welcoming in a properly processed HDR image.
Professional Appearance
Buyers have been conditioned by years of seeing well-processed listing photos. Blown-out windows and dark interiors now read as "amateur" or "low effort." HDR processing signals professionalism and care, reflecting positively on both the property and the listing agent.
Accurate Color Representation
When a camera's exposure is fighting extreme brightness differences, color accuracy suffers. Underexposed areas shift toward blue, overexposed areas lose color entirely, and the midtones can pick up unwanted casts from mixed light sources. HDR processing, by capturing accurate exposure data for each brightness zone, preserves true colors throughout the frame.
MLS Requirements
Many MLS systems now expect HDR-quality listing photos. While there is rarely a formal requirement, photos with blown windows or dark interiors may be flagged during the review process and can delay your listing going live.
How to Shoot HDR: The Traditional Method
Traditional HDR photography for real estate follows a well-established workflow.
Equipment Needed
- Camera with auto-exposure bracketing (AEB): Most DSLRs and mirrorless cameras have this feature. It automatically captures a sequence of exposures at different brightness levels.
- Sturdy tripod: Essential. The camera must not move between bracketed exposures, or the images will not align properly during merging.
- Wide-angle lens: 16-35mm on full frame or 10-22mm on crop sensor is standard for real estate interiors.
- Remote shutter release: Prevents camera shake when triggering the exposure sequence.
Camera Settings for HDR Bracketing
Set up your camera for a 3-shot or 5-shot bracket:
3-shot bracket (most common):
- Base exposure (metered for the room's midtones)
- Underexposed by 2 stops (captures window detail)
- Overexposed by 2 stops (captures shadow detail)
5-shot bracket (for extreme dynamic range):
- Base exposure
- -2 stops
- -4 stops
- +2 stops
- +4 stops
Recommended settings:
- Mode: Aperture Priority or Manual
- Aperture: f/7.1 to f/9 (consistent across all brackets)
- ISO: 100-400 (as low as possible)
- AEB: Set to +/- 2 EV (or +/- 2 and +/- 4 for 5-shot)
- Drive mode: Continuous (so all brackets fire in rapid succession)
- White balance: Manual, set to 5500K for consistency
Critical Setting
When shooting brackets, only the shutter speed should change between frames. The aperture must remain constant. If the aperture changes, depth of field shifts between frames, creating alignment issues in the merge. Use Aperture Priority mode or set everything manually, varying only shutter speed.
Shooting Technique
- Set up the tripod at your chosen composition point, typically in a doorway or room corner.
- Level the camera both horizontally and vertically. Crooked verticals are even more noticeable in HDR images because the increased detail makes lines more prominent.
- Focus manually on a point roughly one-third into the room. Then switch to manual focus so the focus point does not shift between brackets.
- Take a test shot at the base exposure. Check the histogram to ensure you are roughly centered with room to capture detail in both directions.
- Enable AEB and set your bracket range.
- Trigger the sequence using your remote release. Keep perfectly still until all frames have been captured.
- Review the bracket set on the camera's LCD. The darkest frame should show detail in the brightest windows. The brightest frame should show detail in the darkest shadows.
Common Shooting Mistakes
- Tripod movement between frames: Even small shifts cause ghosting and misalignment in the merge. Use a remote release and do not touch the camera.
- Moving objects: People, pets, ceiling fans, and curtains blowing in the breeze create ghosting artifacts. Clear the room and turn off fans before shooting.
- Insufficient bracket range: If your darkest exposure still has blown windows, add more stops to your underexposure. Two stops is often not enough for south-facing rooms with large windows on bright days.
- Changing aperture: As noted above, this creates depth-of-field inconsistencies. Lock your aperture.
HDR Processing and Merging
Once you have your bracketed exposures, the next step is merging them into a single HDR image.
Software Options for HDR Merging
Several software tools can merge HDR brackets:
- Adobe Lightroom: Photo Merge > HDR. Simple, effective, and integrates seamlessly with the Lightroom workflow. Produces a 32-bit DNG file that you then tone-map using Lightroom's standard adjustment sliders.
- Adobe Photoshop: Merge to HDR Pro. More control than Lightroom but a more complex workflow.
- Aurora HDR: Dedicated HDR software with real estate-specific presets. Strong ghost removal and alignment tools.
- Enfuse/Luminosity Masking: Advanced techniques that blend exposures based on luminosity rather than creating a true HDR merge. Produces natural-looking results favored by many real estate photographers.
The Tone Mapping Challenge
Merging brackets into an HDR file is only half the process. The resulting 32-bit image contains more brightness information than a standard display can show. "Tone mapping" is the process of compressing that extended range into a viewable image while preserving the detail advantage.
This is where HDR processing can go wrong. Aggressive tone mapping produces the hyper-real, over-processed look that gave HDR a bad reputation in the early 2010s --- halos around high-contrast edges, unnatural saturation, and a grungy quality that looks nothing like real life.
For real estate, the goal is natural-looking HDR: images where the extended dynamic range is invisible to the viewer. The room should simply look well-lit and balanced, as if the photographer had perfect lighting in every corner. The viewer should not be able to tell that HDR processing was used.
Settings for Natural Real Estate HDR
When tone mapping in Lightroom (after HDR merge):
- Highlights: Pull down significantly (-60 to -90)
- Shadows: Push up moderately (+30 to +60)
- Whites: Slight increase (+10 to +20)
- Blacks: Slight increase (+10 to +20)
- Clarity: Keep moderate (+10 to +20, never above +30)
- Dehaze: 0 to +5 (use sparingly)
- Saturation: 0 to -10 (slightly desaturated looks more natural)
The result should look like a well-exposed single image with detail visible throughout, not like an obvious HDR composite.
For more on achieving the right look in your editing, our guide to bright and airy real estate photography covers complementary editing techniques.
Single-Shot HDR With AI
The traditional HDR workflow described above is effective but comes with significant overhead: you need a tripod, multiple exposures, careful technique, and post-processing time for merging and tone mapping. What if you could get HDR-quality results from a single handheld exposure?
This is exactly what AI-powered single-shot HDR delivers.
How AI HDR Works
AI models trained on millions of paired images (single exposures alongside their properly merged HDR counterparts) have learned to predict what a multi-exposure merge would look like from a single frame. When you feed the AI a single interior photo with blown windows and dark corners, it:
- Recovers highlight detail in overexposed areas, reconstructing the view through windows using contextual understanding of what outdoor scenes look like
- Lifts shadow areas naturally, revealing detail in dark corners without introducing noise or unnatural brightness
- Balances the overall exposure across the frame, creating the even, well-lit look that traditional HDR achieves
- Preserves color accuracy throughout the brightness range
- Maintains natural contrast without the halos and artifacts common in over-processed traditional HDR
The results are not identical to a properly shot multi-exposure HDR merge --- physics dictates that data captured at different exposures will always contain more information than a single exposure. But for the vast majority of real estate applications, AI single-shot HDR produces results that are visually indistinguishable from traditional HDR to the average viewer.
When AI HDR Makes Sense
AI single-shot HDR is particularly valuable in these situations:
- Handheld shooting: No tripod required. Shoot naturally and let the AI handle the dynamic range.
- Moving scenes: Rooms with ceiling fans, pets, people, or other movement that would create ghosting in traditional bracket merges.
- Speed: No extra time for bracket sequences or post-processing merges. Upload and enhance in seconds.
- Retroactive enhancement: Apply HDR processing to photos that were shot as single exposures --- including older listing photos or images shot by the agent on a smartphone.
- Smartphone photography: Phone cameras capture a limited dynamic range. AI HDR can dramatically improve smartphone listing photos.
Using Twilight's HDR Enhancement
Twilight's HDR Enhance preset is designed specifically for real estate interiors. Upload any interior photo --- even a handheld smartphone shot --- and the AI automatically detects areas of overexposure and underexposure, applies intelligent recovery, and produces a balanced, natural-looking result.
The key advantage over generic HDR apps is the real estate-specific training. Twilight's AI understands that windows should show outdoor detail, that room corners should be visible, and that the overall look should be bright and inviting without the grunge aesthetic that plagues consumer HDR tools.
For a complete walkthrough of using Twilight's HDR and other presets, see our guide to editing real estate photos with AI.
HDR for Different Room Types
Different rooms present different HDR challenges. Here is how to approach each:
Living Rooms and Great Rooms
Often the most challenging rooms due to large windows, high ceilings, and mixed light sources. Shoot from corners to capture maximum space, and pay special attention to the balance between window brightness and interior ambient light. These rooms benefit the most from HDR processing.
Kitchens
Under-cabinet lighting, pendant fixtures, and natural light from windows create multiple brightness zones. HDR helps balance all of these while preserving the gleam of countertops and appliances. Watch for reflections on stainless steel and granite, which can create specular highlights that even HDR struggles with.
Bathrooms
Small rooms with bright tile and mirrors present unique HDR challenges. Mirrors reflect light sources directly, creating extremely bright spots. The white tile in bathrooms also reflects a lot of light, narrowing the usable dynamic range. Use fewer stops of bracket range (try +/- 1.5 EV) in bathrooms to avoid an over-processed look.
Bedrooms
Typically the easiest room for HDR. The dynamic range challenge is usually just the window versus the room interior, without the complex mixed lighting of kitchens or the reflective surfaces of bathrooms. A standard 3-shot bracket at +/- 2 EV handles most bedrooms well.
Basements and Interior Rooms
Rooms without windows eliminate the primary HDR challenge but introduce a different one: mixed artificial lighting. Tungsten, fluorescent, and LED fixtures in the same room create color cast issues that HDR processing can amplify. Set a consistent white balance and address color casts before merging.
HDR Best Practices for Real Estate
Follow these guidelines for consistently professional HDR results:
Keep It Natural
The number one rule of real estate HDR is subtlety. If a viewer can tell the photo has been HDR-processed, you have gone too far. The goal is a photo that looks like the room was perfectly lit, not like it was heavily processed.
Match Your Hero Image Style
If your exterior hero image uses a twilight conversion, ensure your interior HDR edits are complementary in tone and brightness. The transition from exterior to interior shots should feel cohesive.
Be Consistent Across the Listing
All interior photos in a listing should have the same HDR treatment. Mixing heavily processed HDR with naturally lit single exposures creates a jarring viewing experience. Apply the same approach (whether traditional bracketing or AI single-shot) to every room.
Watch for HDR Artifacts
Even with good technique, watch for these common artifacts:
- Halos: Bright or dark edges around high-contrast boundaries (like window frames against bright sky). Reduce clarity and dehaze if these appear.
- Ghosting: Translucent duplicates of moving objects. Use ghost removal features in your merging software.
- Noise in shadows: Lifting very dark areas reveals sensor noise. Apply noise reduction selectively to shadow areas.
- Flat, lifeless images: Over-aggressive shadow lifting and highlight pulling can remove all contrast. Maintain some tonal variation for a three-dimensional feel.
Optimize Your Source Material
Whether you are shooting traditional brackets or using AI single-shot HDR, better source material produces better results:
- Turn on all interior lights to reduce the brightness gap between the interior and windows
- Open blinds and curtains in all rooms, including adjacent rooms
- Shoot in RAW for maximum data when processing
- Avoid extreme backlighting compositions where windows dominate the frame
Ethical Consideration
HDR processing should enhance the true appearance of a room, not misrepresent it. Extreme processing that makes a dark, cramped room look like a sunlit loft crosses the line from marketing into deception. Buyers who feel misled by listing photos lose trust in the agent. Keep your HDR natural and honest.
The Evolution of HDR in Real Estate
HDR processing for real estate has evolved through distinct phases:
Phase 1 (2008-2013): Early HDR was often overdone --- heavily saturated, haloed, and artificial-looking. It was a novelty, and the "HDR look" was the point.
Phase 2 (2013-2020): Photographers learned restraint. Natural-looking HDR became the standard, with the processing invisible to the untrained eye. Manual bracketing and merging was the workflow.
Phase 3 (2020-2024): Camera sensors improved dramatically, capturing more dynamic range in a single exposure. Built-in computational HDR in mirrorless cameras reduced the need for manual bracketing.
Phase 4 (2024-present): AI single-shot HDR has matured to the point where it produces results comparable to traditional multi-exposure merging for most real estate applications. The workflow has shifted from "shoot brackets, merge, tone-map" to "upload, enhance, download."
This evolution has democratized professional-quality real estate photography. What once required expensive equipment, extensive training, and hours of post-processing is now achievable by anyone with a camera (or even a smartphone) and an AI editing tool.
Getting Started With HDR
If you are new to HDR real estate photography, here is the simplest path to professional results:
- Shoot your listing photos as you normally would --- even single exposures from a smartphone work.
- Upload to Twilight and apply the HDR Enhance preset.
- Compare the before and after. Notice how windows now show the outdoor view, shadows reveal room detail, and the overall exposure feels balanced and professional.
- Apply the same treatment to all interior photos for a consistent look across the listing.
That is it. No brackets, no tripod, no merging software, no tone-mapping expertise. AI handles the complexity while you focus on composition and client service.
For agents and photographers ready to elevate their listing photography, HDR processing --- whether traditional or AI-powered --- is one of the most impactful improvements you can make. Combined with techniques like twilight conversion for exteriors and bright and airy editing for interiors, HDR completes the toolkit for consistently stunning property photos. For more on fixing the color issues that often accompany dynamic range challenges, see our color correction guide for real estate photos.
Related Articles
Drone and Aerial Photography for Real Estate: A Practical Guide
Everything you need to know about drone photography for real estate listings, including FAA Part 107 requirements, best practices for angles and altitude, editing tips, pricing, and when aerial shots actually add value.
MLS Photo Requirements: Complete Guide for Real Estate Agents
Learn everything about MLS photo requirements including resolution standards, file size limits, common rejection reasons, and how to ensure your listing photos pass every time.
Twilight Photography for Real Estate: The Complete Guide
Discover why twilight photography sells homes faster and for more money. Learn how to shoot golden hour photos, overcome common challenges, and use AI to convert any daytime photo into a stunning twilight image.