Color Correction for Real Estate Photos: Fix Mixed Lighting, Yellow Casts, and More
Learn how to fix color casts, white balance issues, and mixed lighting in real estate photos. Covers Kelvin temperature basics, common lighting problems, and AI-powered color correction workflows.
Color is one of those things that buyers notice immediately when it is wrong but rarely think about when it is right. A living room drenched in yellow-orange light feels dingy and outdated. A bathroom with a harsh blue cast feels clinical and cold. But a room with accurate, neutral color balance feels clean, modern, and move-in ready, even if the viewer never consciously registers why.
Color correction is the process of adjusting a photograph's color balance so that whites appear truly white, neutrals look neutral, and the overall palette accurately represents the space. In real estate photography, this is not just an aesthetic preference. It is a trust signal. Buyers who see color-accurate photos trust that the listing is honest, while distorted colors raise subconscious red flags about what else might be misrepresented.
The challenge is that real-world interiors almost never have perfect lighting. Homes combine tungsten bulbs, fluorescent tubes, daylight from windows, and LED fixtures, each emitting light at a different color temperature. Your camera tries to compensate, but it often gets it wrong or only corrects for one light source while leaving the others to cast visible color shifts across the room.
This guide covers the science behind color temperature, the most common color problems in real estate photos, and practical techniques for fixing them, including how Twilight's AI tools can automate the process.
Understanding Color Temperature and White Balance
Every light source emits light at a specific color temperature, measured in Kelvin (K). Lower Kelvin values produce warm, orange-red light. Higher values produce cool, blue-white light. Understanding this scale is the foundation of all color correction work.
The Kelvin Scale for Common Light Sources
| Light Source | Approximate Kelvin | Color Appearance |
|---|---|---|
| Candlelight | 1,800 - 2,200 K | Deep warm orange |
| Incandescent / tungsten bulbs | 2,700 - 3,000 K | Warm yellow-orange |
| Halogen bulbs | 3,000 - 3,500 K | Warm white |
| Fluorescent tubes (warm) | 3,000 - 3,500 K | Yellow-green tint |
| Fluorescent tubes (cool) | 4,000 - 5,000 K | Blue-green tint |
| Direct sunlight (midday) | 5,200 - 5,500 K | Neutral white |
| Overcast daylight | 6,000 - 7,000 K | Cool blue-white |
| Shade / heavy overcast | 7,000 - 9,000 K | Blue |
| LED bulbs (varies widely) | 2,700 - 6,500 K | Depends on bulb rating |
Your camera's white balance setting tells the sensor what "white" should look like under the current lighting. When set correctly, a white wall appears white in the photo. When set incorrectly, that same white wall appears orange, blue, or green depending on the mismatch.
Auto White Balance: When It Works and When It Fails
Most photographers shoot real estate interiors on Auto White Balance (AWB). Modern cameras are remarkably good at analyzing a scene and selecting an appropriate Kelvin value. AWB works well when:
- A single dominant light source illuminates the room
- Daylight is the primary light (windows open, artificial lights off)
- The room contains neutral reference colors (white walls, gray countertops)
AWB struggles when:
- Multiple light sources at different color temperatures illuminate the same room
- The room is dominated by a single strong color (all-red accent wall, bright green carpet)
- Small, dim rooms where the camera has limited color data to analyze
For reliable results in mixed-lighting situations, consider shooting in RAW format and setting white balance manually in post-processing. RAW files preserve full color data, giving you complete control over the Kelvin value during editing.
Common Color Problems in Real Estate Photos
Understanding what causes each type of color cast helps you fix it efficiently, whether manually or with AI tools. Here are the most frequent color issues and their sources.
Yellow-Orange Cast
This is the most common color problem in real estate photography. It occurs when tungsten or incandescent bulbs are the dominant light source and the camera's white balance is set too low or on auto. Virtually every home with traditional light bulbs will exhibit some degree of yellow-orange cast if not corrected.
The buyer impact: Yellow-orange casts make rooms look dated, dim, and smaller than they are. White cabinets look cream or tan. Gray walls look muddy brown. Stainless steel appliances look dull and dirty. This single color problem can age a property by a decade in a buyer's perception.
Blue Cast
Blue casts appear when the white balance is set too high for the actual lighting conditions, or when the room is lit primarily by overcast daylight or shade without any warm artificial light to balance it. Rooms with north-facing windows are especially prone to blue casts.
The buyer impact: Blue casts make rooms feel cold, sterile, and uninviting. Hardwood floors look ashen. Warm paint colors lose their intended tone. The overall impression shifts from "cozy home" to "vacant office."
Green Cast
The green cast is the trickiest because it does not fit neatly on the Kelvin scale. Fluorescent lighting emits light with a green spike in its spectrum that the simple warm-to-cool Kelvin adjustment cannot fully correct. You need to adjust the tint slider (green-magenta axis) in addition to the temperature slider.
The buyer impact: Green casts are particularly unflattering to skin tones in photos where people are present, and they make white surfaces look sickly. Bathrooms and kitchens with fluorescent under-cabinet or overhead lighting are common culprits.
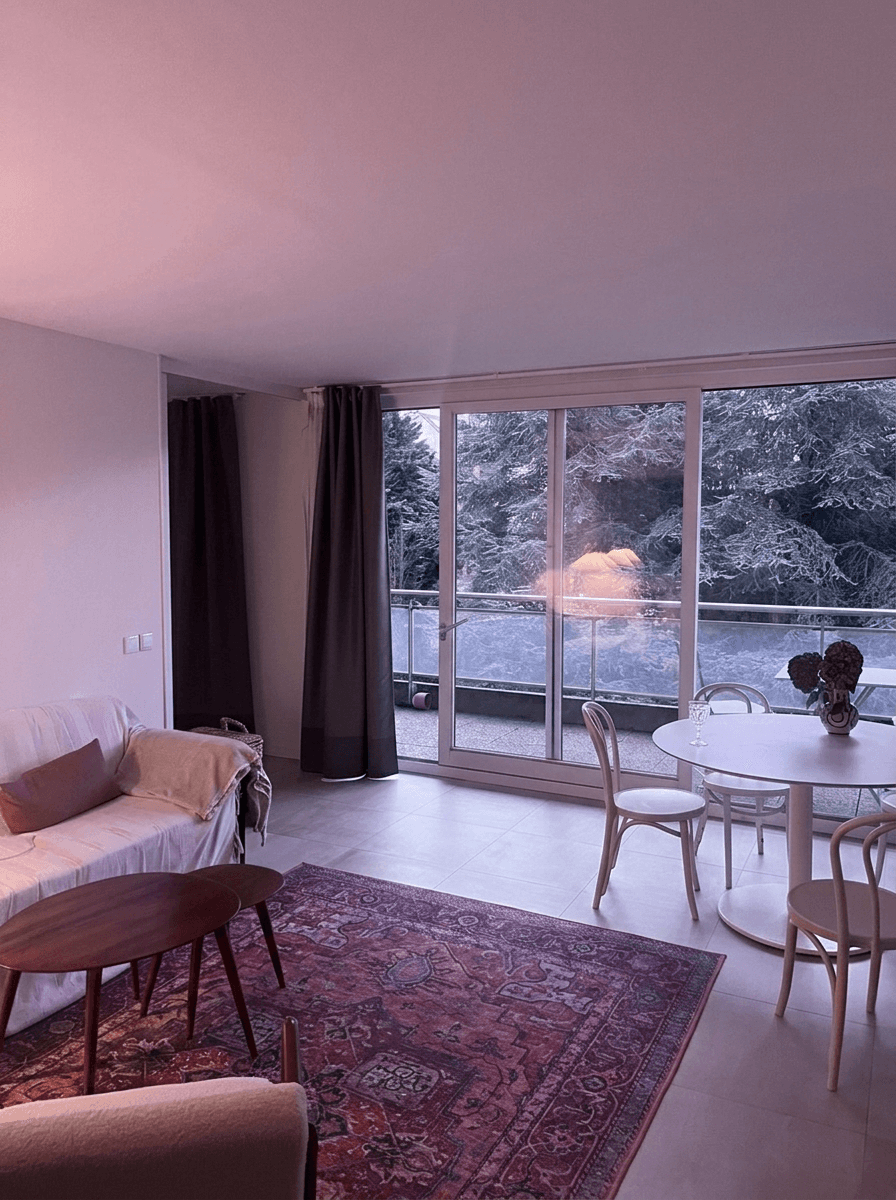
Mixed Lighting: The Real-World Challenge
The scenario that trips up even experienced photographers is mixed lighting: a room where daylight comes through windows at 5,500 K while tungsten overhead fixtures emit light at 2,800 K and fluorescent under-cabinet lights add a green spike. Each area of the room has a different color cast.
In this situation, there is no single white balance setting that corrects everything. You have three options:
- Control the light sources: Turn off all artificial lights and shoot with daylight only, or close blinds and shoot with artificial light only
- Match the bulbs: Replace bulbs with daylight-balanced LEDs (5,000-5,500 K) before shooting
- Correct in post-processing: Use selective adjustments or AI tools to correct different areas independently
Option three is where modern AI editing tools like Twilight excel. The AI can analyze different regions of the image and apply localized color corrections that would take significant manual effort with traditional editing software.
Pro Tip
If you control the shoot environment, bring a pack of 5,000 K LED bulbs with you. Replacing two or three key bulbs in a room takes five minutes and eliminates mixed lighting at the source. This single step reduces editing time more than any software trick.
How Color Casts Affect Buyer Perception
The impact of color accuracy on real estate listings goes beyond aesthetics. Research in environmental psychology consistently shows that color influences emotional responses to spaces. Buyers scrolling through listings make snap judgments based heavily on color.
What the Data Shows
- Listings with neutral, accurate white balance receive more saves and shares than those with visible color casts
- Warm, slightly bright color palettes are rated as most inviting across multiple studies
- Buyers consistently rate yellow-cast photos as showing older, less maintained properties, even when the property itself is new
- Blue-cast photos are rated as less comfortable and buyers estimate the rooms as physically colder
The lesson is clear: color correction is not optional polish. It is a core part of presenting a property accurately and attractively. A $500,000 home photographed with a heavy yellow cast will be perceived as worth less than the same home photographed with balanced colors.
This is directly related to the bright and airy photography style that dominates modern real estate marketing. Achieving that clean, bright look requires accurate color as its foundation.
Step-by-Step: Fixing Yellow-Orange Casts
Yellow-orange casts are so common that every real estate photographer needs a reliable workflow for fixing them. Here is the process.
In Traditional Editing Software
- Open the RAW file in your preferred editor (Lightroom, Capture One, etc.)
- Use the eyedropper white balance tool and click on something that should be white or neutral gray (a white wall, white trim, gray countertop)
- Fine-tune the temperature slider by pulling it toward blue (higher Kelvin compensation) until whites look truly white
- Adjust the tint slider slightly toward magenta if there is any residual green from fluorescent contribution
- Check your adjustment by looking at white and gray surfaces throughout the image, not just where you sampled
- Apply to similar images if you shot a batch under identical lighting conditions
Common Pitfalls
- Over-correcting: Pulling too far toward blue results in a cold, clinical look. Stop as soon as whites look neutral.
- Ignoring tint: Temperature alone cannot fix fluorescent-contaminated yellowing. Always check the green-magenta axis.
- Sampling the wrong reference: Clicking the eyedropper on a surface that looks white but is actually cream or off-white will skew all your colors.
Step-by-Step: Fixing Blue Casts
Blue casts require the opposite correction, warming the image by pulling the color temperature toward amber. But there are nuances to doing it well.
The Process
- Identify the source: Is the blue cast from overcast daylight, shade, or an incorrectly set white balance?
- Warm the temperature slider gradually, moving toward lower Kelvin values
- Watch your highlights: Blue-cast images often have highlights that look clean. As you warm the image, watch that highlights do not turn yellow.
- Adjust saturation selectively: Sometimes warming an image over-saturates existing warm elements (wood tones, warm textiles). Reduce orange and yellow saturation slightly to compensate.
- Check skin tones if people are visible in the image. Skin should look natural, not orange or ruddy.
For properties shot on overcast days, color correction combined with HDR techniques can compensate for the flat, cool light that clouds produce.
RAW vs. JPEG
RAW files give you roughly three times more latitude for color correction than JPEGs. A JPEG with a heavy color cast may show banding or color breakdown when corrected aggressively, while the same correction on a RAW file remains smooth and natural. Always shoot RAW for real estate work.
AI Color Correction: A Faster Workflow
Traditional color correction works, but it is time-consuming, especially when processing dozens or hundreds of images per listing. Manual white balance adjustments, selective corrections for mixed lighting zones, and batch processing still require a trained eye and significant editing time.
AI-powered color correction tools have changed this equation dramatically. Modern AI can analyze an image, identify the lighting conditions, detect color casts across different regions, and apply corrections automatically. The results are not always perfect on the first pass, but they provide a strong starting point that requires far less manual refinement.
How Twilight Handles Color Correction
Twilight's AI editing engine approaches color correction as part of its holistic image enhancement. When you apply a preset or custom prompt, the AI:
- Analyzes the lighting environment across the entire image, identifying different light sources and their color temperatures
- Detects and corrects color casts while preserving intentional warm or cool tones in materials (warm wood should still look warm, cool marble should still look cool)
- Unifies the color balance across mixed-lighting zones so the entire image reads consistently
- Preserves material accuracy so that granite looks like granite, hardwood looks like hardwood, and stainless steel has its correct neutral tone
This workflow is particularly effective when combined with other enhancements like brightness adjustments and sky replacement. Instead of making separate passes for color, exposure, and enhancement, everything is handled in a single AI-powered edit.
For a complete overview of AI editing workflows, see our guide on how to edit real estate photos with AI.
Color Correction for Specific Room Types
Different rooms present different color challenges. Here is what to watch for in each space.
Kitchens
Kitchens are mixed-lighting battlegrounds. Overhead recessed lighting, under-cabinet fluorescents, pendant lights over islands, and window light all combine. Pay special attention to how countertops and backsplashes render, since these are selling features that buyers scrutinize.
Bathrooms
Bathrooms are small spaces where a single vanity fixture dominates the lighting. Warm-toned vanity lights create heavy yellow casts on tile and porcelain. Correct aggressively here, as buyers expect bathrooms to look clean and white.
Living Rooms
Living rooms often have the most varied lighting: floor lamps, table lamps, overhead fixtures, and windows. The key is ensuring that the largest wall surfaces and the floor look neutral while allowing intentional warmth in lighting fixtures.
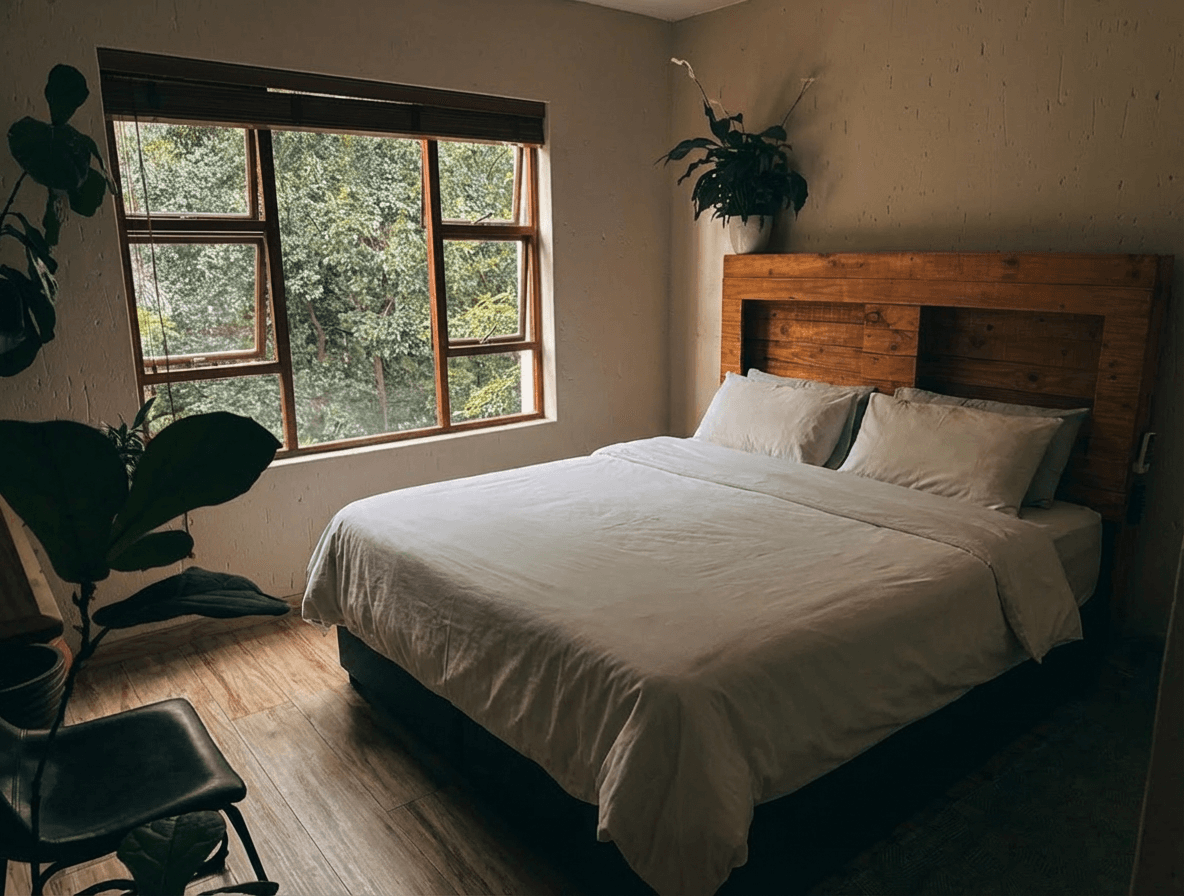
Bedrooms
Bedrooms are typically the easiest rooms to color correct because they tend to have simpler lighting setups. Watch for heavy yellow casts from bedside lamp light that was left on during shooting.
Exterior-to-Interior Transitions
When shooting from inside looking out through windows, the exterior will often appear blue-cool while the interior appears warm. This is a white balance conflict that can be addressed with HDR bracketing or AI-powered editing that handles interior and exterior zones independently.
Choosing the Right Editing Software
Color correction capabilities vary significantly between editing tools. Here is how the major options stack up for real estate-specific color work.
| Feature | Lightroom | Capture One | Twilight AI | Free Editors |
|---|---|---|---|---|
| Global white balance | Excellent | Excellent | Automatic | Basic |
| Selective color regions | Good (masks) | Excellent | Automatic | Limited |
| Mixed lighting handling | Manual | Manual | AI-automated | Not practical |
| Batch processing | Yes | Yes | Yes | Varies |
| Learning curve | Moderate | Steep | Minimal | Low |
| Time per image | 2-5 minutes | 2-5 minutes | Under 30 seconds | 5-10 minutes |
For a deeper comparison of editing tools, see our comprehensive software guide.
Building a Color-Accurate Workflow
The best approach to color correction is preventing problems at the source and having an efficient system for fixing what remains. Here is a workflow that professional real estate photographers use.
Before the Shoot
- Bring daylight-balanced LED bulbs (5,000 K) to replace problematic fixtures
- Carry a gray card for custom white balance reference shots
- Decide on a lighting strategy: all-daylight, all-artificial, or accept mixed and correct later
During the Shoot
- Take a reference shot with the gray card in the first room under each lighting condition
- Shoot in RAW format to preserve maximum color data
- Turn off lights that clash with your chosen dominant light source when possible
- Note which rooms have the most complex lighting for prioritized editing attention
During Editing
- Set white balance from the gray card reference and sync across images shot under the same lighting
- Address mixed-lighting zones with selective adjustments or AI tools
- Check all images at 100% zoom on a calibrated monitor before delivery
- Maintain consistency across all photos in a listing so the property has a unified visual identity
Color correction may not be the most glamorous part of real estate photography, but it is one of the most impactful. Accurate color turns average listing photos into professional ones, builds buyer trust, and ensures that the properties you photograph look their absolute best. Whether you correct manually or leverage AI tools like Twilight, the investment in color accuracy pays dividends in every listing.
Related Articles
White Balance and Color Correction for Real Estate Photos: Fix Bad Lighting Fast
Fix yellow casts, mixed lighting, and color issues in real estate photos. Learn manual and AI techniques for accurate, appealing color in listings.
Sky Replacement for Real Estate Photos: When and How to Use It
Learn when and how to use sky replacement in real estate photos. Covers buyer psychology, manual techniques, AI-powered tools, ethical guidelines, and best practices for stunning exterior shots.
AI Decluttering for Real Estate Photos: Remove Clutter in Seconds
Learn how AI decluttering transforms messy, lived-in property photos into clean, show-ready images. Step-by-step guide with before and after examples.