How to Photograph Your Airbnb Outdoor Spaces: Patios, Pools, and Gardens
Outdoor spaces can make or break an Airbnb booking. Learn to photograph patios, pools, gardens, and balconies that make guests hit 'Reserve' instantly.
A guest scrolling through Airbnb listings in Scottsdale sees two nearly identical properties. Same price, same number of bedrooms, same neighborhood. One has a handful of dim interior shots and a single wide-angle photo of a backyard with patchy grass. The other opens with a sun-drenched pool reflecting a golden sky, a patio set for dinner under string lights, and a garden path leading to a private fire pit. The second property books. The first sits empty.
Outdoor spaces are the single biggest differentiator for short-term rentals. According to Airbnb's own search data, listings that feature pools see up to 40% more bookings during summer months compared to similar properties without them. Patios, gardens, and outdoor dining areas rank among the top amenity filters guests use when searching. Yet the majority of hosts treat outdoor photography as an afterthought -- a quick snap of the backyard before heading inside.
This guide will teach you how to photograph every type of outdoor space so that potential guests can see themselves relaxing there before they even finish reading your listing.
Why Outdoor Spaces Drive Bookings
The psychology behind outdoor space appeal is straightforward. Guests booking a vacation rental are buying an experience, not just a place to sleep. A hotel room provides a bed. An Airbnb with a private pool, a shaded patio, and a garden provides a lifestyle.
The Numbers Behind Outdoor Amenities
Data from multiple hosting platforms and Airbnb analytics tools consistently shows:
- Pool listings earn 15-40% more per night than comparable properties without pools, depending on the market and season.
- Outdoor dining spaces are among the top five amenities guests mention in positive reviews.
- Fire pits and hot tubs correlate with higher average review scores, likely because they create memorable moments that guests want to talk about.
- Garden and patio views increase the average time guests spend looking at a listing before making a booking decision.
None of these advantages matter if guests cannot see and feel the outdoor spaces through your photos. A pool photographed at noon with harsh shadows and a slightly green tint does not communicate "resort lifestyle." It communicates "maintenance concern."
What Guests Look For in Outdoor Photos
When potential guests evaluate outdoor spaces in listing photos, they are subconsciously asking:
- Is this space clean and well-maintained? Dead plants, stained concrete, and murky water are instant dealbreakers.
- Can I actually use this space? A pool without any lounging area nearby feels incomplete. A patio without furniture looks barren.
- What will it feel like to be there? This is where photography quality makes the difference. Great lighting, warm tones, and thoughtful composition communicate a feeling that guests want to experience.
Best Time of Day for Each Outdoor Space Type
Timing is everything in outdoor photography, and different spaces photograph best at different times. Unlike interior rooms where you can control lighting, outdoor spaces are entirely dependent on the sun.
Pools and Water Features
Best time: Early morning (7-9 AM) or golden hour (1-2 hours before sunset)
Early morning offers several advantages for pool photography. The water is typically at its clearest and calmest because nobody has been swimming. The low sun angle creates beautiful reflections on the water surface without the harsh glare you get at midday. Morning light also tends to be slightly cooler in tone, which makes pool water look more inviting and blue.
Golden hour works equally well, with warmer tones that create a resort-like atmosphere. The low sun angle produces long shadows that add depth and dimension to the pool area.
Avoid: Noon to 2 PM. The overhead sun creates harsh reflections on the water surface, blows out highlights on light-colored pool decking, and produces unflattering shadows under furniture and umbrellas.
Patios and Decks
Best time: Golden hour or twilight
Patios are transitional spaces -- they connect the interior of your property to the outdoors. They photograph best when the lighting is warm and inviting, which means golden hour is ideal. If your patio has string lights, lanterns, or other ambient lighting, twilight photography produces stunning results. The combination of a deep blue sky and warm artificial lighting creates an atmosphere that practically screams "book this place."
Gardens and Landscaping
Best time: Morning light (8-10 AM) or overcast days
Gardens look best in soft, even light that brings out the full range of greens and flower colors. Morning light provides gentle warmth without harsh contrast. Overcast days are actually ideal for garden photography because the cloud cover acts as a giant diffuser, eliminating harsh shadows and allowing all the colors and textures to show clearly.
Avoid: Midday sun, which creates dark shadows between plants and washes out flower colors.
Balconies and Rooftop Spaces
Best time: Depends on the view direction
If your balcony faces east, photograph it in the morning. If it faces west, shoot at golden hour or sunset. The goal is to capture both the space itself and the view beyond it in flattering light. For city skyline views, twilight is unbeatable -- the combination of a glowing sky and city lights creates maximum visual impact.
Shooting Pools: Reflections, Clarity, and Safety
Pool photography is an art form in itself. Get it right, and your listing instantly feels like a boutique resort. Get it wrong, and guests start wondering about the pH balance.
Getting the Water Right
The single most important element in pool photography is water clarity and color. Before you photograph:
- Run the pool filter for at least 2-3 hours before the shoot. You want the water crystal clear.
- Check the chemical balance. Slightly off chemistry can make water look green or cloudy in photos, even if it looks fine in person.
- Remove all floats, toys, and debris. You can add a single tasteful float for lifestyle appeal, but the pool should look pristine first.
- Skim the surface immediately before shooting. Even a few leaves or bugs will be visible in your photos.
Managing Reflections
Water reflections are both your best friend and your worst enemy in pool photography.
Use reflections when: The sky is beautiful and the surrounding landscape is attractive. A still pool reflecting a clear blue sky or a sunset doubles the visual impact.
Minimize reflections when: You want to show the pool's depth, the bottom tile pattern, or underwater features. In this case, use a circular polarizing filter (available for phones via clip-on accessories) to cut surface glare and see into the water.
Composition Strategies for Pools
- Shoot from a corner to capture the full length and shape of the pool.
- Include the surrounding area. A pool without context -- loungers, a covered pavilion, landscaping -- feels incomplete. Show the entire pool experience.
- Get elevated if possible. A slightly elevated angle (from a second-floor balcony, a ladder, or a nearby hill) shows the pool shape and the surrounding deck area more effectively than a ground-level shot.
- Include scale indicators. A pair of sunglasses on a lounger, a towel draped over a chair, or a drink on a side table help guests understand the scale and imagine themselves there.
Safety Matters
If your pool has a safety fence or cover, photograph it both with and without. The "lifestyle" shot without the fence is for visual appeal. A separate photo showing the safety features reassures parents traveling with children, which is a large segment of Airbnb guests.
Patios and Decks: Staging for the Perfect Shot
Patios are where guests imagine themselves spending lazy mornings with coffee and long evenings with wine. Your photos should make that vision effortless.
Staging Furniture and Accessories
The key to patio staging is creating a scene that looks lived-in but not cluttered:
- Arrange seating in conversational groupings. Chairs should face each other, not stare blankly into space. Add throw pillows for color and comfort.
- Set the table. A patio dining table with plates, glasses, and a centerpiece (a simple plant or candle arrangement) tells a story. It says "you will have dinner under the stars here."
- Add textiles. An outdoor rug, throw blankets on chairs, and cloth napkins on the table add layers and warmth to what can otherwise feel like a sterile catalog photo.
- Use plants strategically. Potted plants frame the space and add life. Place them at corners and along edges to define the patio boundaries.
String Lights at Twilight
If your patio has string lights, this is your secret weapon. String lights at twilight produce some of the most bookable images in all of vacation rental photography.
The technique is straightforward:
- Turn on all string lights and any other outdoor lighting (lanterns, path lights, landscape up-lighting).
- Wait for the blue hour -- roughly 20-30 minutes after sunset when the sky is a deep blue but not yet black.
- Set your phone on a stable surface or tripod. The low light requires a longer exposure, and any camera shake will ruin the shot.
- Take several shots. Bracketed exposures (one darker, one lighter) give you options in editing.
The result is a warm, inviting scene that looks like a magazine cover. This is the exact look that twilight photo conversion can achieve through AI editing if you cannot capture it in person -- transforming a daytime patio shot into that coveted dusk atmosphere.
Covered vs. Uncovered Patios
If your patio has a pergola, awning, or roof, photograph it from just inside the covered area looking out. This framing creates a sense of shelter and coziness while showcasing the view beyond. It also naturally frames the outdoor space and gives the viewer a sense of being there.
For uncovered patios, shoot from slightly above (standing on a step or low wall) to show the full layout of furniture and the relationship to the surrounding landscape.
Gardens and Landscaping
A well-photographed garden communicates care, investment, and attention to detail. Guests who see a beautiful garden assume the entire property is well-maintained.
What to Focus On
Not every garden needs the same treatment. Prioritize based on what your property offers:
- Flower gardens: Get close enough to show color and detail, but pull back enough to show the overall design. Include the property in the background for context.
- Mature trees and shade: Photograph these with the sun behind or to the side of the trees, creating dappled light patterns on the ground. Show seating areas in the shade -- this communicates comfort in hot climates.
- Pathways and walkways: Shoot along the path to create depth and lead the viewer's eye through the garden. A winding stone path is inherently more photogenic than a straight concrete sidewalk.
- Lawn areas: Photograph freshly mowed lawns in the morning when the grass is most vibrant. If your lawn has bare patches, shoot from an angle that minimizes them, or consider AI editing to enhance the green.
Garden Photography Tips
- Water the garden 30 minutes before shooting. Wet foliage catches light beautifully and makes everything look more vibrant and healthy.
- Remove garden hoses, tools, and debris from the frame.
- Deadhead flowers and remove any wilting or brown plants visible in the shot.
- Shoot at plant height for flower beds. Getting your camera down to the level of the flowers creates a more immersive perspective than shooting down at them.
Fire Pits and Outdoor Dining
Fire pits are among the most searched-for amenities on Airbnb. Photographing them effectively can significantly boost your listing's appeal.
Fire Pit Photography
The best fire pit photos show the fire actually lit, which means shooting at dusk or after dark. The technique:
- Light the fire and let it burn for 15-20 minutes until you have good flames.
- Stage seating around the fire with blankets and perhaps a s'mores setup or drinks.
- Shoot during blue hour for the most dramatic effect. The fire glow against a deep blue sky is compelling.
- Use a tripod or stable surface. Low-light fire photography requires steady hands.
- Expose for the overall scene, not the fire. The fire will be bright enough on its own. If you expose for the flames, everything else goes dark.
Outdoor Dining Areas
Whether it is a built-in BBQ island, a simple grill setup, or a full outdoor kitchen, food preparation and dining areas deserve dedicated photos:
- Stage the grill area with a clean grill, utensils hanging neatly, and perhaps a cutting board with colorful vegetables.
- Set the dining table as if guests are about to sit down. Include wine glasses, cloth napkins, and a simple centerpiece.
- Show the relationship between the cooking and dining areas. Guests want to see the full outdoor entertaining flow.
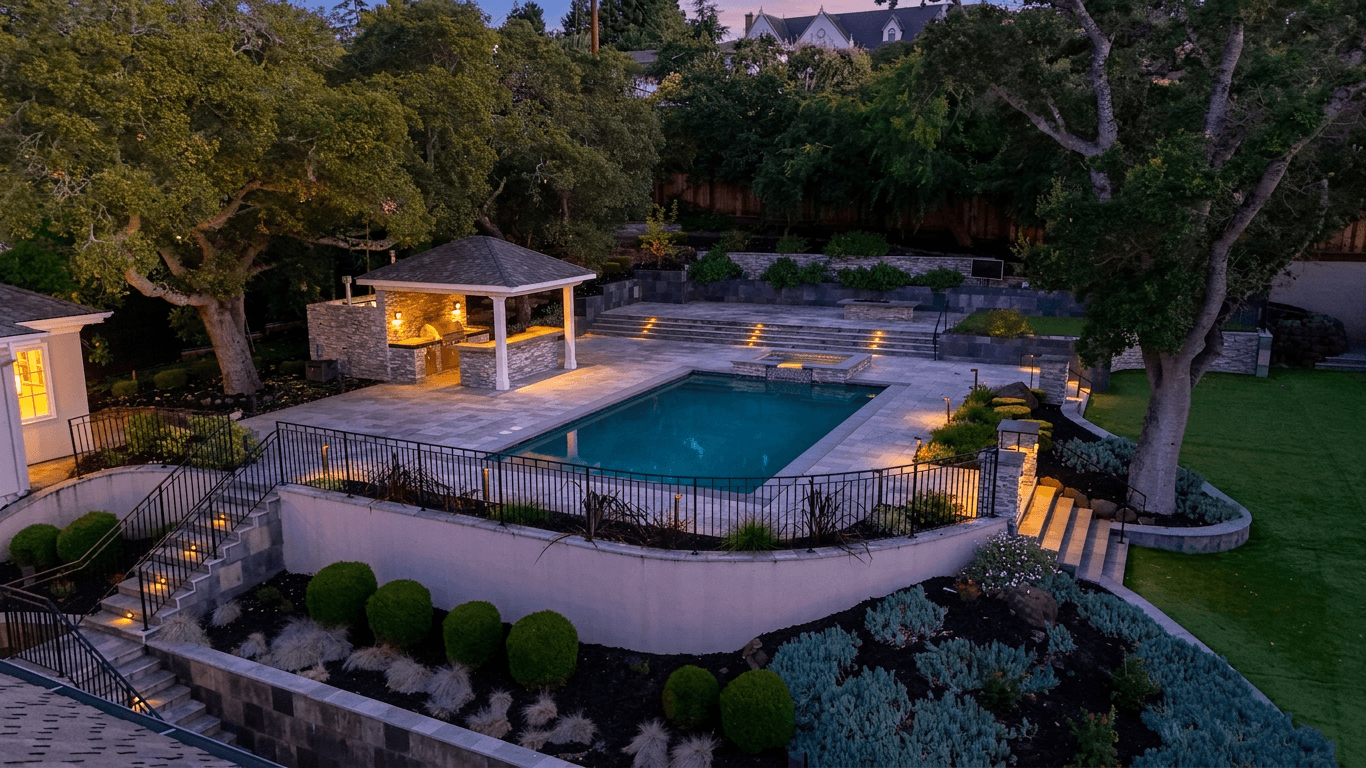
Elevated and Drone Angles
A bird's-eye view of your outdoor space can be a powerful addition to your listing. It shows the full layout -- how the pool relates to the patio, how the garden wraps around the property, how much total outdoor space is available.
When Elevated Angles Help
- Large properties with multiple outdoor zones (pool, patio, garden, fire pit area).
- Properties with interesting lot shapes or landscaping patterns visible from above.
- Waterfront or view properties where the elevated angle captures both the outdoor space and the scenery beyond.
Getting the Shot Without a Drone
If you do not have a drone (or if local regulations restrict drone use):
- Shoot from upper-floor windows or balconies looking down at the outdoor areas.
- Use a selfie stick or monopod to raise your phone 8-10 feet for a semi-elevated perspective.
- Stand on stable, safe elevated surfaces -- a deck, a retaining wall, a hill in the yard.
Drone Regulations
If you do use a drone, be aware that many municipalities have regulations about drone flight over residential areas. In the United States, FAA Part 107 rules apply to commercial drone photography. Check local rules before flying, and always respect neighbor privacy.
Dealing with Weather Challenges
You cannot always photograph outdoor spaces on a perfect day. Here is how to handle less-than-ideal conditions.
Overcast Skies
A gray sky over a beautiful pool or patio undermines the entire mood you are trying to create. You have two options:
- Wait for a better day. If your schedule allows it, this is always the best choice for hero shots.
- Shoot now and fix the sky later. AI sky replacement can transform a flat gray sky into a vibrant blue or golden sunset. This is one of the most common and impactful edits for outdoor vacation rental photos.
Harsh Sunlight
If you must shoot at midday:
- Seek shade. Photograph shaded areas of the patio or garden where light is more even.
- Embrace the brightness. Overexpose slightly to create a bright, airy feel rather than fighting the harsh contrast.
- Use HDR mode on your phone. It will capture multiple exposures and blend them, recovering detail in both bright highlights and dark shadows.
- Edit later. AI editing tools can balance exposure, recover blown-out skies, and reduce harsh shadows in post-processing.
Rain and Wet Surfaces
A light rain can actually be an advantage. Wet surfaces reflect light, adding visual interest to stone patios, wooden decks, and garden paths. The key is to shoot during or immediately after rain when surfaces are still glistening, rather than in the middle of a downpour.
Editing Outdoor Photos for Maximum Impact
Even well-photographed outdoor spaces benefit significantly from editing. The gap between a good outdoor photo and a great one often comes down to post-processing.
Sky Enhancement and Replacement
The sky in your outdoor photos sets the emotional tone for the entire image. If your natural sky is lackluster, sky replacement is the single most impactful edit you can make. AI tools can seamlessly swap a gray sky for a brilliant blue, a cotton-candy sunset, or a dramatic golden hour sky in seconds.
When choosing a replacement sky, match it to the mood you want:
- Blue sky with white clouds for daytime pool and garden shots -- communicates relaxation and perfect weather.
- Golden hour sky for patio and fire pit areas -- communicates warmth and evening ambiance.
- Twilight sky for properties with outdoor lighting -- communicates luxury and atmosphere.
Lawn and Foliage Enhancement
Brown patches, dormant grass, and faded foliage are common in outdoor real estate photos, especially in transitional seasons. AI editing can enhance greens to look their healthiest without making them look artificial. The goal is to show the landscape at its seasonal best, not to create an impossibly green fantasyland.
Twilight Conversion for Dramatic Effect
If you photographed your patio or pool area during the day but wish you had captured it at twilight, AI twilight conversion can transform the scene. The technology replaces the sky with a dusk gradient and adjusts the lighting in the scene to simulate warm artificial light sources. The result is that coveted blue-hour look without having to reshoot.
This is particularly effective for:
- Patios and decks with string lights or lanterns
- Pool areas with underwater lighting
- Properties with landscape lighting
- Outdoor dining setups
For hosts who cannot be at the property during golden hour, or who photographed on a cloudy day, twilight conversion is a game-changer. Learn more about the full range of AI editing capabilities in our guide on how to edit real estate photos with AI.
Brightness and Color Correction
Outdoor photos frequently need:
- Exposure balancing between bright sky areas and darker ground-level details.
- Color temperature correction to remove unwanted blue or orange casts.
- Saturation adjustments to make greens, blues, and earth tones look natural but vibrant.
- Shadow lifting to reveal details in shaded areas under pergolas, trees, or umbrellas.
These are exactly the kinds of adjustments that AI photo editing handles well, often producing results that would take significant time in manual editing software.
Putting It All Together: Your Outdoor Photo Checklist
Before you start shooting your Airbnb outdoor spaces, run through this checklist:
Preparation:
- Clean and stage all outdoor furniture
- Run pool filter and skim the surface
- Mow lawn, deadhead flowers, remove debris
- Water the garden 30 minutes before shooting
- Set tables, add lifestyle props (towels, drinks, books)
- Test all outdoor lighting
Shooting:
- Photograph each space at its ideal time of day
- Capture wide establishing shots and tighter detail shots
- Shoot from multiple angles, including elevated perspectives
- Include lifestyle elements for scale and aspiration
- Take enough frames to have options in editing
Editing:
- Replace or enhance lackluster skies
- Balance exposure across bright and shaded areas
- Enhance greens and natural colors
- Consider twilight conversion for dramatic hero shots
- Ensure consistent editing style across all outdoor photos
Your outdoor spaces are often the reason guests choose your property over the competition. Give them the photographic attention they deserve, and you will see the difference in your booking rate. For more comprehensive guidance on capturing your entire listing, see our full guide on vacation rental photography tips, and for insights on how top-rated hosts approach their listing imagery, check out Superhost photography secrets.
Related Articles
Photography for Unique Airbnb Properties: Treehouses, Tiny Homes, Boats, and Beyond
Master the art of photographing unique Airbnb properties including treehouses, tiny homes, boats, yurts, and glamping sites. Learn small-space techniques, outdoor photography tips, and how to capture the experience guests are booking.
Vacation Rental Photography: 15 Tips to Make Your Property Stand Out
Professional vacation rental photography tips that work for VRBO, Airbnb, and Booking.com. No expensive equipment needed.
Airbnb Photography vs Real Estate Photography: Key Differences That Matter
Understand the critical differences between Airbnb and real estate photography. From shooting style and staging to editing and photo ordering, learn how to optimize for each market.