Real Estate Photo Editing Before and After: 10 Stunning Transformations
See 10 dramatic real estate photo editing transformations including twilight conversion, sky replacement, HDR enhancement, virtual staging, and more. Before and after comparisons show the power of AI editing.
A picture is worth a thousand words, but a professionally edited picture might be worth thousands of dollars in faster sales and higher offers. Real estate photo editing has evolved dramatically with AI technology, making transformations that once required hours of skilled Photoshop work available in seconds.
In this post, we walk through ten of the most impactful types of real estate photo editing transformations. Each one addresses a common problem that agents and photographers encounter on shoots, and each one shows how the right edit can turn a mediocre photo into a listing standout.
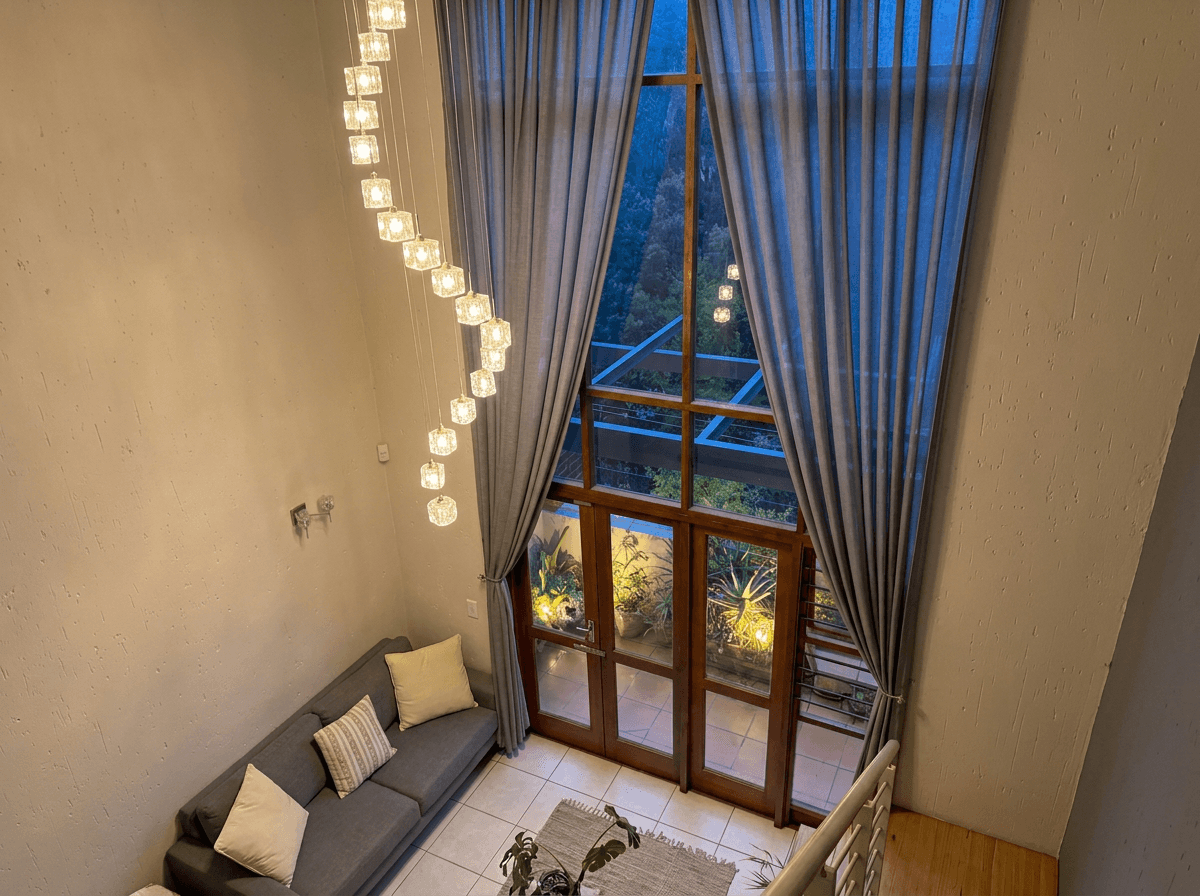
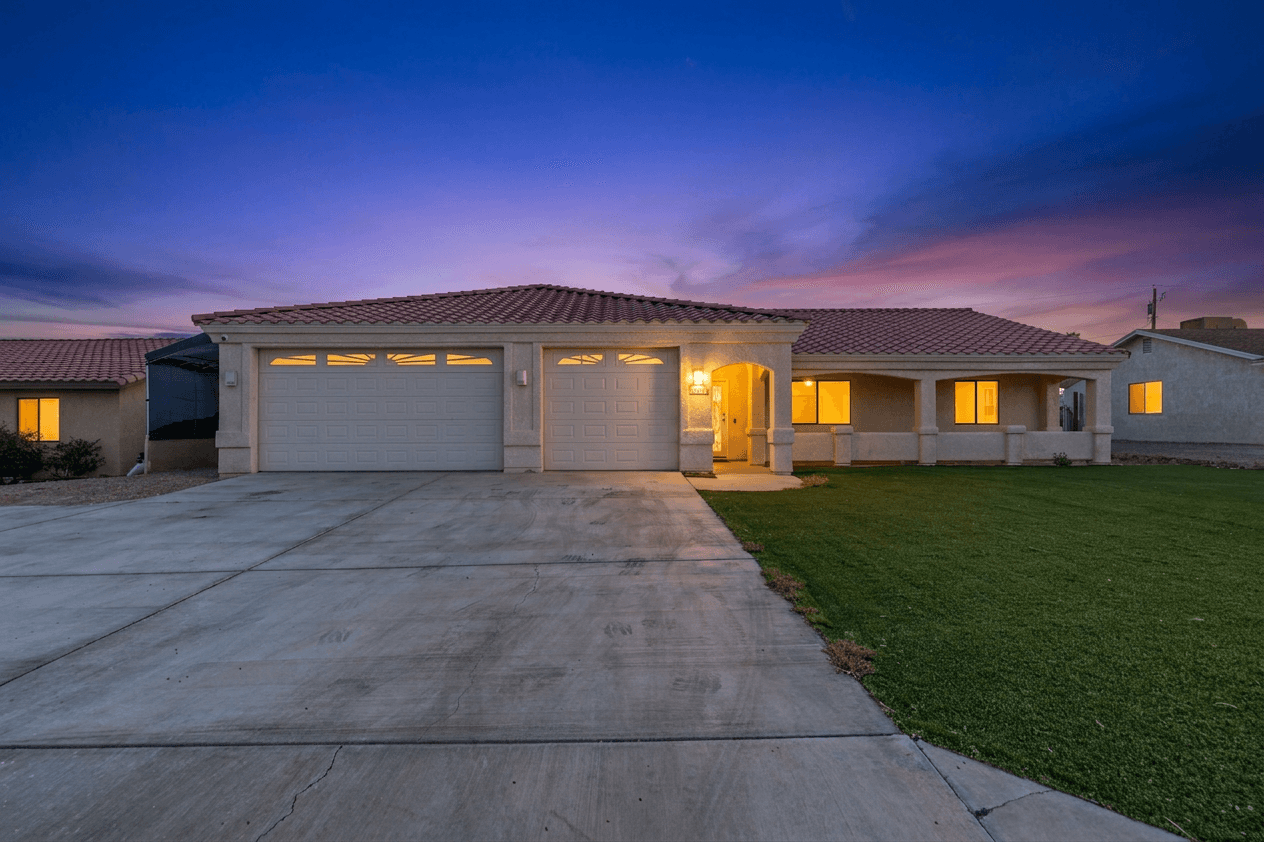
1. Twilight Conversion
Twilight photography -- capturing a home at dusk with warm interior lights glowing against a deep blue sky -- is one of the most powerful visual techniques in real estate marketing. The problem is that actual twilight shoots are expensive, weather-dependent, and require the photographer to return at a specific 20-minute window in the evening.
AI twilight conversion takes a standard daytime exterior photo and transforms it into a realistic dusk scene, complete with warm window lighting, a gradient twilight sky, and adjusted landscape lighting.

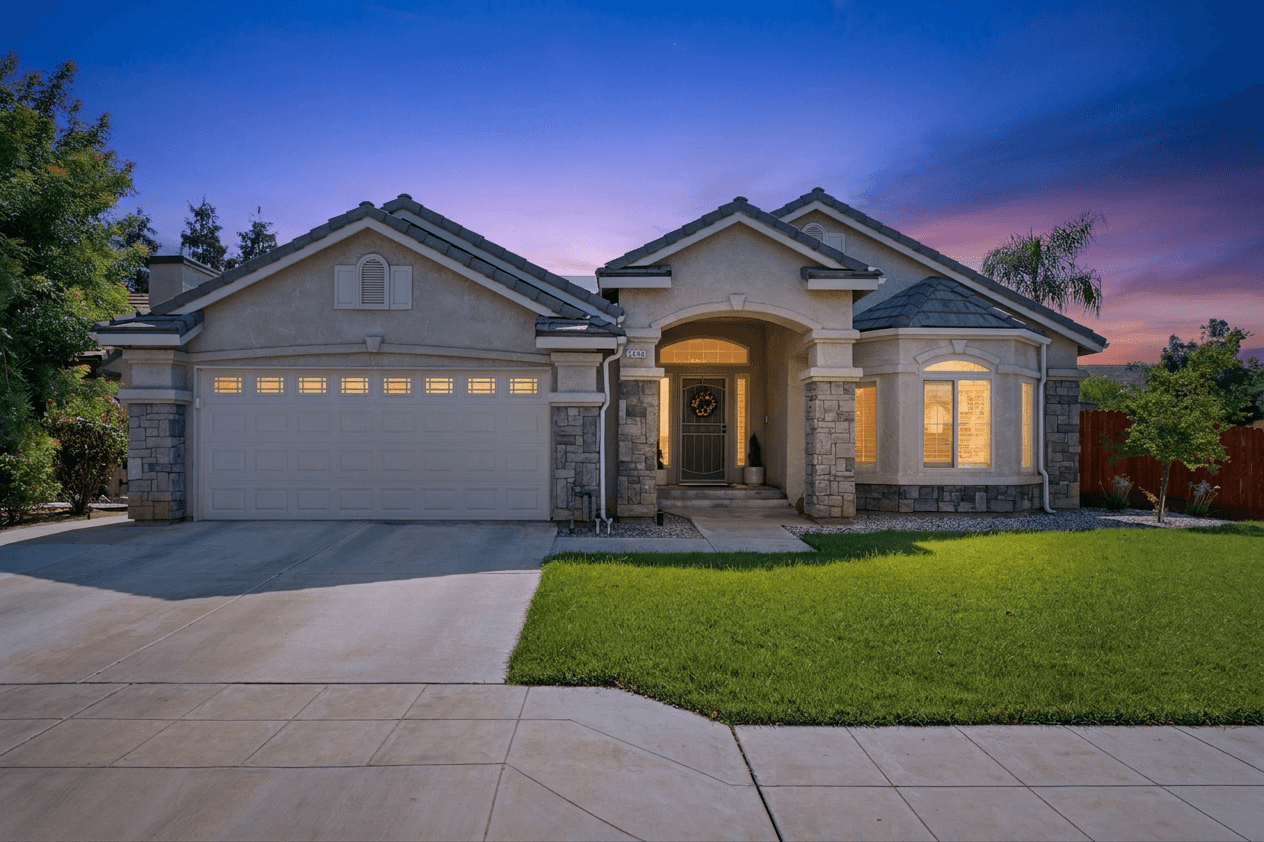
What Changed
- The bright midday sky was replaced with a gradient dusk sky transitioning from deep blue to warm orange at the horizon
- Interior lights were added to windows, creating that signature warm glow
- Landscape lighting was adjusted to simulate the soft, directional light of golden hour
- The lawn and landscaping took on the rich, saturated tones typical of dusk photography
When to Use This
Twilight conversion works best on homes with prominent windows and good architectural features. It is particularly effective for luxury listings where the additional visual drama justifies the production value. If your listing has small or few windows, the effect is less dramatic.
Real twilight photography typically costs $200-500 per session on top of regular shoot costs. AI conversion achieves a comparable result for a fraction of that price.
2. Bright and Airy Enhancement
The "bright and airy" look has dominated real estate photography and interior design content for years. It is characterized by lifted shadows, slightly reduced contrast, bright whites, and a clean, fresh feeling. Buyers associate this style with modern, well-maintained homes.
What Changed
- Shadows were lifted throughout the room, revealing detail in dark corners
- The overall exposure was increased while keeping highlights controlled
- A slight warm-to-neutral white balance shift created a cleaner, more modern feel
- Contrast was softened to reduce the harshness of direct light sources
When to Use This
Bright and airy editing works for virtually any interior space, but it is especially impactful in rooms that photograph darker than they appear in person -- a common frustration for agents. Many cameras underexpose interiors to preserve bright window highlights, leaving rooms looking dim and uninviting.
3. HDR Enhancement
HDR (High Dynamic Range) editing addresses the single biggest technical challenge in real estate photography: the extreme difference between bright windows and dark room interiors. The human eye can handle this range easily, but cameras cannot, resulting in either blown-out white windows or dark, underexposed rooms.
What Changed
- Blown-out windows were recovered, revealing the outdoor view and landscape
- Shadow areas in the room were brightened to show furniture and floor detail
- The overall dynamic range was compressed to create a balanced, natural look
- Color accuracy was maintained across the full tonal range
When to Use This
HDR enhancement is useful for nearly every interior shot, but it is critical for rooms with large windows, especially south- and west-facing rooms that receive direct sunlight. It is also essential for photos that include both a bright window view and a darker room interior, which is extremely common in real estate photography.
Traditional HDR requires shooting multiple exposures (typically 3-7 bracketed shots) and merging them in software. AI HDR enhancement can achieve similar results from a single exposure, which is a game-changer for agents who shoot with their iPhone or a basic camera.
4. Sky Replacement
We covered sky replacement in depth in our dedicated guide, but it deserves a spot in this transformation gallery because the visual impact is so dramatic.


What Changed
- The flat, featureless gray sky was replaced with a realistic blue sky and natural cloud formations
- The overall image warmth increased slightly to match the sunny sky
- The landscaping appears more vibrant as the ambient light shifts from cool gray to warm daylight
- Edge blending around the roofline and trees is seamless
When to Use This
Sky replacement is most impactful when the original sky is a uniform gray or blown-out white. It is less necessary (and can look less natural) when the original sky has some detail or interest, even if it is not perfect. The goal is always realism -- a sky that looks like it could naturally occur at that location and time of year.
5. Lawn and Landscape Enhancement
Brown patches, bare spots, and dormant winter grass are common issues in real estate photography. The lawn is often the first thing buyers see in exterior shots, and a patchy lawn communicates neglect, even if the rest of the property is immaculate.

What Changed
- Brown and patchy areas of the lawn were shifted to a natural green tone
- The grass color was unified across the entire yard for consistency
- Landscaping plants and shrubs received subtle color enhancement
- The overall exterior image feels more cared-for and inviting
When to Use This
Lawn enhancement is appropriate when seasonal conditions or drought have made the grass brown, but the underlying lawn is in reasonable shape. It is also useful when a photo is taken in winter but the listing will be active into spring. The ethical line here is similar to sky replacement -- you are correcting for temporary conditions, not hiding permanent problems.
A Note on Honesty
If the lawn is genuinely dead or the landscaping has major structural issues (drainage problems, steep grades, missing retaining walls), enhancing the color does not fix those problems and may mislead buyers. Use your judgment.
6. Declutter and Object Removal
Occupied homes present a constant challenge: personal belongings, everyday clutter, and distracting objects that make rooms feel smaller and prevent buyers from envisioning themselves in the space. Professional stagers remove these items physically, but that is not always possible before a shoot.


What Changed
- Personal items on countertops and surfaces were removed
- The underlying surfaces were intelligently filled in to look natural
- Distracting items in the background were cleaned up
- The room immediately feels larger and more inviting
When to Use This
Decluttering edits work best for removing small, scattered items from surfaces -- kitchen counters, bathroom vanities, desk surfaces, and shelves. They are less effective for removing large furniture pieces or structural elements, which falls more into the territory of virtual staging.
7. Virtual Staging
Empty rooms are one of the hardest spaces to photograph compellingly. Without furniture, buyers struggle to understand the scale of rooms, cannot envision how the space functions, and often feel a coldness that occupied rooms avoid.
What Changed
- A complete furniture arrangement was digitally added including a sofa, coffee table, area rug, and accent pieces
- The furniture style and colors complement the room's finishes and architectural style
- Lighting and shadows on the virtual furniture match the natural light in the room
- The room now communicates scale, function, and lifestyle
When to Use This
Virtual staging is most valuable for vacant listings where physical staging is not in the budget ($2,000-5,000 per home for professional staging). It is also useful for new construction where model units are not yet available. For a deeper comparison of when to choose virtual staging versus other editing approaches, see our virtual staging vs photo editing guide.
8. Color Correction
Mixed lighting is the enemy of real estate photography. A room lit by warm tungsten bulbs, cool daylight from windows, and greenish fluorescent under-cabinet lights in the kitchen will produce an image with ugly, inconsistent color casts that make the space look unpleasant.
What Changed
- The dominant orange/yellow cast from tungsten lighting was neutralized
- White walls and ceilings now appear actually white, not cream or yellow
- Natural light from windows reads as neutral daylight rather than competing blue
- The overall color palette of the room is accurate and appealing
When to Use This
Color correction should be applied to virtually every real estate photo to some degree. Very few cameras produce perfectly accurate color straight out of the camera, especially in mixed lighting conditions that are typical of residential interiors. The correction should aim for neutral, natural-looking color -- not overly cool or stylized.
9. Lens Distortion Correction
Wide-angle lenses are essential for real estate photography because they make rooms appear spacious and capture more of the space in a single frame. However, they introduce barrel distortion that makes straight lines bow outward, walls appear to lean, and vertical lines converge toward the top of the frame.

What Changed
- Barrel distortion was removed, straightening bowed walls and doorframes
- Vertical lines are now truly vertical, eliminating the "leaning" effect
- The horizon line is level
- The room proportions appear natural and accurate
When to Use This
Lens correction is necessary whenever a wide-angle lens (anything wider than about 24mm equivalent) is used, which is virtually always in real estate photography. This is especially important for photos taken with smartphones, which use very wide lenses and aggressive computational processing that can exaggerate distortion. If you are shooting real estate with your iPhone, lens correction should be part of your post-processing workflow.
10. Day-to-Dusk Conversion
Similar to twilight conversion but with a different aesthetic goal, day-to-dusk conversion transforms a late afternoon exterior into an early evening scene. The result is moodier and more atmospheric than a full twilight conversion, with deeper blues and more dramatic lighting contrast.

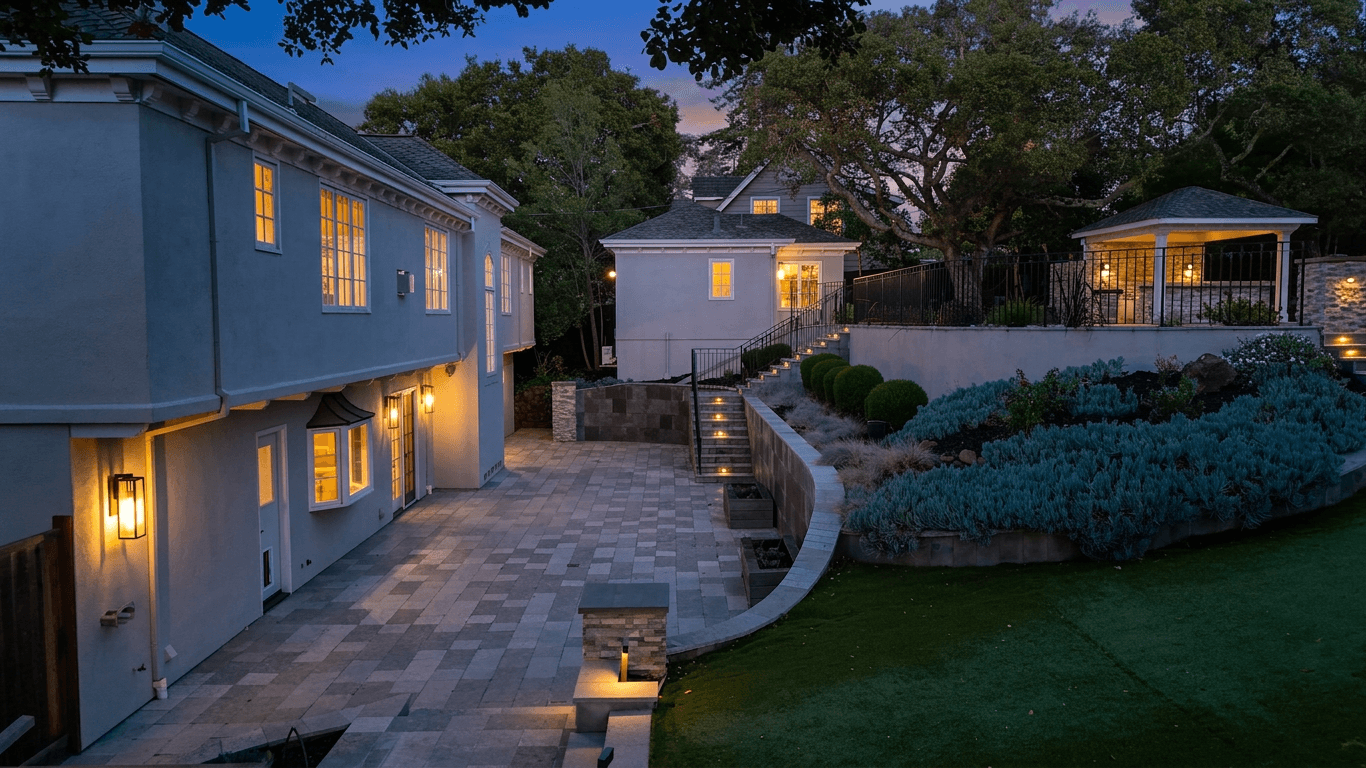
What Changed
- The sky transitions from daylight to a deep blue-purple dusk gradient
- Interior and exterior lights are activated, creating warm accent points throughout the image
- Landscape lighting highlights architectural features and pathways
- The overall mood shifts from informational to aspirational
When to Use This
Day-to-dusk conversion is the premium treatment for luxury listings and properties with distinctive architecture that benefits from dramatic lighting. It works best on homes with interesting rooflines, multiple window exposures, landscape lighting, and architectural features like stone or wood that take on rich tones in warm light.
The Editing Spectrum: From Subtle to Dramatic
These ten transformations span a wide range of editorial intensity:
Subtle corrections (should be applied to most photos):
- Color correction
- Lens distortion correction
- Bright and airy enhancement
- HDR enhancement
Moderate enhancements (situational, commonly used):
- Sky replacement
- Lawn enhancement
- Declutter and object removal
Dramatic transformations (selective, high-impact use):
- Twilight conversion
- Day-to-dusk conversion
- Virtual staging
The most effective listing photography workflow applies the subtle corrections to every photo, uses moderate enhancements where needed, and selects one or two dramatic transformations for hero images that will drive buyer engagement.
Time and Cost Comparison
Understanding the effort involved in each transformation helps you decide when AI editing makes sense versus traditional methods.
| Transformation | Manual Editing Time | Traditional Cost | AI Processing Time |
|---|---|---|---|
| Twilight conversion | 45-90 min | $30-75 | Seconds |
| Bright & airy | 5-10 min | $3-5 | Seconds |
| HDR enhancement | 15-30 min | $10-20 | Seconds |
| Sky replacement | 15-30 min | $5-15 | Seconds |
| Lawn enhancement | 10-20 min | $5-10 | Seconds |
| Declutter | 20-45 min | $15-30 | Seconds |
| Virtual staging | 60-120 min | $25-75 | Seconds |
| Color correction | 5-15 min | $3-5 | Seconds |
| Lens correction | 5-10 min | $3-5 | Seconds |
| Day-to-dusk | 45-90 min | $30-75 | Seconds |
For a typical 25-photo listing needing a mix of these corrections, manual editing or outsourcing can easily cost $200-500 and take days. AI processing handles the entire set in minutes.
What Makes a Great Before-and-After
Looking at these transformations, a few principles stand out:
-
The best edits are invisible. If a buyer looks at the edited photo and immediately thinks "this has been edited," the edit went too far. The goal is a photo that looks naturally excellent.
-
Consistency matters more than intensity. A listing where every photo has the same balanced, professional look will outperform one where a few photos are dramatically edited and the rest are untouched.
-
Enhancement should match the property. A modest starter home does not need a dramatic dusk conversion. A luxury estate might look odd with only basic corrections. Match the level of editing to the property's positioning.
-
The original matters. No amount of editing rescues a fundamentally bad photo -- poor composition, wrong angles, or missing key rooms. Start with the best raw material you can capture, and use editing to polish it to perfection.
Related Articles
Color Correction for Real Estate Photos: Fix Mixed Lighting, Yellow Casts, and More
Learn how to fix color casts, white balance issues, and mixed lighting in real estate photos. Covers Kelvin temperature basics, common lighting problems, and AI-powered color correction workflows.

Airbnb Photo Editing: Before and After Transformations That Boost Bookings
See how AI photo editing transforms ordinary Airbnb photos into booking magnets. Real before-and-after examples for every room type.
Sky Replacement for Real Estate Photos: When and How to Use It
Learn when and how to use sky replacement in real estate photos. Covers buyer psychology, manual techniques, AI-powered tools, ethical guidelines, and best practices for stunning exterior shots.