Drone and Aerial Photography for Real Estate: A Practical Guide
Everything you need to know about drone photography for real estate listings, including FAA Part 107 requirements, best practices for angles and altitude, editing tips, pricing, and when aerial shots actually add value.
Aerial photography was once the exclusive domain of helicopter-mounted cameras and five-figure budgets. Today, a capable drone costs less than a mid-range camera lens, and aerial shots have become a standard expectation for properties above a certain price point. According to MLS data, listings with aerial photography receive 68% more views than those without, and they sell up to 32% faster.
But drone photography for real estate is not as simple as sending a quadcopter into the sky and pressing the shutter button. There are federal regulations to understand, optimal altitudes and angles to learn, common mistakes to avoid, and post-processing considerations that differ from ground-based photography. Doing it wrong can result in FAA fines, disappointing images, or worse, a crashed drone on a client's roof.
This guide covers everything you need to know to use aerial photography effectively in your real estate work, whether you plan to fly yourself or hire a licensed operator. We will cover the regulations, the creative decisions, the editing workflow, and the business case for when aerial shots genuinely add value to a listing.
FAA Part 107: The Legal Requirements
In the United States, using a drone for any commercial purpose, including real estate photography, requires compliance with Federal Aviation Administration (FAA) regulations. This is not optional. Violating these rules can result in fines of up to $32,666 per incident and potential criminal penalties.
FAA Compliance Is Non-Negotiable
Flying a drone for real estate photography without a Part 107 Remote Pilot Certificate is illegal, regardless of the drone's size or how informal the shoot seems. "I did not know" is not a valid defense. If you plan to fly commercially, get certified first. If you do not want to get certified, hire someone who is.
Part 107 Remote Pilot Certificate
To legally fly a drone for commercial real estate photography, the pilot must hold an FAA Part 107 Remote Pilot Certificate. Here is what is involved:
Eligibility requirements:
- At least 16 years old
- Able to read, speak, write, and understand English
- Physically and mentally capable of safely operating a drone
- Pass the FAA Aeronautical Knowledge Test
The knowledge test:
- 60 multiple-choice questions
- 2-hour time limit
- Covers airspace classification, weather, drone operations, regulations, and radio communication
- Minimum passing score: 70%
- Administered at FAA-approved testing centers
- Cost: approximately $175
After passing:
- Apply through the FAA's IACRA system
- TSA background check (typically 2-4 weeks)
- Certificate is valid for 24 months
- Renewal requires passing a recurrent knowledge test (shorter than the initial test)
Key Part 107 Operating Rules
| Rule | Requirement |
|---|---|
| Maximum altitude | 400 feet above ground level (AGL) |
| Airspace | Class G airspace only without LAANC authorization or waiver |
| Time of day | 30 minutes before sunrise to 30 minutes after sunset (civil twilight) |
| Visual line of sight | Pilot must maintain visual contact with the drone at all times |
| Maximum speed | 100 mph (87 knots) |
| Right of way | Must yield to manned aircraft at all times |
| Over people | Allowed with Category 1-4 drones depending on risk category |
| Controlled airspace | Requires LAANC authorization or FAA waiver |
| Night operations | Allowed with anti-collision lighting visible for 3 statute miles |
LAANC: Accessing Controlled Airspace
Many residential areas fall within the controlled airspace of nearby airports. The Low Altitude Authorization and Notification Capability (LAANC) system allows Part 107 pilots to request near-real-time authorization to fly in controlled airspace through approved apps like Aloft, AirMap, or DJI Fly.
Before every real estate shoot, check whether the property falls within controlled airspace using the B4UFLY app or the FAA's UAS Facility Map. If authorization is required, submit your LAANC request in advance, as approvals are usually instant for altitudes within the published ceiling grid.
When Aerial Photography Adds Value
Not every property benefits from aerial photography. Understanding when it genuinely adds value helps you make smart decisions about when to invest the time and expense, and when to skip it.
Properties That Benefit Most
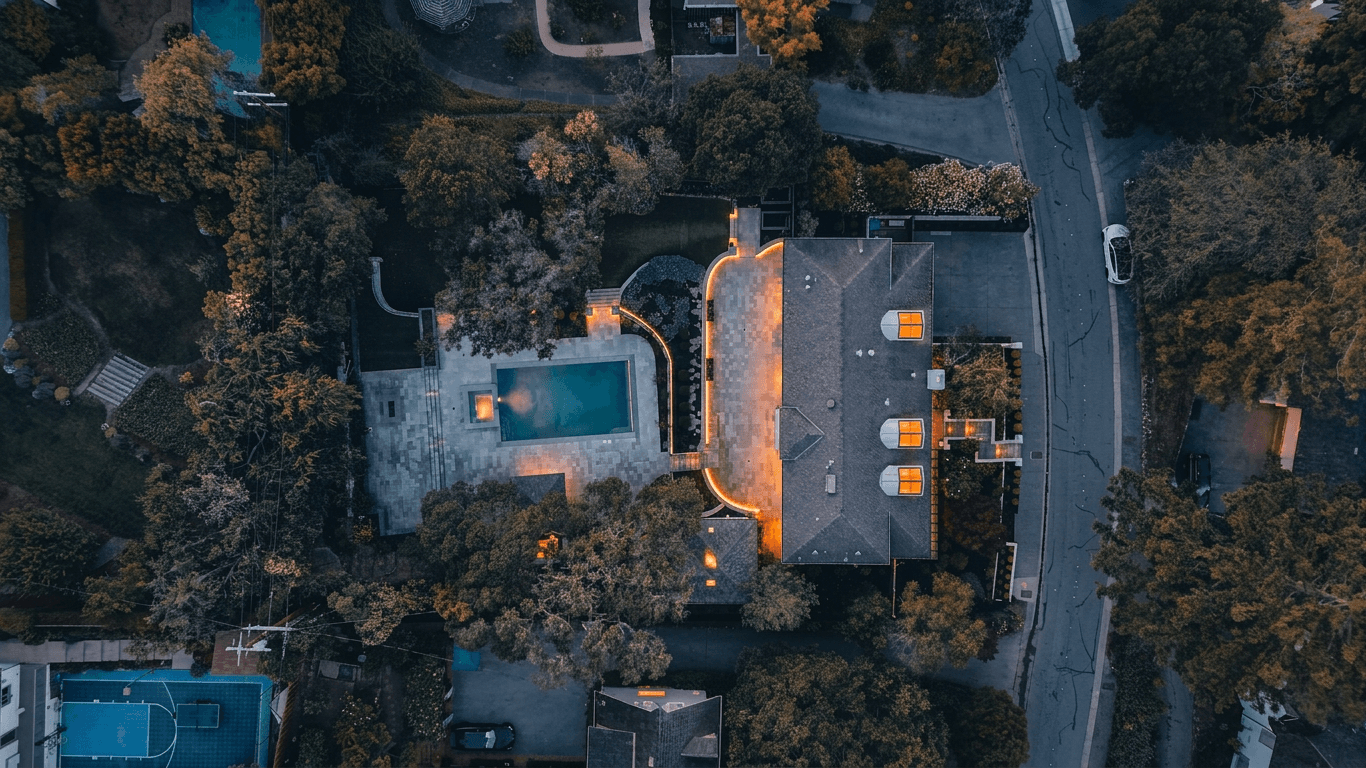
Large lots and acreage: Properties on one acre or more need aerial shots to convey the full scope of the land. Ground-level photography simply cannot communicate the size and shape of a large parcel.
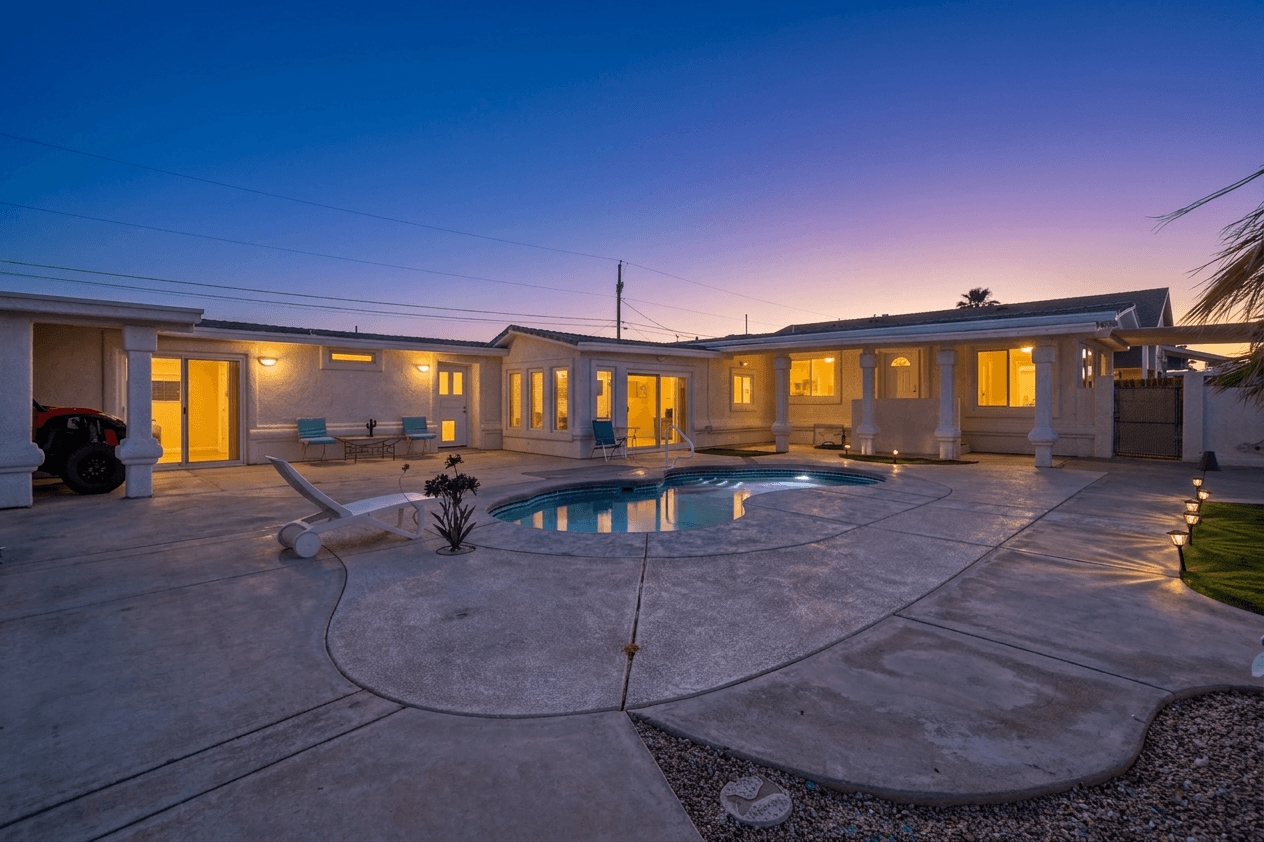
Waterfront properties: Aerial views show the relationship between the home, the waterfront, a dock or boat lift, and the water itself. These shots are often the most compelling images in the entire listing.
Properties with notable surroundings: Golf course homes, properties adjacent to parks or nature preserves, and homes near desirable amenities benefit from aerial context that shows the location advantage.
New construction or unique architecture: Aerial angles can showcase roof lines, building shapes, and site plans that are invisible from the ground. L-shaped homes, courtyards, and properties with complex layouts are best understood from above.
Investment properties or land: Vacant land, multi-unit properties, and commercial-residential mixed-use buildings often require aerial photography for buyers to assess the site.
Properties Where Aerials Add Less Value
Standard suburban homes on small lots: A quarter-acre lot in a typical subdivision may not benefit much from an aerial view that primarily shows the neighbor's roof.
Condos and townhomes: Unless the unit has a notable rooftop terrace or the building's location is the selling point, aerial shots of a condo building are rarely useful for marketing individual units.
Urban properties in no-fly zones: Properties near airports, heliports, or restricted airspace may be impossible or impractical to photograph aerially.
Budget listings: If the property is priced at the lower end of the market, the cost of drone photography may not be justified by the marginal increase in buyer interest.
Best Angles and Altitudes
The creative decisions you make about altitude and camera angle determine whether your aerial photos look professional or amateurish. Here are the standard approaches that work for real estate.
Altitude Guidelines
50-80 feet (low altitude): Best for showing the home and immediate yard. At this height, the home is the dominant subject with the property boundary clearly visible. This is the workhorse altitude for most residential real estate aerial photography.
100-150 feet (medium altitude): Shows the property in the context of its immediate neighborhood. Useful for demonstrating proximity to parks, water features, cul-de-sac positioning, or lot size relative to neighbors.
200-300 feet (high altitude): Provides a neighborhood overview. The individual property becomes smaller in the frame, so this altitude works best when the location context is the selling point: waterfront communities, golf course neighborhoods, or properties near downtown areas.
300-400 feet (maximum altitude): Essentially a map view. Useful for large acreage, farm properties, or development parcels, but the home itself is a small element in the frame.
Camera Angle Approaches
Straight down (nadir/bird's eye): The drone looks directly downward. This shows the property layout like a site plan. Useful for pool homes, landscaped properties, and lots where the shape is a selling feature. Not flattering for the home's architecture.
45-degree angle (oblique): The most versatile and commonly used angle for real estate. Shows the roof, the front and one side of the home, the yard, and surrounding context all in one frame. Start here for your hero aerial shot.
Low-angle elevated (20-30 degrees): The drone is slightly elevated but the camera is angled more toward the horizon. This creates a "slightly above eye level" perspective that adds drama without being a full aerial view. Excellent for curb appeal photography when you want a more elevated version of the ground-level hero shot.
Straight ahead (horizontal): The drone is elevated but the camera points straight at the horizon. This is essentially a ground-level photo taken from a higher vantage point. Useful for showing views from a second-story balcony or rooftop.
The Standard Aerial Shot List
For a typical residential property, plan to capture:
- Hero oblique shot at 50-80 feet, 45-degree angle, showing the home and property
- Rear property shot at 50-80 feet, showing backyard and outdoor living spaces
- Neighborhood context at 150-200 feet, positioning the home within its surroundings
- Bird's eye view straight down over the property (if the layout warrants it)
- Any location features (water, golf course, parks) that add value
Common Drone Photography Mistakes
Aerial real estate photography has a distinct learning curve, and certain mistakes appear consistently in beginners' work. Here is what to avoid.
Flying Too High
The most common mistake is sending the drone to maximum altitude for every shot. At 400 feet, the home is a tiny rectangle surrounded by other tiny rectangles. Unless you are shooting a 100-acre farm, there is rarely a reason to go above 200 feet for residential work. Most of your best shots will come from 50-100 feet.
Ignoring the Sun
All of the sun-direction principles from ground-level exterior photography apply to aerial work as well. Shooting with the sun behind the drone illuminates the home's facade. Shooting into the sun creates silhouettes and flare. Check the sun position before launching and plan your orbit around the property accordingly.
Forgetting to Check for Obstacles
Power lines, tall trees, flagpoles, and communication towers are all collision hazards. Walk the property and look up before you launch. Check for overhead lines crossing the yard that might not be visible from ground level.
Crooked Horizons
A tilted horizon in an aerial photo is just as distracting as in a ground-level photo, and it is easier to miss because there are no vertical architectural references in a bird's eye view. Use the drone's gimbal leveling feature and verify the horizon line before and after each shot.
Propeller Shadows
When the sun is low, the drone's own propellers can cast shadows visible at the bottom of the frame. This is most common during early morning or late afternoon flights. Position the drone so the shadow falls outside the camera's field of view.
Over-Processing
Aerial photos present unique post-processing challenges that tempt photographers into heavy-handed editing. Resist the urge to over-saturate sky and lawn colors. The wide perspective of aerial shots makes over-processing more obvious than it would be in a tight interior frame.
Editing Drone Photos
Aerial photos benefit from specific post-processing attention that differs from ground-level real estate photography. Here is what to focus on.
Sky Enhancement
The sky occupies a significant portion of most aerial shots, making it the dominant color element. If the sky is hazy, washed out, or overcast, consider sky replacement to create a clean, attractive backdrop. The wide field of view in aerial shots means sky replacement needs to be especially convincing, as there is more sky area for the eye to scrutinize.
Color Correction
Drone cameras, especially on consumer-grade drones, tend to produce flatter color profiles than dedicated camera bodies. Lawn green, roof colors, and building materials may need saturation and contrast adjustments to match what the eye sees in person.
Twilight's AI editing tools can handle these corrections automatically, analyzing the aerial image and enhancing colors while maintaining the natural look that buyers expect. This is particularly useful when you are processing aerial shots alongside ground-level photos and need consistent color treatment across the entire listing set.
For a comprehensive overview of color correction techniques, see our guide on color correction for real estate photos.
Lens Distortion Correction
Many drone cameras use wide-angle lenses that introduce barrel distortion, bending straight lines at the edges of the frame. This is most noticeable in low-altitude shots where buildings and fences should have straight edges. Apply lens profile corrections in your editing software to straighten these lines.
Straightening and Cropping
Aerial photos often need minor rotation to level the horizon and cropping to improve the composition. Unlike ground-level photography where you carefully compose through the viewfinder, drone photography involves piloting and framing simultaneously. It is common to need 5-10% cropping in post to achieve the ideal composition.
DIY vs. Hiring: Cost Comparison
Doing it yourself: DJI Mini 4 Pro ($760) or DJI Air 3 ($1,100) plus the Part 107 test fee ($175). Your per-shoot cost is essentially zero after the initial investment, amortized over many shoots.
Hiring a licensed operator: $150-$500 per property, depending on your market, the number of shots needed, and whether video is included. Most operators charge $200-$300 for a standard residential package of 10-15 edited aerial stills.
The break-even point: If you shoot more than 5-8 properties per month that benefit from aerial photography, owning a drone and getting your Part 107 pays for itself within 2-3 months. Below that volume, hiring may be more cost-effective.
Equipment Recommendations
The drone market has matured significantly, and several models stand out for real estate photography specifically.
Best Drones for Real Estate Photography (2026)
| Drone | Price | Camera | Best For |
|---|---|---|---|
| DJI Mini 4 Pro | ~$760 | 48MP, 1/1.3" sensor | Budget-friendly, under 249g (simplified FAA rules) |
| DJI Air 3 | ~$1,100 | Dual cameras, 48MP | Best value for professional work |
| DJI Mavic 3 Pro | ~$2,200 | Triple cameras, Hasselblad 20MP | Premium image quality |
| DJI Mavic 3 Classic | ~$1,600 | Hasselblad 20MP, 4/3" sensor | Best single-camera quality |
| Autel Evo II Pro V3 | ~$1,800 | 1" sensor, 6K video | DJI alternative with strong specs |
What to Look For
Sensor size matters most. A larger sensor captures more light and produces cleaner images with better dynamic range. The 1-inch and 4/3-inch sensors in higher-end drones produce noticeably better image quality than the smaller sensors in budget models.
Obstacle avoidance is non-negotiable for professional work. Flying around properties means navigating near trees, power lines, and buildings. Multi-directional obstacle sensing prevents expensive and embarrassing crashes.
Battery life should be 30+ minutes. Real estate shoots require time to position the drone, compose shots, and move to different angles. A 20-minute battery is cutting it close. Budget for at least 2-3 batteries per shoot.
RAW capture is essential for professional editing. Ensure the drone can shoot in DNG or another RAW format rather than JPEG only.
DIY vs. Hiring a Licensed Operator
The decision to fly yourself or hire an operator depends on your volume, comfort with technology, and willingness to invest in training and equipment.
Reasons to DIY
- You shoot more than five properties per month that benefit from aerial photography
- You want full creative control over angles, timing, and composition
- You enjoy the technical challenge and are willing to practice
- You want to offer aerial photography as a value-added service that differentiates your listings
Reasons to Hire
- You shoot aerial-worthy properties infrequently
- You do not want the liability, insurance costs, and regulatory burden
- The investment in equipment and certification does not make financial sense at your volume
- You prefer to focus on ground-level photography and editing while specialists handle the aerial work
Finding a Licensed Operator
- The FAA maintains a searchable database of Part 107 certificate holders
- Real estate photography companies often include drone services
- Platforms like DroneBase and Snappr connect property professionals with licensed operators
- Local photography groups and real estate associations can provide referrals
When hiring, always verify the operator's Part 107 certificate, ask about their liability insurance (minimum $1 million is standard), and review their portfolio for real estate-specific work.
Pricing Your Drone Photography Services
If you are a photographer adding drone services to your offerings, pricing requires balancing market rates with your investment and expertise.
Market Rate Ranges (2026)
| Service | Typical Price Range |
|---|---|
| 5-10 aerial stills, edited | $150 - $300 |
| 10-20 aerial stills, edited | $250 - $450 |
| Aerial stills + 60-second video | $300 - $500 |
| Full package (ground + aerial + video) | $400 - $800 |
| Luxury or commercial (half-day shoot) | $500 - $1,500 |
Factors That Affect Pricing
- Market: Major metro areas command higher rates than rural markets
- Property value: Higher-value listings justify and expect premium pricing
- Travel time: Factor in driving to the property and setup time
- Deliverable count: More shots and editing time means higher pricing
- Turnaround time: Rush delivery (same-day or next-day) warrants a premium
- Licensing: Some photographers charge per image with usage licensing; others include licensing in the base price
Integrating Aerials Into Your Listing Photo Set
Aerial photos should complement, not replace, your ground-level photography. The complete listing photo set tells a story, and aerial shots play a specific role in that narrative.
Recommended Photo Sequence for Listings
- Hero exterior (ground level, three-quarter angle)
- Aerial hero (oblique, 50-80 feet)
- Interior photos (all rooms, multiple angles)
- Backyard and outdoor living (ground level)
- Aerial rear/backyard (showing outdoor space from above)
- Neighborhood context (aerial, 150-200 feet)
This sequence takes the buyer on a journey: first impression of the home, then the big-picture view, then inside, then the outdoor spaces, and finally the neighborhood and location context. Each aerial photo serves a purpose rather than being included just because you had a drone in the air.
MLS Considerations
Most MLS systems accept aerial photography, but check your local MLS photo requirements for specific rules about:
- Maximum number of aerial photos allowed in the main gallery
- Whether aerial photos must be clearly labeled
- Any restrictions on the use of virtual or enhanced elements in aerial shots
- Requirements for including a standard front exterior photo even when aerial is provided
The Future of Aerial Real Estate Photography
Drone technology continues to advance rapidly. Higher-resolution sensors, longer battery life, improved AI-powered flight modes, and increasingly sophisticated editing tools are making aerial photography more accessible and more powerful every year.
For real estate professionals, the question is no longer whether aerial photography matters, but how to use it most effectively. When applied strategically to the right properties, with proper legal compliance and professional editing, aerial photography is one of the most impactful investments you can make in listing presentation.
The properties that benefit from aerial shots deserve to be shown from every angle, including from above. The properties that do not need it should not have it forced in just because the technology exists. Making that distinction intelligently is what separates good real estate marketing from great real estate marketing.
Related Articles
HDR Real Estate Photography: A Complete Guide for Agents (and the AI Shortcut)
Everything you need to know about HDR photography for real estate listings. Learn what HDR is, why it matters, how to shoot bracketed exposures, and how AI can create HDR results from a single photo.
MLS Photo Requirements: Complete Guide for Real Estate Agents
Learn everything about MLS photo requirements including resolution standards, file size limits, common rejection reasons, and how to ensure your listing photos pass every time.
Twilight Photography for Real Estate: The Complete Guide
Discover why twilight photography sells homes faster and for more money. Learn how to shoot golden hour photos, overcome common challenges, and use AI to convert any daytime photo into a stunning twilight image.