Curb Appeal Photography: How to Shoot and Edit Stunning Exteriors
Master exterior real estate photography with tips on timing, composition, and AI editing for sky replacement, twilight conversion, and curb appeal.
The exterior photo is the most important image in any real estate listing. It is the first thing buyers see in search results, the hero image that determines whether they click or scroll past, and the visual anchor that sets expectations for the entire property. According to NAR data, 91% of buyers say the exterior or hero photo is the single most important image in a listing.
Yet exterior photography is where many agents and photographers struggle most. Weather does not cooperate. The neighbor's car is in the frame. The lawn is patchy. The sky is flat and gray. The timing is wrong. In this guide, we cover everything you need to know about capturing and editing exterior photos that maximize curb appeal --- from camera technique to AI-powered post-processing.
Why the Exterior Shot Is the Most Important Photo in Your Listing
The exterior photo serves multiple functions that no other image in the listing can replicate.
It is the cover image. On every major real estate platform --- Zillow, Realtor.com, Redfin, MLS search portals --- the exterior photo appears as the thumbnail in search results. This single image determines your listing's click-through rate.
It establishes the first impression. Buyers form an opinion about a property within seconds of seeing the exterior photo. That impression colors their perception of every subsequent interior photo. A stunning exterior creates a positive frame; a dull exterior creates skepticism.
It communicates the lifestyle. A well-photographed exterior does not just show a building --- it sells a lifestyle. The manicured lawn, the warm porch light, the inviting walkway all tell the buyer "this could be your home."
It differentiates your listing. In a neighborhood where every home has similar square footage, bedrooms, and price, the exterior photo is often the primary visual differentiator in search results.
The investment in getting this single photo right is arguably the highest-ROI decision in the entire listing process.
Timing Your Exterior Shoot
Lighting is the single most important variable in exterior photography, and it changes dramatically throughout the day.
Golden Hour (Best for Warm, Inviting Shots)
The golden hour --- roughly 30-60 minutes after sunrise or before sunset --- produces warm, directional light that adds depth and dimension to exterior photos. Shadows are long but soft, surfaces glow with warm tones, and the sky often has beautiful color gradients.
Best for: Properties with warm exterior colors (brick, stone, warm-toned siding), homes with significant landscaping, properties where you want to emphasize outdoor living spaces.
Timing tip: Use a golden hour calculator app to determine exact times for your location and date. Arrive 15 minutes early to set up and scout angles.
Overcast Days (Surprisingly Useful)
Overcast skies produce soft, even lighting with no harsh shadows. While the sky itself is unappealing (we will fix that with AI), the light on the building is excellent --- even exposure across all surfaces, no squinting in portraits, and no dark shadow areas.
Best for: Homes with complex architecture (lots of overhangs, recessed areas), properties where you plan to use AI sky replacement anyway, white or light-colored exteriors that reflect hard sunlight.
Midday Sun (Avoid If Possible)
Direct overhead sun at midday creates harsh, unflattering shadows under eaves, porches, and landscaping. The light is flat and the contrast is extreme. If you must shoot at midday, position yourself so the sun is behind you and illuminating the front of the home.
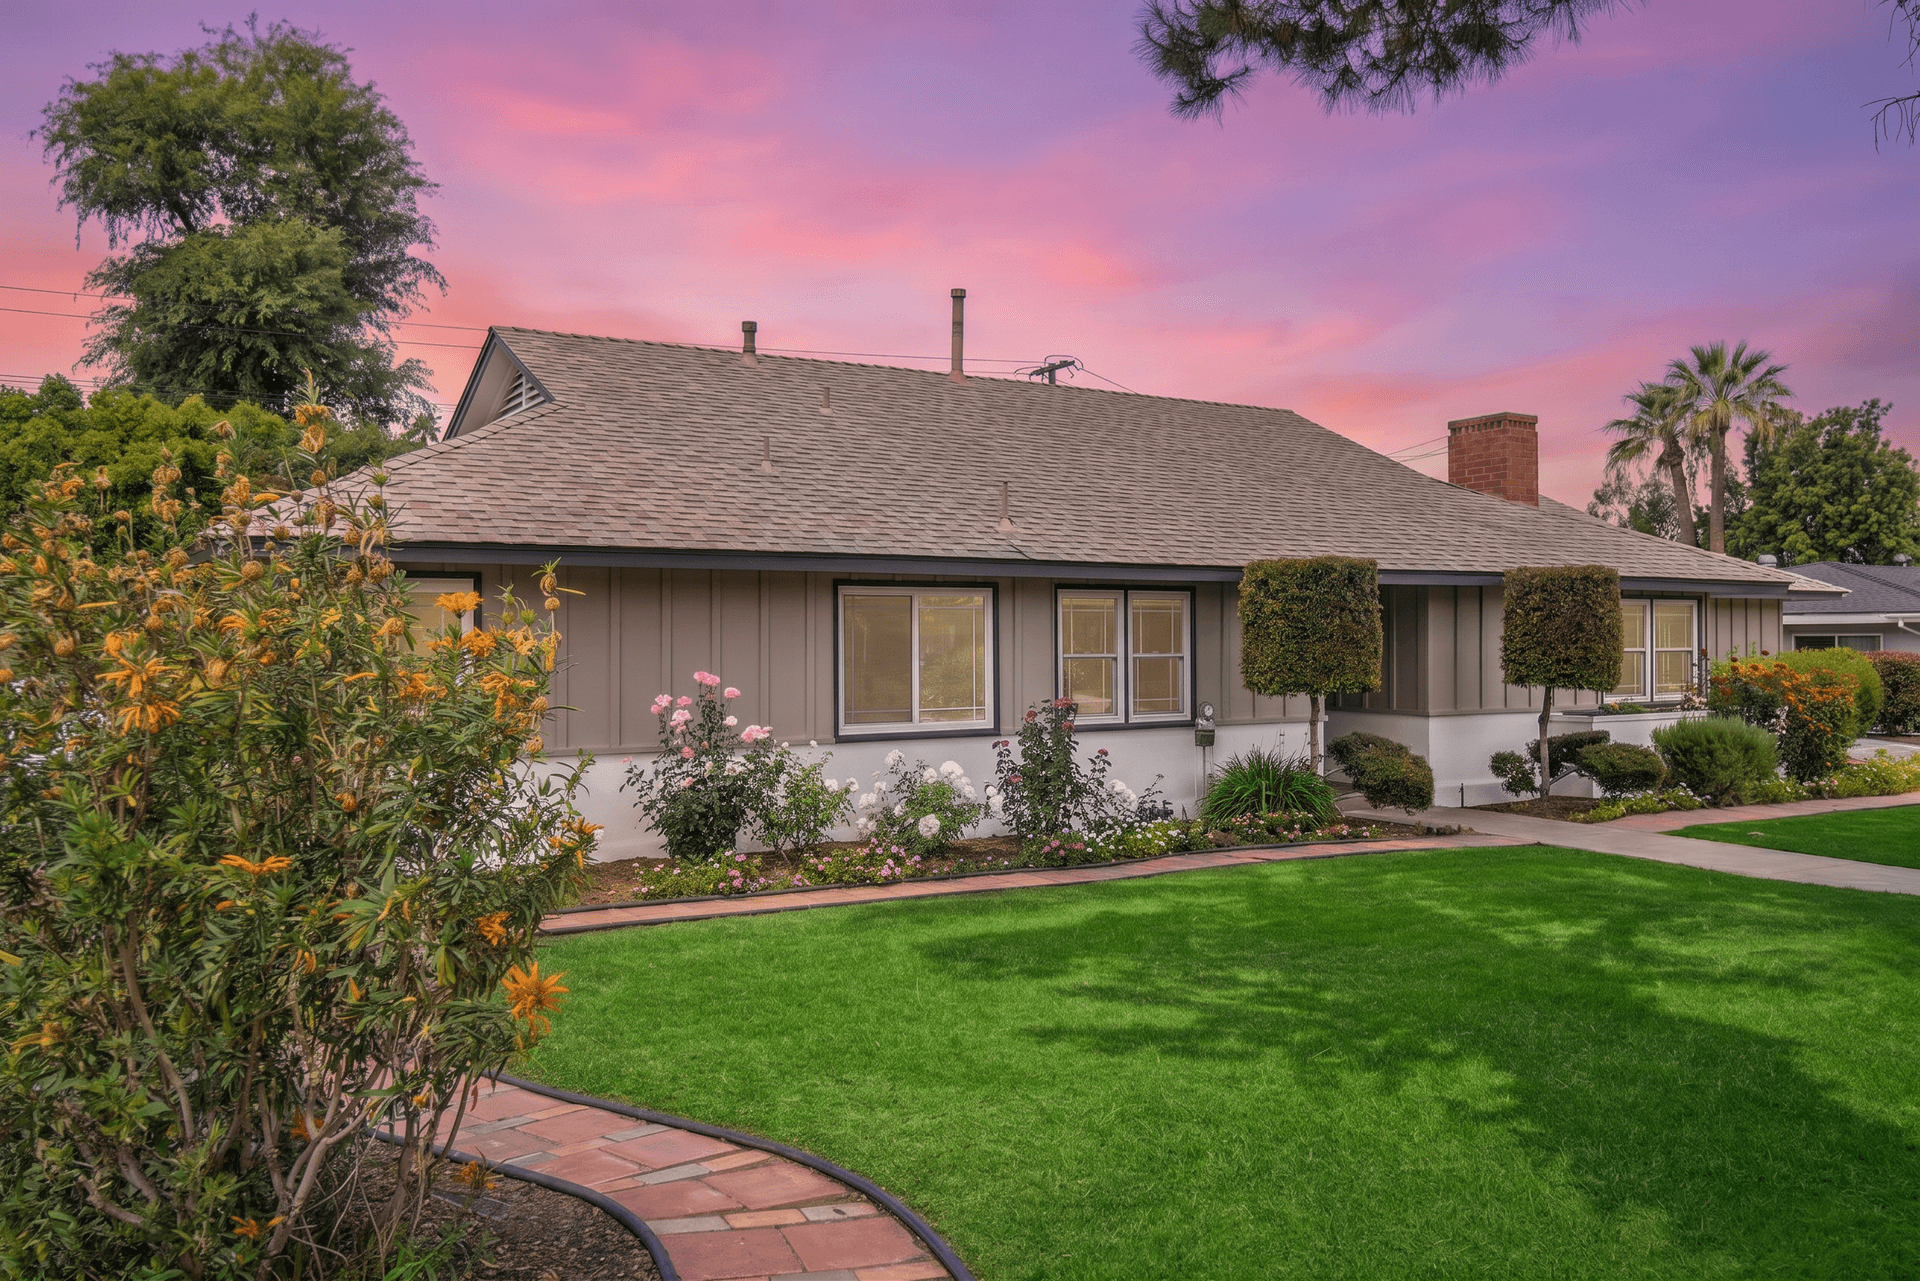
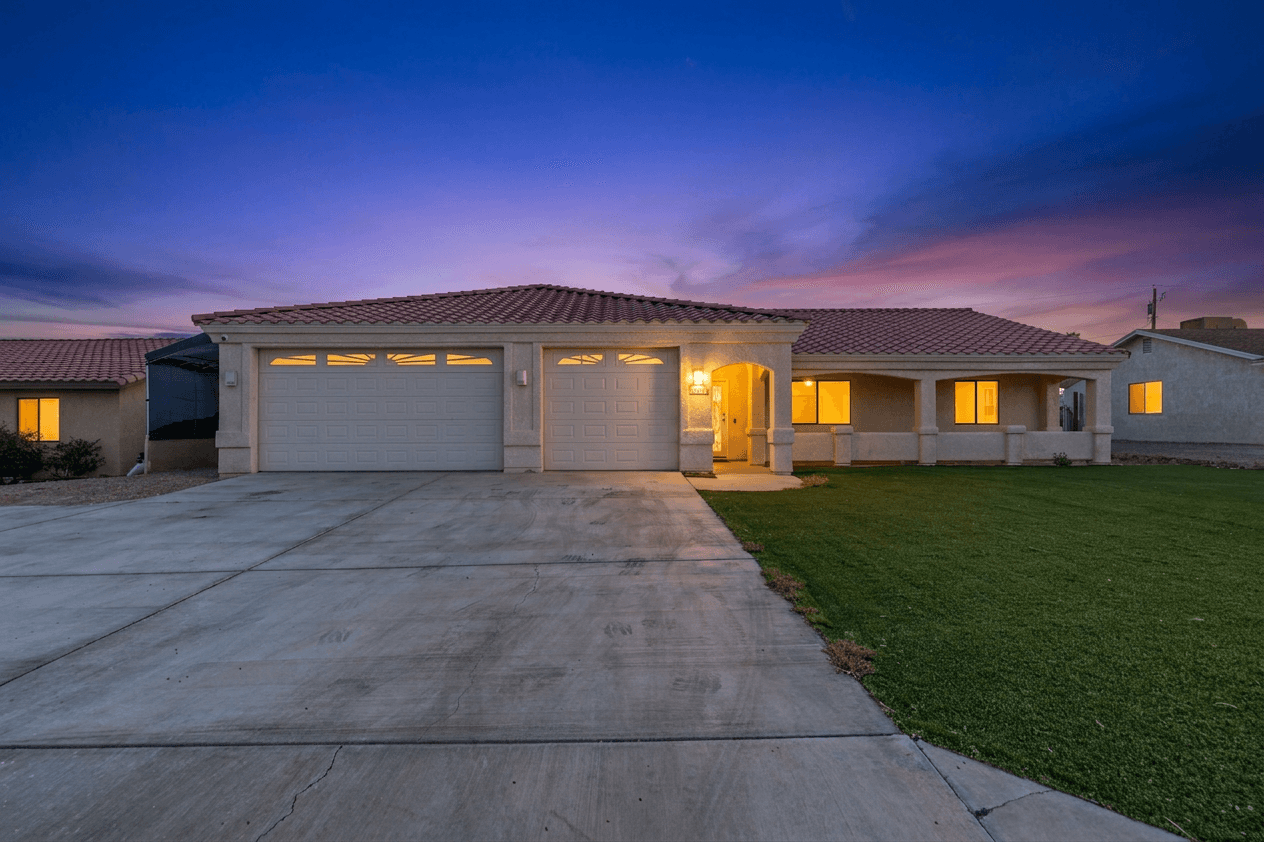
Twilight (The Premium Option)
True twilight photography --- shooting during the 20-30 minute window after sunset when the sky is a deep blue and interior lights glow warm --- produces the most dramatic, emotionally compelling exterior images in real estate. But the window is narrow, the timing is weather-dependent, and many photographers charge a premium for twilight shoots.
This is where AI twilight conversion has become a game-changer. You can shoot during convenient daylight hours and convert to a twilight look in seconds. For a deep dive, see our complete guide to twilight photography.
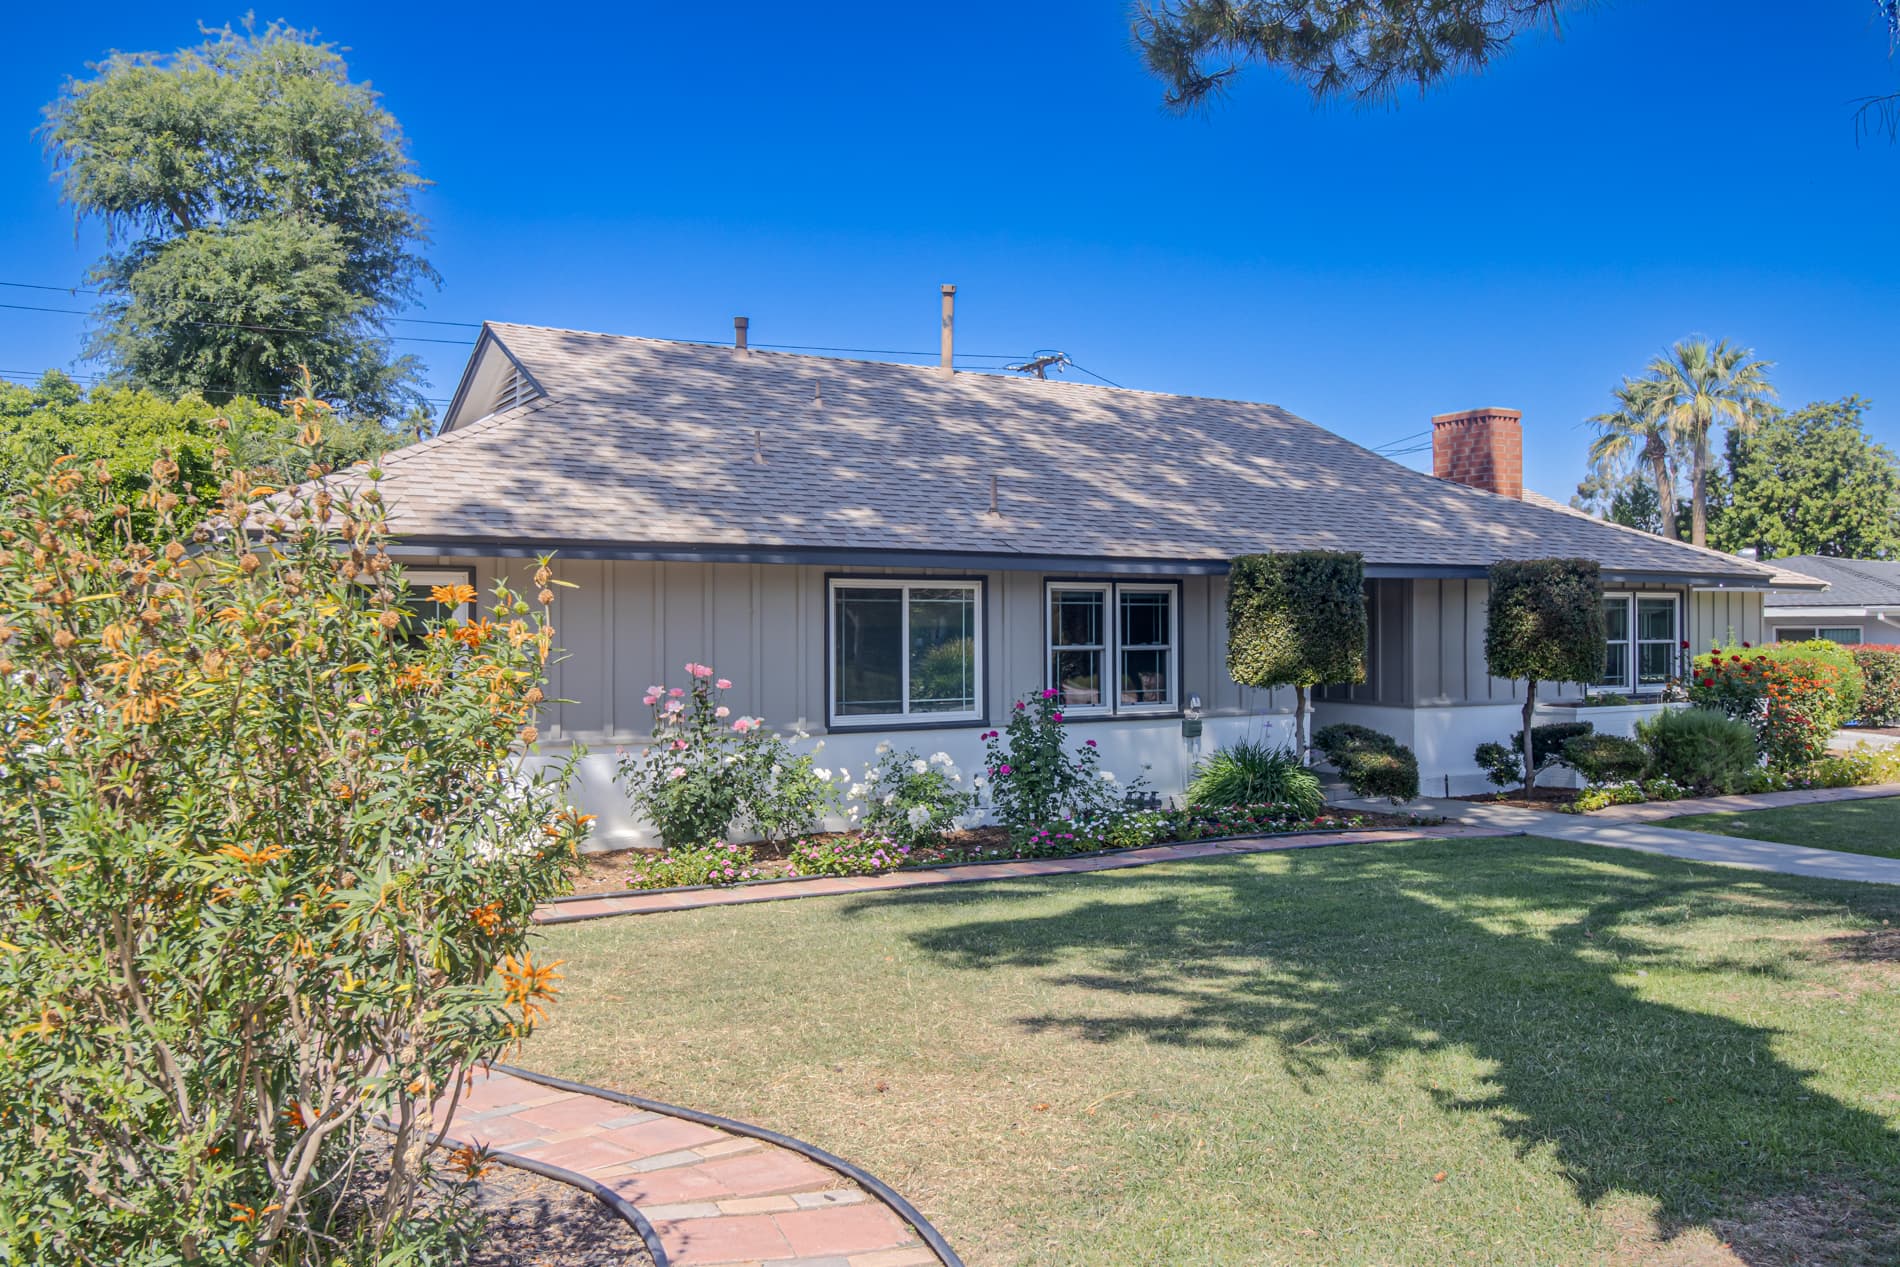
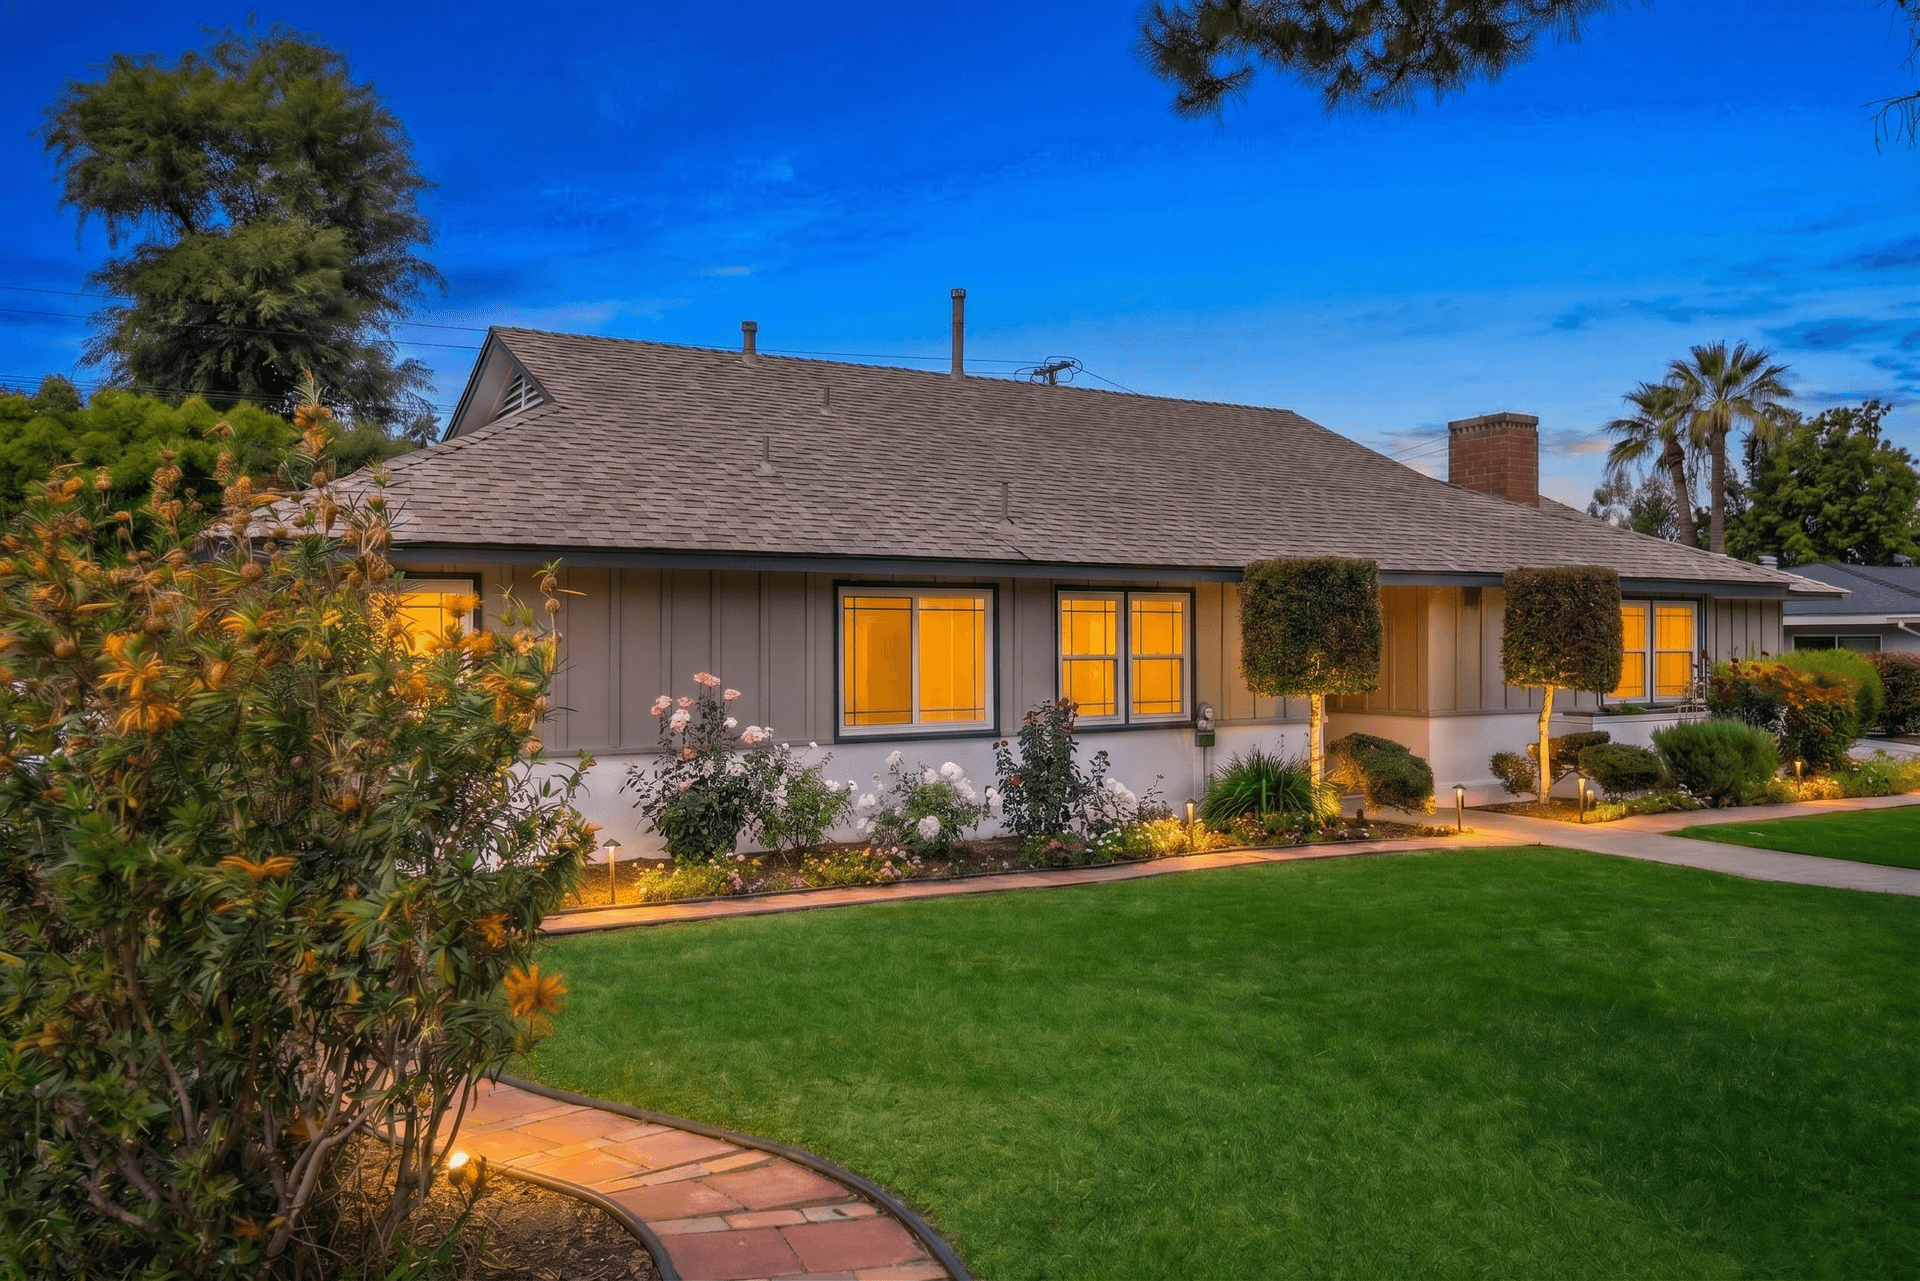
Composition for Maximum Curb Appeal
Technical lighting knowledge means nothing if the photo is poorly composed. Here are the composition principles that make exterior real estate photos compelling.
Camera Height
Shoot from approximately 4-5 feet high (chest level). This height avoids the "looking down" perspective of eye-level shots and the distortion of ground-level shots. It naturally makes the home appear grander and more balanced.
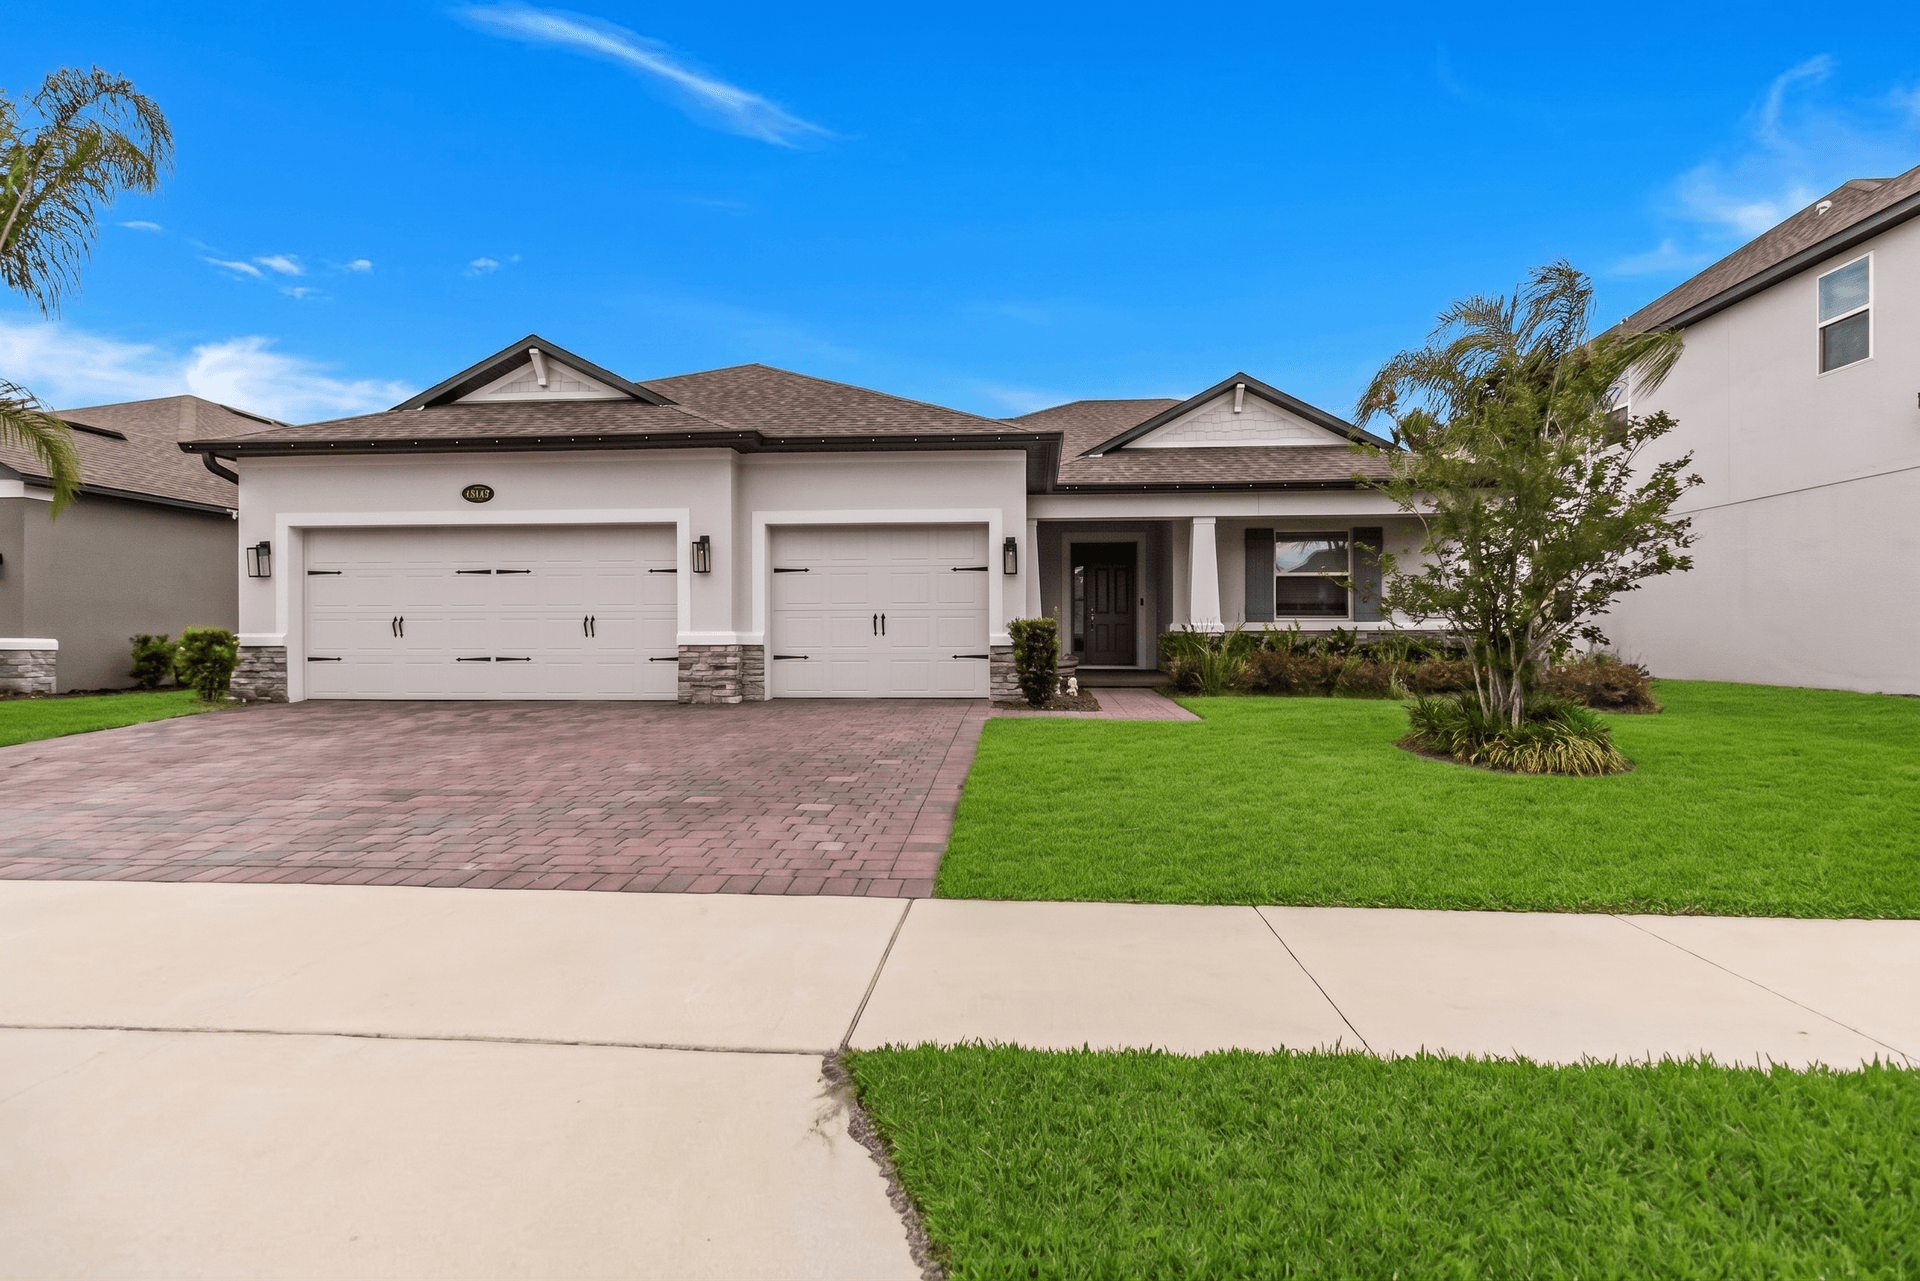
The Three-Quarter Angle
The most flattering angle for most homes is a three-quarter view --- roughly 30-45 degrees off the front face. This angle shows both the front and one side of the home, creating depth and dimension. A dead-center, straight-on shot tends to flatten the building and make it look two-dimensional.
Include the Full Property
Frame the shot to include the entire home with a bit of sky above and landscaping below. Cutting off the roofline, the garage, or the front walkway makes the home feel cramped. A little breathing room at the edges of the frame lets the eye settle on the home naturally.
Composition Tip
Include the front walkway or driveway as a leading line that draws the viewer's eye toward the front door. This compositional technique creates a natural visual path into the image.
Frame with Landscaping
If the property has mature trees or landscaping, use them as natural framing elements. A tree branch or flower bed at the edge of the frame adds depth and context. Just be careful not to let landscaping obscure the home itself.
Watch the Edges
Before pressing the shutter, scan the edges of your frame. Trash cans, parked cars, garden hoses, construction equipment, and neighbor clutter are common edge-of-frame distractions that are easy to miss in the moment but obvious in the final photo.
Common Exterior Photography Problems and Solutions
Problem: Parked Cars in the Driveway
Solution: Ask the homeowner to move vehicles before the shoot. If that is not possible, position yourself at an angle that minimizes the car's presence, or use AI editing to remove it.
Problem: Patchy or Brown Lawn
Solution: AI editing can enhance grass color to a natural green without looking artificial. The key is natural --- you want healthy-looking grass, not neon green. Combining this with a lower camera angle that reduces the visible lawn area also helps.
Problem: Cluttered Front Porch or Entry
Solution: A quick 5-minute cleanup before shooting makes a huge difference. Remove welcome mats, excess planters, delivered packages, and personal items. What remains should look intentional and curated.
Problem: Power Lines and Utility Equipment
Solution: Composition is your first defense --- often a slight change in angle moves power lines out of the frame or behind the roofline. For unavoidable utility elements, AI editing can clean these up.
Problem: Harsh Shadows Under the Porch or Eaves
Solution: Shoot when the sun is lower (morning or late afternoon) so light reaches under overhangs. Alternatively, HDR editing can recover shadow detail while maintaining natural highlights.
AI Sky Replacement: Transforming Any Weather
One of the most impactful exterior edits is sky replacement. A gorgeous home under a flat, white, or gray sky loses much of its visual appeal. AI sky replacement swaps an unappealing sky with a natural, attractive alternative --- blue with scattered clouds, a warm sunset, or a dramatic twilight gradient.
Modern AI sky replacement handles complex edges like tree branches, rooflines, chimneys, and antenna with remarkable precision. What used to require 30-45 minutes of careful Photoshop masking now happens automatically in seconds.
When to Replace the Sky
- Overcast or white sky: Always replace. A white sky adds nothing and makes the photo look flat.
- Partly cloudy: Usually fine as-is, unless clouds are dark or threatening.
- Harsh blue (no clouds): Consider adding subtle clouds for visual interest.
- Sunset/golden hour sky: Usually keep the natural sky; it is already beautiful.
Getting Natural Results
The key to convincing sky replacement is matching the lighting. If the home is lit from the left (morning sun from the east), the sky should have lighting that is consistent with that direction. AI tools like Twilight handle this automatically, analyzing the light direction in the original image and selecting a sky that matches.
For a comprehensive guide to sky replacement techniques, see our sky replacement guide for real estate.
AI Twilight Conversion for Exteriors
If sky replacement is the most common exterior edit, twilight conversion is the most impactful. Converting a standard daytime exterior to a twilight scene adds drama, warmth, and emotional appeal that consistently outperforms daytime alternatives.
AI twilight conversion works by:
- Replacing the sky with a twilight gradient (deep blue to warm horizon)
- Adding warm light glowing from windows
- Adjusting the overall color temperature to match the dusk atmosphere
- Enhancing landscape lighting (path lights, accent lights)
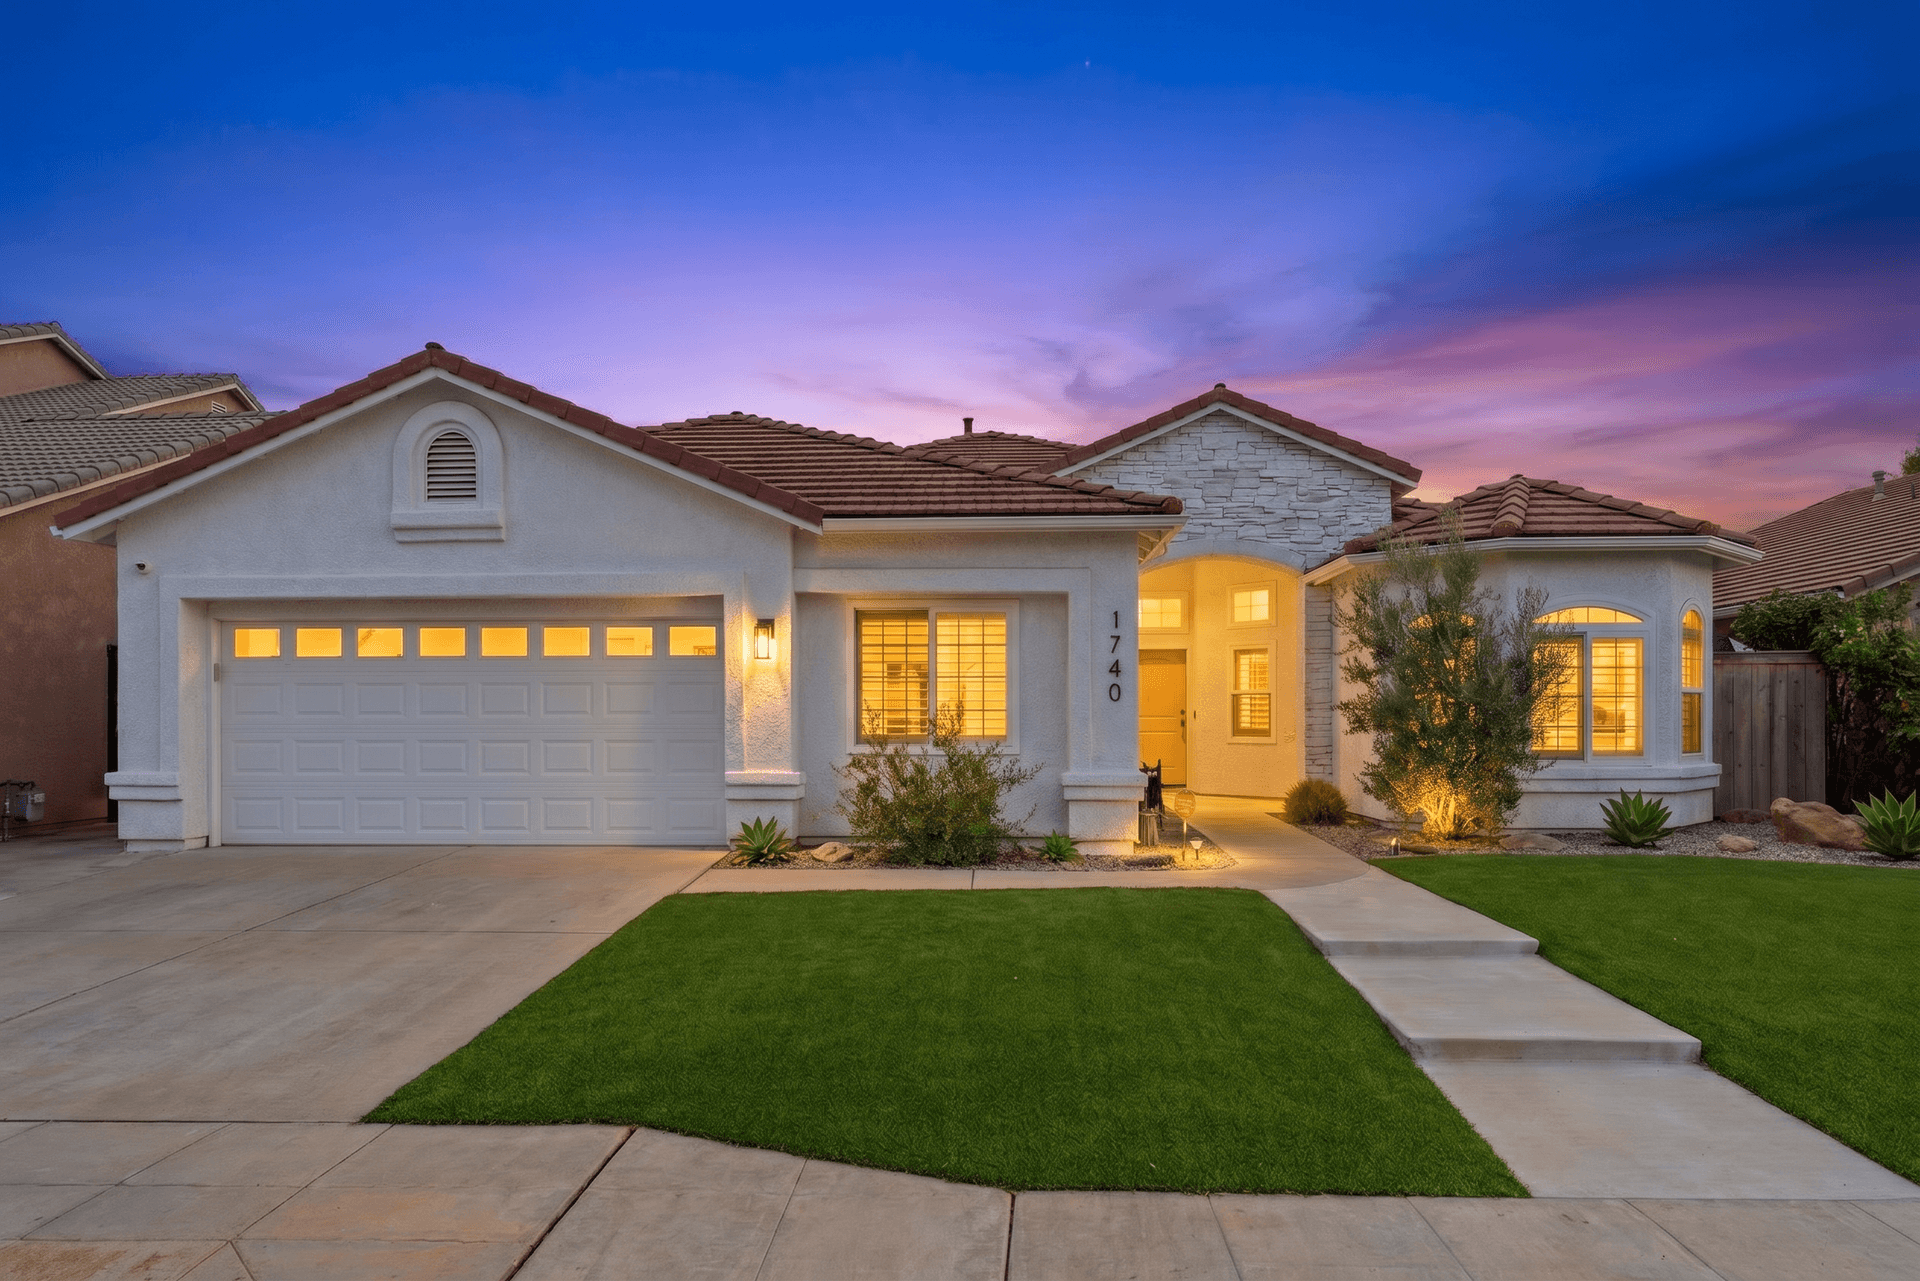
Tips for Twilight-Ready Daytime Shots
Not every daytime photo converts well to twilight. To get the best results:
- Shoot when windows are visible. The AI adds warm light glowing through windows, so your source photo should clearly show the windows.
- Avoid harsh midday light. Photos with extreme shadows do not convert as naturally as photos taken in softer light.
- Include the full roofline and sky. The AI needs sky area to create the twilight gradient.
- Turn on interior lights if possible. While the AI can add window glow, photos where the interior lights are actually on produce the most natural-looking conversions.
For everything you need to know about twilight real estate photography, see our complete twilight photography guide.
Editing the Landscape: Green Grass and Clean Driveways
Beyond the sky, the ground plane --- lawn, driveway, walkways, and landscaping --- is a critical element of curb appeal.
Enhancing Lawn Color
Brown patches, dormant winter grass, and uneven color are common problems. AI editing can bring grass to a natural, healthy green that looks realistic rather than artificial. The key is subtlety --- the lawn should look well-maintained, not painted.
Cleaning Driveways and Walkways
Oil stains, cracks, leaf debris, and general weathering make concrete surfaces look neglected. AI can clean these surfaces to appear freshly pressure-washed, removing distractions and creating a well-maintained impression.
Brightening Landscaping
Flower beds, shrubs, and ornamental plants benefit from a subtle brightness and saturation boost. Healthy, vibrant landscaping signals a well-cared-for property and adds color to the overall composition.
Seasonal Strategy
If you are shooting in winter or during a dry season when landscaping looks dormant, AI green enhancement is essential. A brown, dead lawn in listing photos is one of the strongest negative signals in buyer research data.
Putting It Together: The Hero Shot Workflow
Here is the complete workflow for creating a stunning exterior hero shot, from planning through final delivery.
1. Scout the Angle (2 minutes)
Walk the property perimeter and identify the most flattering three-quarter angle. Consider which direction the light will come from at your planned shoot time.
2. Prepare the Scene (5 minutes)
Move cars, hide trash cans, close the garage door, remove hoses, and do a quick front-porch tidy. These small actions have an outsized impact on the final photo.
3. Shoot at the Right Time
Aim for golden hour or an overcast morning. Shoot from chest height at a three-quarter angle. Take multiple frames --- slight variations in angle and timing give you options.
4. Upload and Edit
Upload your best exterior shot to Twilight. Choose from:
- Sky Swap if the sky is the main issue
- Twilight if you want the premium dusk look
- Bright & Clean if the photo just needs a general polish
5. Review and Download
Use the before/after slider to verify the edit looks natural. Download at full resolution for MLS upload and marketing materials.
The difference between a forgettable exterior photo and a scroll-stopping hero image often comes down to these simple steps. Get the basics right in camera --- timing, composition, scene prep --- and let AI handle the technical polish. The result is a hero shot that does justice to the property and earns clicks in every search result.
For more exterior photography techniques, explore our HDR real estate photography guide and our sky replacement tutorial.
Related Articles
Sky Replacement for Real Estate Photos: When and How to Use It
Learn when and how to use sky replacement in real estate photos. Covers buyer psychology, manual techniques, AI-powered tools, ethical guidelines, and best practices for stunning exterior shots.
Curb Appeal Photography: How to Make Any Exterior Look Its Best
Master exterior real estate photography with practical tips on timing, angles, landscaping enhancement, sky replacement, and twilight conversions that maximize curb appeal and attract more buyers.
Day-to-Dusk AI Conversion: A Technical Deep Dive for Real Estate Photographers
How AI converts a daytime exterior into a magazine-quality dusk shot. Inside the model, the prompt, and the failure modes, with a checklist for getting consistent results.